A-wings are interceptors equipped with highly damaging lasers. They hit are very fast, hit above their weight, and are very small and hard to pin down. The silhouette of the A-wing is very small in general, but is the largest from above or below.
The A-wing has several tools for pinning down starfighters both armoured and unarmoured. Against more heavily armoured targets, the A-wing can use cluster missiles and rockets to hit a single target multiple times, and no other Republic fighter has the DPS of the A-wing. Its default missiles have excellent tracking but light damage, excellent at pinning down TIE interceptors.
Against capital ships, the A-wing is out of its element, but can still assist the team. A-wings can do little against shielding, so they must instead use their manoeuvrability to skip past the shields and go for the hull of of the Arquitens and the Raider, or against the Star Destroyer's subsystems and gun turrets.
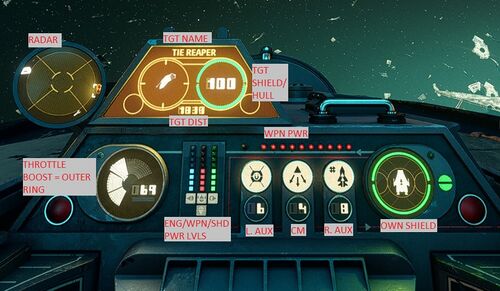
=Cockpit

=Components
Weapons
|
Name |
Description
|
 |
Standard Taim & Bak KX8 Laser Cannon |
The default laser cannon on the A-wing is the longest ranged weapon, and is the standard by which the others are measured. If you use the stealth attachment, consider using this weapon so you don't have to be out of stealth for as long.
|
 |
Krupx JR-89 Ion Cannon |
Ion cannons aren't often used on the A-wing, since most Imperial craft lack shielding. The one that does - the TIE Reaper - is not often a threat in itself, and can be burned down with normal gunfire. Ion cannons on Republic craft are most often used to target the shields on capital ships.
|
 |
Plasburst Laser Cannon |
The Plasburst's slow fire rate and short range make it uncommon to see on all craft.
|
 |
Gyrhil R/F Rapid Fire Cannon |
The most common weapon seen on the A-wing next to the standard laser. Deals excellent damage, but the closer range means you must be very cautious when fighting enemies head-on, and the closer proximity means you must expose yourself to greater danger in a ship with low health.
|
Countermeasures
|
Name |
Description
|
 |
ArMek HM Seeker Warheads |
Seeker Warheads, or sometimes called "flares", are the most common and flexible anti-missile countermeasure. A-wings are often found turning and manoeuvring, making chaff less useful, and the sensor jammer only has a single use.
|
 |
Particle Burst |
The Particle Burst is not often used on the A-wing, as in order for it to reach maximum effectiveness, enemy missiles must fly through the static cloud. This cloud can be used to cover capital ships on occasion, but flares are the more popular choice.
|
 |
Melihat Sensor Jammer |
The sensor jammer's short 4 second duration and single use make it not often used. Its biggest benefit is being able to shake missiles at any rate and from any direction.
|
 |
Carbanti Sensor Inverter |
Exclusive to the A-wing and the TIE Interceptor, the sensor inverter only functions at short range, but can surprise opponents. The sensor inverter hacks the enemy missile in range and sends it back to its launcher. With two charges, it's superior to the sensor jammer in versatility and number of uses. Inverted missiles can be re-inverted by another interceptor.
|
Auxiliary
|
Name |
Description
|
 |
ArMek Barrage Rockets |
The A-wing's best weapon against capital ships, these unguided rockets can cause notable damage to capital ship turrets and subsystems. It is difficult to land hits on moving starfighters. Individual rockets are light on damage, but with over 40 rockets in reserve and a good rate of fire, they cause considerable damage as a group.
|
 |
Kessler Quick-Lock Missile |
A part of the stock A-wing's loadout, the quick lock missile causes about three rockets worth of damage (or a third of the default concussion missile). It's not enough to finish a fighter on its own, but it works well in conjunction with the A-wing's lasers.
|
 |
Kessler IF-42 Cluster Missile |
The cluster missile locks onto a single target several times before unloading multiple missiles against it. This missile is best used against hardened targets like TIE bombers and capital ships with their shields down.
|
 |
Czerka Seeker Mine |
Drops a mine behind you. The mine locks onto and chases any enemy that gets too close. Mines are most effective in narrow corridors where enemies will have to run near them.
|
 |
Incom E-73 Repair Kit |
The repair kit is unlocked at the start of the game and repairs your ship when activated. It is most commonly used on the X-wing, as the A-wing has the ability to withdraw from fights and has low maximum health in general.
|
 |
Carbanti Targeting Jammer |
When activated, cloaks your ship from enemy radar for 5 seconds. Effective when you need to creep up on a target and hit them. With a long 30 second cooldown, however, your window of stealth must be expertly timed.
|
Hull
|
Name |
Description
|
 |
Incom Ferroceramic Hull |
The standard hull provides no strengths or weaknesses. It is the most durable option for the A-wing.
|
 |
Fabritech Dampener Hull |
Increases the time enemies take to lock onto you, but you also have less health. If you fly evasively enough to dodge lasers, this can be an effective counter to missiles and tractor beams.
|
 |
Slayn & Korpil Laminasteel Hull |
Reduces the damage taken by missiles, but increases the damage taken by lasers. Both this option and the dampener hull are effective at blocking missile attacks.
|
 |
Carbanti Reflec Hull |
Equipping this results in the most fragile ship possible. With a -30 to health, you cannot stand up to any sort of head-on attacks, especially to capital ships. The passive stealth is only effective at long range, and is worthless in a melee. Use this hull to sneak around to the sides of enemies, using terrain and debris to mask your approach. Avoid using this on open maps like Yavin.
|
Engines
|
Name |
Description
|
 |
Incom Sublight Engine |
The standard engine offers no drawbacks and benefits. Works reasonably well in all situations.
|
 |
Koensayr Microthrust Engine |
This engine decreases maximum speed and acceleration while increasing your manoeuvrability. This makes it decently good for brawling, but the true power of turning fights lies in understanding drifting, not traditional turns.
|
 |
Quadex Propulsion Engine |
This engine increases acceleration, allowing you to change speeds much faster than normal. This comes at a slight loss to manoeuvrability. This engine does not increase your maximum speed, only the rate at which you change speed.
|
 |
Koensayr Thrust Engine |
This engine modification provides an increase to maximum speed, but you lose acceleration and mobility. The implications are clear: this engine is for flying very fast in straight lines. Use this engine for high speed passes against enemy targets.
|
Shields
|
Name |
Description
|
 |
Incom Standard Shield |
The standard shield offers no benefits or drawbacks to the A-wing.
|
 |
Sirplex Nimble Deflector |
This shield offers a decrease in shield capacity in exchange for faster regeneration. You can use this in combination with the thrust engine to dart in and out of fights, using the faster regeneration to get your shields back up. With low capacity, this shield cannot withstand direct fire for long.
|
 |
Fabritech Scrambler Shield |
An alternative to the Dampener Hull, the scrambler shield offers even longer lock times than the dampener hull, but it is only effective when your shields are at 100% or are overcharged. Even a glancing hit at normal shield power will eliminate the scrambler shield bonus, so users of this shield must be adept at switching shield directions. Once these shields are down, they take longer than normal to regenerate.
|
 |
Overloaded Shield |
The overloaded shield offers a lot of defence, reducing incoming damage while still having a good capacity. Once these shields are depleted, however, they will not regenerate.
|
