|
| Hull |
????
|
| Shield |
????
|
| Speed |
????
|
| Acceleration |
????
|
| Manoeuvrability |
????
|
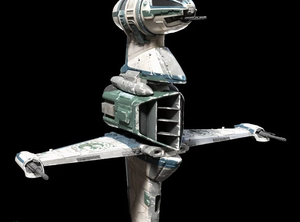
The B-wing is a variant of the bomber on the Y-wing, and will have many shared abilities. The B-wing features a gyro-stabilized cockpit, letting the entire craft rotate around the cockpit.
The B-wing is currently unreleased, and the information here is conjecture.
Official Description: TBD
Cockpit
File:SWS-BwingCockpit.jpg
Components
For specific component numbers and statistics, see the Components page.
Weapons
|
Name |
Description
|
 |
Standard Taim & Bak KX8 Laser Cannon |
The default laser cannon on the Y-wing is not often used, and is oftentimes replaced by the rotary cannon as soon as it is unlocked.
|
 |
Krupx JR-89 Ion Cannon |
Ion cannons aren't often used on the Y-wing. They can be used to target a capital ship's shields to make it easier to attack.
|
 |
Krupx Guided Rotary Cannon |
Less often used than its non-guided counterpart, the guided rotary cannon's aim assist can be used to help pin down TIE Interceptors. It is otherwise not often used.
|
 |
Krupx Rotary Cannon |
The most common weapon seen on the Y-wing. After a short wind-up time, the rotary cannon fires a flurry of blaster bolts with a DPS as good as the short-range gun on the A-wing, but with greater range. The wind-up time is negligible, as by the time players figure out they're in the sights of the rotary cannon, they are already dead. The rotary cannon's high damage also lends it well to dealing with capital ship subsystems.
|
Countermeasures
|
Name |
Description
|
 |
ArMek HM Seeker Warheads |
Seeker Warheads, or sometimes called "flares", are the most common and flexible anti-missile countermeasure. A-wings are often found turning and manoeuvring, making chaff less useful, and the sensor jammer only has a single use.
|
 |
Particle Burst |
The Particle Burst is not often used on the A-wing, as in order for it to reach maximum effectiveness, enemy missiles must fly through the static cloud. This cloud can be used to cover capital ships on occasion, but flares are the more popular choice.
|
 |
Melihat Sensor Jammer |
The sensor jammer's short 4 second duration and single use make it not often used. Its biggest benefit is being able to shake missiles at any rate and from any direction.
|
Auxiliary
|
Name |
Description
|
 |
Krupx MG7-A Proton Torpedo |
Proton torpedoes cause up to four times the damage of a regular concussion missile. They are ineffective against shielding, but pack a wallop when they hit. Deploy them carefully against corvettes, which can outrun the torpedo. Combine with an ion torpedo strike from a fighter or support for best effect. Stay at maximum range (1500) when you launch the torpedo and reduce speed so you don't get too close when you launch it. The long range lets you potentially even snipe enemy frigates while on defence.
|
 |
Arakyd MD-88 Multi-Lock Missile |
Not to be confused with the cluster missile, the multi-missile locks onto multiple targets and fires a missile at each one. It will always consume one charge of ammunition, no matter how many actual missiles are fired. Lock onto as many targets as possible before firing. It is best used to farm enemy AI ships on defence, shrinking the enemy's window of opportunity to destroy your capital ships.
|
 |
ArMek Goliath Missile |
This variant of the normal concussion missile is identical in most respects to its fighter counterpart. Unique to the Goliath missile is that it explodes in a huge area of effect, destroying entire AI squadrons and causing considerable damage even if decoyed by flares or chaff.
|
 |
Taim & Bak Ion Bomb |
Ion bombs cause extra damage to shielding and can disable subsystems, but do not cause raw damage. Follow up attacks will be required to damage the targets. Green arrows will indicate your bomb will hit a target. Use the roll function to orient your ship so the target is beneath you and drop your bombs.
|
 |
Arakyd PW-16 Proton Bomb |
Proton bombs cause considerable damage to targets, but require the target be directly beneath you. Green arrows will indicate your bomb will hit a target. Use the roll function to orient your ship so the target is beneath you and drop your bombs.
|
 |
Czerka Seeker Mine |
Drops a mine behind you. The mine locks onto and chases any enemy that gets too close. Mines are most effective in narrow corridors where enemies will have to run near them. Particularly useful for bombers which have trouble shaking enemies off their tail.
|
 |
Chempat Emergency Assault Shield |
The Assault Shield, when activated, puts up a shield in front of you that blocks a large percentage of damage. It only lasts 3 seconds, making it more useful on bombers than on fighters for attacking capital ships. The assault shield can, however, be used to give you an edge in head-on attacks against enemy fighters.
|
 |
Quarrie Composite Beam Cannon |
The composite beam cannon, sometimes called the "memebeam", is a powerful anti-capital ship weapon. While you can't alter your course with the beam active, it is more than capable of drilling through shields and hull to deal considerable damage - especially against enemy subsystems.
|
 |
ArMek Automatic Ion Cannon |
Unique to the Y-wing, the automatic ion cannon is a stock option that adds a canopy-mounted automatic ion cannon. It is capable of dissuading enemies, but does not cause enough damage to ward off dedicated players. It is often removed and replaced by one of the other options as a result. With a cooldown shorter than its duration and infinite charges, always have this ion cannon working if you equip it.
|
| File:SWS-Icons-BoostExtensionKit.svg |
Boost Extension Kit |
When triggered, this component gives you a full boost charge. Utilize this component to aid in advanced drifting techniques, allowing you to maintain offence and mobility simultaneously.
|
| File:SWS-Icons-PrototypePiercingTorpedo.svg |
Prototype Piercing Torpedo |
Piercing Torpedoes are used exclusively against flagship subsystems. While they cause minimal damage to the hull of the target flagship, they are unique in their ability to ignore shielding. They are most often used against shield generators to allow for easier subsequent attacks.
|
Hull
|
Name |
Description
|
 |
Incom Ferroceramic Hull |
The standard hull, with no strengths or weaknesses.
|
 |
Fabritech Dampener Hull |
The Dampener hull increases the amount of time an enemy needs to lock onto you with missiles. This benefit comes with a reduction in health, so it isn't often used since Y-wings are generally fairly easy to lock onto anyway.
|
 |
Koensayr Reinforced Hull |
This hull increases your ship's hull at the expense of mobility. This makes it perfect for dedicated bombers, looking to fly with the extra health required to reach their targets.
|
 |
Chempat Deflector Hull |
This hull improves the shield capacity of your craft at the expense of health. This hull modification is best used for dogfights where it is possible to retreat and regenerate your shield. The default is preferable in bombing runs as it offers more total health, including shields.
|
Engines
|
Name |
Description
|
 |
Incom Sublight Engine |
The standard sublight engine with no benefits or drawbacks.
|
 |
Unstable Sublight Engine |
This engine makes you lose a moderate amount of both health and shields, but offers greatly increased acceleration and speed. What really makes this engine stand out, however, is the large explosion you create when you are shot down. Some players use this explosion as an anti-capital ship weapon, hoping to take out the capital ship's turrets when they die.
|
 |
Quadex Jet Engine |
This engine greatly increases the rate at which you generate boost power, but also greatly increases the rate at which you consume it. This engine is mostly designed for drifting, as it performs very poorly when boosting in straight lines.
|
 |
Incom SLAM Engine |
The SLAM (Sublight Acceleration Motor) engine automatically produces boost power regardless of whether there is maximum power in the engines or not, at the cost of maximum speed. It is similar to the Jet Engine, in that it provides smaller boosting power but lets you boost more often. The SLAM engine reduces your overall speed, but lets you divert power from engines to other systems and receive a small trickle of boost power. Increasing power to engines will appropriately increase the boost meter respectively.
|
Shields
|
Name |
Description
|
 |
Standard Incom Deflector Shield |
This shield offers no benefits or drawbacks.
|
 |
Krupx Conversion Shield |
When the conversion shield is depleted, this shield takes all your weapon power and dumps it into a brief but impenetrable barrier. With no weapon power, you are effectively a sitting duck, but it can give you time to temporarily withdraw from battle to make it to safety.
|
 |
Loronoar Ray Shield |
This shield falls quickly to missiles, but takes less damage than normal from lasers. Mines and capital ship missiles can be dealt with by manoeuvring and countermeasures, but Onslaught Rockets from TIE Interceptors and TIE Fighters become a considerable threat. As Y-wings are not very mobile, enemies equipped with rockets will always use them against you with them if they are able.
|
 |
Overloaded Shield |
The overloaded shield offers a lot of defence, reducing incoming damage while still having a good capacity. Once these shields are depleted, however, they will not regenerate.
|
