(Added TIE Defender Auxiliaries) |
m (use {{img}}) |
||
| (7 intermediate revisions by one other user not shown) | |||
| Line 4: | Line 4: | ||
|colspan="2"|[[File:SWS-TIEDefender.png|300px]] | |colspan="2"|[[File:SWS-TIEDefender.png|300px]] | ||
|- | |- | ||
| Hull || | | Hull || 400 | ||
|- | |- | ||
| Shield || | | Shield || 1200 | ||
|- | |- | ||
|Speed || | |Speed || 130 | ||
|- | |- | ||
| Acceleration || | | Acceleration || 256 | ||
|- | |- | ||
|Manoeuvrability || | |Manoeuvrability || 76 | ||
|} | |} | ||
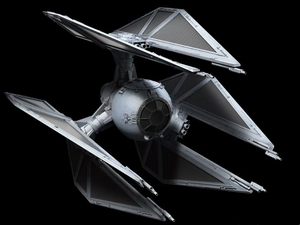
The TIE Defender is a variant of the TIE Fighter. | The TIE Defender is a variant of the TIE Fighter. The TIE Defender is highly adaptable, featuring extremely powerful shields rivaling that of the Y-wing. At only 400 hull, however, the TIE Defender has the least amount of health of any Imperial ship, including the TIE Interceptor. The TIE Defender relies heavily on its shields for survival, and can thus fall quickly to ion weapons. | ||
Offensively, the TIE Defender is a mix of the TIE Interceptor and the TIE Fighter's anti-starfighter loadout. Unlike the TIE Fighter, it cannot equip torpedoes, so it fares poorly against capital ships unless you equip Onslaught Rockets. Like the TIE Reaper, the Defender cannot shunt power between engine and weapons. It instead can be equipped with the Advanced Power System, which overcharges whichever subsystem has the most power. | |||
'''Official Description:''' '' | '''Official Description:''' ''Based on prototype blueprints, this experimental TIE Defender's systems offer amazing performance to pilots skilled enough to manage them.'' | ||
{{-}} | {{-}} | ||
==Cockpit== | ==Cockpit== | ||
{{img | |||
|file=SWS-TIEDefenderCockpit.png | |||
|class=maxwidth | |||
}} | |||
==Components== | ==Components== | ||
For specific component numbers and statistics, see the [[Star Wars: Squadrons/Components|Components]] page. | For specific component numbers and statistics, see the [[Star Wars: Squadrons/Components|Components]] page. | ||
| Line 46: | Line 50: | ||
|- | |- | ||
| [[File:SWS-Icons-Jammer.svg|50px]] || Sienar Sensor Jammer || The sensor jammer's short 4 second duration and single use make it not often used. Its biggest benefit is being able to shake missiles at any rate and from any direction. | | [[File:SWS-Icons-Jammer.svg|50px]] || Sienar Sensor Jammer || The sensor jammer's short 4 second duration and single use make it not often used. Its biggest benefit is being able to shake missiles at any rate and from any direction. | ||
|- | |||
| [[File:SWS-Icons-Inverter.svg|50px]] || Sienar Sensor Inverter ||The sensor inverter only functions at short range, but can surprise opponents. The sensor inverter hacks the enemy missile in range and sends it back to its launcher. With two charges, it's superior to the sensor jammer in versatility and number of uses. Inverted missiles can be re-inverted by an enemy A-wing. | |||
|} | |} | ||
===Auxiliary=== | ===Auxiliary=== | ||
{| {{prettytable}} | {| {{prettytable}} | ||
! !! Name !! Description | ! !! Name !! Description | ||
|- | |- | ||
| [[File:SWS-Icons-APS. | | [[File:SWS-Icons-APS.png|50px]] || Sienar Advanced Power System || The advanced power system, when triggered, will provide a moderate overcharge for the system at maximum power. For example, if you need an immediate surge of boost power, simply divert all power to engines and then trigger the APS. It thus functions similarly to the power shunting found on the TIE Fighter, Bomber, and Interceptor, but does not deplete other systems when used. | ||
|- | |- | ||
| [[File:SWS-Icons-ConcussionMissile.svg|50px]] || Sienar CB-08 Concussion Missile || Concussion missiles are no-frills missiles that simply lock onto and destroy their target. Like other missiles, it can be fired without a lock, usually against a target too slow to dodge it. Concussion missiles hit hard and have decent tracking, but lack the power to be used against capital ships on a regular basis. | | [[File:SWS-Icons-ConcussionMissile.svg|50px]] || Sienar CB-08 Concussion Missile || Concussion missiles are no-frills missiles that simply lock onto and destroy their target. Like other missiles, it can be fired without a lock, usually against a target too slow to dodge it. Concussion missiles hit hard and have decent tracking, but lack the power to be used against capital ships on a regular basis. | ||
| Line 65: | Line 72: | ||
| [[File:SWS-Icons-Rockets.svg|50px]] || Sienar Onslaught Rockets || The Defender's best weapon against capital ships, these unguided rockets can cause notable damage to capital ship turrets and subsystems. It is difficult to land hits on moving starfighters. Individual rockets are light on damage, but with over 40 rockets in reserve and a good rate of fire, they cause considerable damage as a group. | | [[File:SWS-Icons-Rockets.svg|50px]] || Sienar Onslaught Rockets || The Defender's best weapon against capital ships, these unguided rockets can cause notable damage to capital ship turrets and subsystems. It is difficult to land hits on moving starfighters. Individual rockets are light on damage, but with over 40 rockets in reserve and a good rate of fire, they cause considerable damage as a group. | ||
|} | |} | ||
===Hull=== | ===Hull=== | ||
{| {{prettytable}} | {| {{prettytable}} | ||
| Line 77: | Line 85: | ||
|[[File:SWS-Icons-LightHull.svg|50px]]||Sienar Agile Hull||Equip to receive a reduction in maximum health, but receiving improvements to manoeuvrability and acceleration. Fairly useful for brawling and turning fights, though the most powerful technique to use in turning fights is microboosts, not traditional turns. The light hull does not offer any benefits to maximum speed, so this part alone will not help you make hit and run attacks. | |[[File:SWS-Icons-LightHull.svg|50px]]||Sienar Agile Hull||Equip to receive a reduction in maximum health, but receiving improvements to manoeuvrability and acceleration. Fairly useful for brawling and turning fights, though the most powerful technique to use in turning fights is microboosts, not traditional turns. The light hull does not offer any benefits to maximum speed, so this part alone will not help you make hit and run attacks. | ||
|- | |- | ||
|[[File:SWS-Icons- | |[[File:SWS-Icons-DeflectorHull.svg|50px]]||Sienar Deflector Hull||The deflector hull places more emphasis on your shields rather than your health. This provides some extra effective hull, and is a good catch-all system on the TIE Defender. | ||
|} | |} | ||
===Engines=== | ===Engines=== | ||
| Line 92: | Line 98: | ||
|- | |- | ||
|[[File:SWS-Icons-PropulsionEngine.svg|50px]]||Twin Propulsion Engine||The propulsion engine makes you start and stop quicker by a significant margin, at the cost of a small loss in manoeuvrability. | |[[File:SWS-Icons-PropulsionEngine.svg|50px]]||Twin Propulsion Engine||The propulsion engine makes you start and stop quicker by a significant margin, at the cost of a small loss in manoeuvrability. | ||
|- | |- | ||
||[[File:SWS-Icons-ThrustEngine.svg|50px]]||Twin Thrust Engine||This engine greatly increases maximum speed, but reduces acceleration and manoeuvrability. Use this to make quick attack runs on enemy capital ships, or using boom and zoom tactics. | ||[[File:SWS-Icons-ThrustEngine.svg|50px]]||Twin Thrust Engine||This engine greatly increases maximum speed, but reduces acceleration and manoeuvrability. Use this to make quick attack runs on enemy capital ships, or using boom and zoom tactics. | ||
|} | |} | ||
===Shields=== | ===Shields=== | ||
| Line 106: | Line 108: | ||
|- | |- | ||
|[[File:SWS-Icons-NimbleDeflector.svg|50px]]||Sienar Nimble Deflector||Increases shield regeneration, but decreases shield capacity. This shield is good for hit and run attacks - hit the enemy quickly and then leave the battle to let your shields recharge before going in again. | |[[File:SWS-Icons-NimbleDeflector.svg|50px]]||Sienar Nimble Deflector||Increases shield regeneration, but decreases shield capacity. This shield is good for hit and run attacks - hit the enemy quickly and then leave the battle to let your shields recharge before going in again. | ||
|- | |- | ||
|[[File:SWS-Icons-ScramblerShield.svg|50px]]||Sienar Scrambler Shield||An alternative to the Dampener Hull, the scrambler shield offers even longer lock times than the dampener hull, but it is only effective when your shields are at 100% or are overcharged. Even a glancing hit at normal shield power will eliminate the scrambler shield bonus, so users of this shield must be adept at switching shield directions. Once these shields are down, they take longer than normal to regenerate. | |[[File:SWS-Icons-ScramblerShield.svg|50px]]||Sienar Scrambler Shield||An alternative to the Dampener Hull, the scrambler shield offers even longer lock times than the dampener hull, but it is only effective when your shields are at 100% or are overcharged. Even a glancing hit at normal shield power will eliminate the scrambler shield bonus, so users of this shield must be adept at switching shield directions. Once these shields are down, they take longer than normal to regenerate. | ||
|- | |- | ||
|[[File:SWS-Icons-FortifiedShield.svg|50px]]||Sienar Fortified Deflector||The Fortified Shield offers a bonus to shield capacity at the cost of shield regeneration. This shield is best used when taking heavy fire to attack a capital ship. | |[[File:SWS-Icons-FortifiedShield.svg|50px]]||Sienar Fortified Deflector||The Fortified Shield offers a bonus to shield capacity at the cost of shield regeneration. This shield is best used when taking heavy fire to attack a capital ship. | ||
|- | |- | ||
|[[File:SWS-Icons_RayShield.svg|50px]]||Sienar Ray Shield||This shield falls quickly to missiles, but takes less damage than normal from lasers. The biggest threat to this shield are Barrage Rockets. Defeat normal missiles and mines with standard manoeuvres and countermeasures, but switch away to a different loadout when rockets are a factor. | |[[File:SWS-Icons_RayShield.svg|50px]]||Sienar Ray Shield||This shield falls quickly to missiles, but takes less damage than normal from lasers. The biggest threat to this shield are Barrage Rockets. Defeat normal missiles and mines with standard manoeuvres and countermeasures, but switch away to a different loadout when rockets are a factor. | ||
|} | |} | ||
{{Footer Nav|game=Star Wars: Squadrons|prevpage=TIE Reaper|nextpage=}} | {{Footer Nav|game=Star Wars: Squadrons|prevpage=TIE Reaper|nextpage=}} | ||
Latest revision as of 20:11, 24 December 2021

| |
| Hull | 400 |
| Shield | 1200 |
| Speed | 130 |
| Acceleration | 256 |
| Manoeuvrability | 76 |
The TIE Defender is a variant of the TIE Fighter. The TIE Defender is highly adaptable, featuring extremely powerful shields rivaling that of the Y-wing. At only 400 hull, however, the TIE Defender has the least amount of health of any Imperial ship, including the TIE Interceptor. The TIE Defender relies heavily on its shields for survival, and can thus fall quickly to ion weapons.
Offensively, the TIE Defender is a mix of the TIE Interceptor and the TIE Fighter's anti-starfighter loadout. Unlike the TIE Fighter, it cannot equip torpedoes, so it fares poorly against capital ships unless you equip Onslaught Rockets. Like the TIE Reaper, the Defender cannot shunt power between engine and weapons. It instead can be equipped with the Advanced Power System, which overcharges whichever subsystem has the most power.
Official Description: Based on prototype blueprints, this experimental TIE Defender's systems offer amazing performance to pilots skilled enough to manage them.
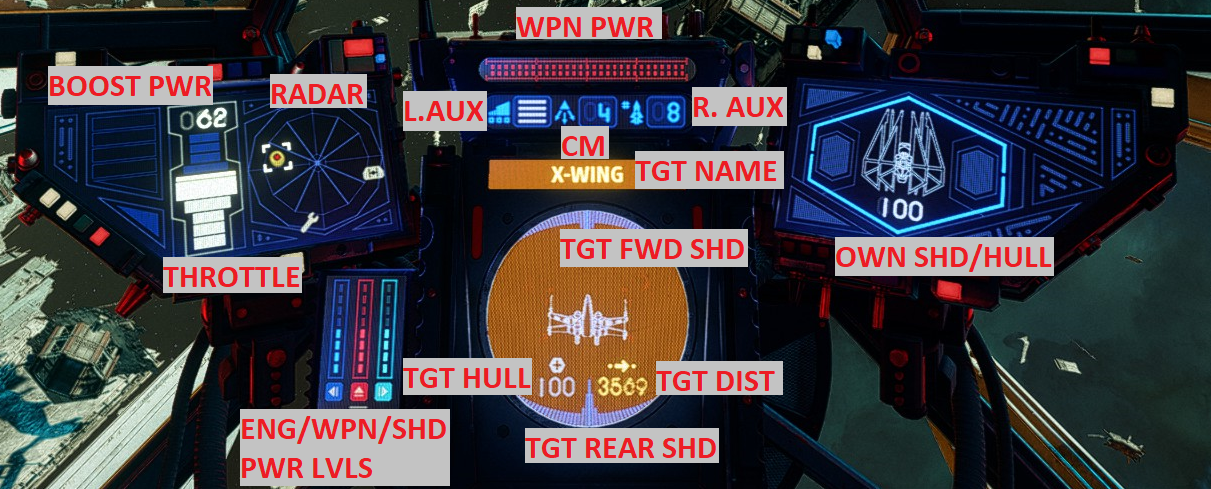
Cockpit[edit]
Components[edit]
For specific component numbers and statistics, see the Components page.
