|
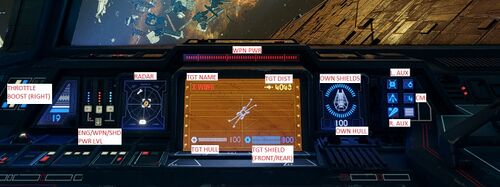
| Hull |
1000
|
| Shield |
1000
|
| Speed |
130
|
| Acceleration |
144
|
| Manoeuvrability |
70
|
Support craft have a number of auxiliary systems dedicated to helping their team and hindering their opponents. While poor dogfighters and should never be in the middle of a furball, supports are often bullied by other players due to their value. They have a few one-on-one auxiliary abilities, but lack the mobility of fighters and interceptors and the raw damage of bombers.
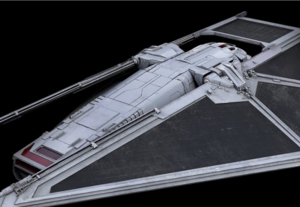
Support Reapers will usually use the Tactical Shield, which allows Imperial fighters to receive the partial benefit of shields from a safe distance. TIE Reapers are very fragile with large hitboxes, making them easy pickings for fighters when isolated. The hitbox of the Reaper is smallest from the sides and largest from above and below, so avoid exposing your dorsal or ventral surfaces.
Cockpit
Components
- For more details on this topic, see Star Wars: Squadrons/Components.
Weapons
|
Name |
Description
|
 |
Standard Sienar L-s1 Laser Cannon |
A well balanced weapon with good range.
|
 |
Sienar Ion Cannon |
The default ion cannon is occasionally used on the TIE Reaper to emphasize its support role. In general however the default laser will actually kill targets and can help target AI opponents in fleet battles.
|
 |
Sienar Au-8 Guided Laser Cannon |
Identical to the default cannon, but causes less damage and has auto-aim. The auto-aim on the cannon helps when tracking mobile targets like TIE Interceptors, but this upgrade is situational at best.
|
Countermeasures
|
Name |
Description
|
 |
Sienar XX-5 Seeker Warheads |
Seeker Warheads, or sometimes called "flares", are the most common and flexible anti-missile countermeasure. A-wings are often found turning and manoeuvring, making chaff less useful, and the sensor jammer only has a single use.
|
 |
Chaff Particles |
Chaff particles are is not often used on the A-wing, as in order for it to reach maximum effectiveness, enemy missiles must fly through the static cloud. This cloud can be used to cover capital ships on occasion, but flares are the more popular choice.
|
 |
Sienar Sensor Jammer |
The sensor jammer's short 4 second duration and single use make it not often used. Its biggest benefit is being able to shake missiles at any rate and from any direction.
|
Auxiliary
|
Name |
Description
|
 |
Sienar I-7 Ion Missile |
Ion missiles are designed to be used against starfighters, and have half the lock-on time of concussion missiles. They cause minimal damage upon hits, but are good against shielding. They inflict a stun on the target. Stunned targets are completely helpless until they reboot their systems, making them sitting ducks. However, ion missiles are rarely used by the Republic, as only the TIE Reaper has shielding.
|
 |
Sienar Ion Torpedo |
Ion torpedoes are much like proton torpedoes in that they are designed to be launched from standoff ranges against capital ships. As ion weapons cause considerable shield damage, ion torpedoes are slightly more widespread. It is much easier to hit a shield from standoff range than it is to hit a subsystem. Like proton torpedoes, ion torpedoes have a minimum range and cannot be dumbfired.
|
 |
Sienar Targeting Beacons |
Targeting Beacons auto-target and mark nearby enemies for 20 seconds. Marked enemies take extra damage, cannot use countermeasures to defend against missile attack, and will receive missile locks faster.
|
 |
Sienar Squadron Mask |
The squadron mask temporarily provides stealth to the entire team, forcing the enemy team to rely on their eyes to track your movements. Lasts 10 seconds.
|
 |
Sienar Tactical Tractor Beam |
The tractor beam is a lock on immobilizing tool. Catching an interceptor in your tractor beam allows you and your team to easily follow up and destroy the target. Lasts 7.5 seconds. Tractored enemies can try to boost their way out of your grasp. Reduce speed so you don't zip past tractored enemies yourself.
|
 |
Sienar Tactical Shield |
Lock onto a friendly and fire the tactical shield at them to grant them 500 extra shield strength. The range of the tactical shield is 2000, allowing you to fire it from safety.
|
 |
Sienar Tactical Supply Droid |
Lock onto a friendly and fire this at them to heal and resupply them. Restores approximately 50% of the targets' health and all their ammunition. Has a 900 metre range and strong homing, almost guaranteed to hit your target. If the resupply misses its mark, it will stay in one spot for 60 seconds, or until picked up by another friendly. Enemies cannot make use of your resupplies.
|
 |
Sienar Deployment Turret |
Can be either dropped behind you or fired at an enemy. When it arrives at its destination, the turret mine will open fire with a small gun at surrounding enemies. A default weapon, but often replaced by the explosive mines which do more damage. Turret mines last 24 seconds but have a 16 second cooldown, and only one can be deployed at a time. The turret mine will also expire if you are shot down.
|
 |
Sienar Seeker Mine |
Drops a mine behind you. The mine locks onto and chases any enemy that gets too close. Mines are most effective in narrow corridors where enemies will have to run near them. Particularly useful for bombers which have trouble shaking enemies off their tail.
|
Hull
|
Name |
Description
|
 |
Sienar Ferroceramic Hull |
The standard hull, with no strengths or weaknesses.
|
 |
Sienar Agile Hull |
Equip this to make your X-wing fly more like an A-wing - a reduction in maximum health, but receiving improvements to manoeuvrability and acceleration. Fairly useful for brawling X-wings, though the most powerful technique to use in turning fights is microboosts, not traditional turns. The light hull does not offer any benefits to maximum speed, so this part alone will not help you make hit and run attacks.
|
 |
Sienar Reinforced Hull |
Equipping this makes your X-wing behave more like a Y-wing - having increased durability at the expense of acceleration and manoeuvrability. This does not decrease your maximum speed, however, so you can potentially use this hull to make gun runs against the enemy capital ship's turrets. Avoid turning fights at all costs with this hull.
|
 |
Sienar Deflector Hull |
The deflector hull places more emphasis on your shields rather than your health. Players who are good at hit and run attacks will find this component attractive, as shields regenerate but health does not.
|
Engine
|
Name |
Description
|
 |
Standard Twin Ion Engine |
The standard sublight engine with no benefits or drawbacks.
|
 |
Twin Microthrust Engine |
Use the Microthrust Engine for close-quarters brawling. You lose a notable amount of maximum speed and acceleration, but gain it back in mobility.
|
 |
Twin Propulsion Engine |
The propulsion engine makes you start and stop quicker by a significant margin, at the cost of a small loss in manoeuvrability.
|
 |
Twin SLAM Engine |
The SLAM (Sublight Acceleration Motor) engine automatically produces boost power regardless of whether there is maximum power in the engines or not, at the cost of maximum speed. It is similar to the Jet Engine, in that it provides smaller boosting power but lets you boost more often. The SLAM engine reduces your overall speed, but lets you divert power from engines to other systems and receive a small trickle of boost power. Increasing power to engines will appropriately increase the boost meter respectively.
|
Shields
|
Name |
Description
|
 |
Standard Sienar Deflector Shield |
This shield offers no benefits or drawbacks.
|
 |
Sienar Resonant Shield |
Reduces your maximum shield capacity, but overcharges your lasers automatically when your shields are maxed out. The shield also does not decay when you switch power away from them. While the laser overcharge and lack of shield decay are very powerful abilities, the maximum shield capacity is reduced by a quarter.
|
 |
Sienar Scrambler Shield |
An alternative to the Dampener Hull, the scrambler shield offers even longer lock times than the dampener hull, but it is only effective when your shields are at 100% or are overcharged. Even a glancing hit at normal shield power will eliminate the scrambler shield bonus, so users of this shield must be adept at switching shield directions. Once these shields are down, they take longer than normal to regenerate.
|
 |
Sienar Fortified Deflector |
The Fortified Shield offers a bonus to shield capacity at the cost of shield regeneration. This shield is best used when taking heavy fire to attack a capital ship.
|

