| [[File:SWS-Icons-RepairKit.svg|50px]] || Kryotech Emergency Repair Droid || The repair droid, when activated, will repair your ship. It has unlimited uses, but has a lengthy cooldown of 30 seconds.
| [[File:SWS-Icons-RepairKit.svg|50px]] || Kryotech Emergency Repair Droid || The repair droid, when activated, will repair your ship. It has unlimited uses, but has a lengthy cooldown of 30 seconds.
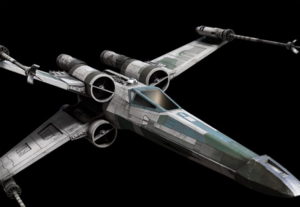
Ah, the X-wing. Backbone of the Rebel Alliance, and our New Republic! A good all-rounder that'll stand up to any starfighter or capital ship in the Imperial fleet.
-Zerelda Sage
Fighters are flexible catch-all craft capable of dealing with any threat, though not to the same extent of interceptors or bombers. If in doubt what to pull, however, fighters are an easy choice. They reward accuracy with their 3-round burst weapons, which cause more damage than the standard, and can attack capital ships at range with torpedoes.
X-wings are unique in that they have shielding, and can thus redirect their shields either forward or aft for extra defences. By redirecting their power to shields, they can also double the effectiveness of the shield. It is strongly advised to do this before going into battle.
Burst cannons, as their name suggests, fire in 3-shot bursts. They lose less damage over longer ranges, making them more reliable over distance. Their general damage per minute, however, remain identical to the standard. Burst cannons are unique to the fighter class.
Czerka Guided Burst Cannon
The guided burst cannon is identical to its non-guided counterpart, but features a lot of aim assist. This comes at a considerable damage reduction, making the guided burst cannon roughly beneath standard lasers in damage. This can prove helpful in engaging interceptors, which are hard to pin down. It otherwise has only situational uses. Guided burst cannons are unique to the fighter class.
Krupx JR-89 Ion Cannon
Ion cannons are not often used on X-wings, as most Imperial craft lack shielding. TIE Reapers, which are the only craft that do, can easily be handled by standard weapons.
Plasburst Laser Cannon
Plasburst weapons are rarely seen due to their low rate of fire and slow charge time. Plasburst lasers also are the only short range weapon on the X-wing, having a range of 600 instead of 1000 like other weapons.
Countermeasures
Name
Description
ArMek HM Seeker Warheads
Seeker Warheads, or sometimes called "flares", are the most common and flexible anti-missile countermeasure. A-wings are often found turning and manoeuvring, making chaff less useful, and the sensor jammer only has a single use.
Particle Burst
The Particle Burst is not often used on the X-wing, as in order for it to reach maximum effectiveness, enemy missiles must fly through the static cloud. This cloud can be used to cover capital ships on occasion, but flares are the more popular choice.
Melihat Sensor Jammer
The sensor jammer's short 4 second duration and single use make it not often used. Its biggest benefit is being able to shake missiles at any rate and from any direction.
Auxiliary
Name
Description
Krupx MG5 Concussion Missile
Concussion missiles are no-frills missiles that simply lock onto and destroy their target. Like other missiles, it can be fired without a lock, usually against a target too slow to dodge it. Concussion missiles hit hard and have decent tracking, but lack the power to be used against capital ships on a regular basis.
Krupx MG7-A Proton Torpedo
Proton torpedoes cause up to four times the damage of a regular concussion missile, but are nonetheless rarely seen in fleet battles due to their slow speed. They lag behind even escorts, making it difficult to land hits on them. Additionally, they have a minimum lock-on distance and cannot be dumb-fired, necessitating their use from long range. They are also generally poor against shielding. While they can lock onto starfighters and will obliterate one if it hits, its slow speed means hits will be due to luck.
Gyrhil EP Ion Missile
Ion missiles are designed to be used against starfighters, and have half the lock-on time of concussion missiles. They cause minimal damage upon hits, but are good against shielding. They inflict a stun on the target. Stunned targets are completely helpless until they reboot their systems, making them sitting ducks. However, ion missiles are rarely used by the Republic, as only the TIE Reaper has shielding.
Krupx Ion Torpedo
Ion torpedoes are much like proton torpedoes in that they are designed to be launched from standoff ranges against capital ships. As ion weapons cause considerable shield damage, ion torpedoes are slightly more widespread. It is much easier to hit a shield from standoff range than it is to hit a subsystem. Like proton torpedoes, ion torpedoes have a minimum range and cannot be dumbfired.
ArMek Barrage Rockets
Rockets hit hard, but their unguided nature makes it hard to catch mobile enemies with them. Individual rockets don't cause a lot of damage - fire them in large volleys to make the damage stack up against both shielded and unshielded targets.
Chempat Emergency Assault Shield
The Assault Shield, when activated, puts up a shield in front of you that blocks a large percentage of damage. It only lasts 3 seconds, making it more useful on bombers than on fighters for attacking capital ships. The assault shield can, however, be used to give you an edge in head-on attacks against enemy fighters.
Kryotech Emergency Repair Droid
The repair droid, when activated, will repair your ship. It has unlimited uses, but has a lengthy cooldown of 30 seconds.
Hull
Name
Description
Incom Ferroceramic Hull
The standard hull, with no strengths or weaknesses.
Fabritech Dampener Hull
A situational upgrade for the X-wing, as X-wings usually don't have trouble dealing with lock-on missiles.
Slayn & Korpil Laminasteel Hull
Reduces incoming missile damage, but increases incoming laser damage. Missiles in general are much rarer to find than lasers, making this a situational upgrade at best.
Slipstream Light Hull
Equip this to make your X-wing fly more like an A-wing - a reduction in maximum health, but receiving improvements to manoeuvrability and acceleration. Fairly useful for brawling X-wings, though the most powerful technique to use in turning fights is microboosts, not traditional turns. The light hull does not offer any benefits to maximum speed, so this part alone will not help you make hit and run attacks.
Carbanti Reflec Hull
Equipping this on an X-wing helps with approaching enemies from odd angles, with a moderate health reduction. The health reduction still makes you have more health than a stock A-wing, but the X-wing will always lack the A-wing's speed. Avoid head-on attacks, and stay close to the edges of the battle. Once you're spotted, this hull offers no benefit.
Koensayr Reinforced Hull
Equipping this makes your X-wing behave more like a Y-wing - having increased durability at the expense of acceleration and manoeuvrability. This does not decrease your maximum speed, however, so you can potentially use this hull to make gun runs against the enemy capital ship's turrets. Avoid turning fights at all costs with this hull.
Chempat Deflector Hull
The deflector hull places more emphasis on your shields rather than your health. Players who are good at hit and run attacks will find this component attractive, as shields regenerate but health does not.
Engines
Name
Description
Incom Sublight Engine
The standard sublight engine with no benefits or drawbacks.
Unstable Sublight Engine
This engine makes you lose a moderate amount of both health and shields, but offers greatly increased acceleration and speed. What really makes this engine stand out, however, is the large explosion you create when you are shot down. Some players use this explosion as an anti-capital ship weapon, hoping to take out the capital ship's turrets when they die.
Koensayr Microthrust Engine
Use the Microthrust Engine for close-quarters brawling. You lose a notable amount of maximum speed and acceleration, but gain it back in mobility.
Quadex Propulsion Engine
The propulsion engine makes you start and stop quicker by a significant margin, at the cost of a small loss in manoeuvrability.
Quadex Jet Engine
This engine greatly increases the rate at which you generate boost power, but also greatly increases the rate at which you consume it. This engine is mostly designed for drifting, as it performs very poorly when boosting in straight lines.
Koensayr Thrust Engine
This engine greatly increases maximum speed, but reduces acceleration and manoeuvrability. Use this to make quick attack runs on enemy capital ships, or using boom and zoom tactics.
Incom SLAM Engine
The SLAM (Sublight Acceleration Motor) engine automatically produces boost power regardless of whether there is maximum power in the engines or not, at the cost of maximum speed. It is similar to the Jet Engine, in that it provides smaller boosting power but lets you boost more often. The SLAM engine reduces your overall speed, but lets you divert power from engines to other systems and receive a small trickle of boost power. Increasing power to engines will appropriately increase the boost meter respectively.
Shields
Name
Description
Standard Incom Deflector Shield
This shield offers no benefits or drawbacks.
Sirplex Nimble Deflector
Increases shield regeneration, but decreases shield capacity. This shield is good for hit and run attacks - hit the enemy quickly and then leave the battle to let your shields recharge before going in again.
Gyrhil Resonant Shield
Reduces your maximum shield capacity, but overcharges your lasers automatically when your shields are maxed out. The shield also does not decay when you switch power away from them. While the laser overcharge and lack of shield decay are very powerful abilities, the maximum shield capacity is reduced by a quarter.
Fabritech Scrambler Shield
An alternative to the Dampener Hull, the scrambler shield offers even longer lock times than the dampener hull, but it is only effective when your shields are at 100% or are overcharged. Even a glancing hit at normal shield power will eliminate the scrambler shield bonus, so users of this shield must be adept at switching shield directions. Once these shields are down, they take longer than normal to regenerate.
Chempat Fortified Deflector
The Fortified Shield offers a bonus to shield capacity at the cost of shield regeneration. This shield is best used when taking heavy fire to attack a capital ship.
Krupx Conversion Shield
When the conversion shield is depleted, this shield takes all your weapon power and dumps it into a brief but impenetrable barrier. With no weapon power, you are effectively a sitting duck, but it can give you time to temporarily withdraw from battle to make it to safety.
Loronoar Ray Shield
This shield falls quickly to missiles, but takes less damage than normal from lasers.
Overloaded Shield
The overloaded shield offers a lot of defence, reducing incoming damage while still having a good capacity. Once these shields are depleted, however, they will not regenerate.