Notmyhandle (talk | contribs) |
(cleanup) |
||
| (25 intermediate revisions by 16 users not shown) | |||
| Line 1: | Line 1: | ||
{{Final Fantasy | {{Header Nav|game=Final Fantasy}} | ||
[[File:Final Fantasy I (NES) Chp7.jpg|thumb|right|Crescent Lake and Mt. Gulg]] | |||
'''''The destiny of the four Warriors of Light is now certain. They must relight the four crystals, or the world will be covered in darkness. With the lighting of the Earth Crystal, Marilith (Kary), the Fiend of Fire, has been awakened before her time. The Warriors must travel to the other side of the world and into the heart of Mt. Gulg, where Marilith's lair is, to defeat her and light the second crystal.''''' | |||
The Light Warriors now turn their attention to the East. There they will find a land of many rivers, the great volcano Mt. Gulg, a cave of ice, and a desert. They will meet Lukahn who foresaw their coming, and learn of still more mysteries from the wise Circle of Sages in the town of Crescent Lake. | |||
== [[Final Fantasy | == {{s|Locations|Crescent Lake}} == | ||
[[File:Final Fantasy 1 map town Crescent Lake.png|frame|left|Crescent Lake]] | |||
There are two ways to reach Crescent Lake, your first destination after lighting the Earth Crystal. You can sail southeast from the Cavern of Earth and travel all the way around the southern continents, or you can head due west across the open water until you reach land. Prepare to face much stronger enemies on the other side of the world. Fight your way to Crescent Lake to speak with the sages and obtain a means of traversing the sprawling rivers. | |||
The smiths of Crescent Lake are renowned for their fine work. Both weapons and armor are here. Most important are the Sages. Lukahn and the Sages have much to tell you about the four fiends affecting the Earth, and Lukahn gives you another transportation device: a [[../Key items#Canoe|canoe]]. | |||
{{-}} | |||
{| {{prettytable|style=font-size:0.8em}} | |||
|+ Crescent Lake Shops | |||
! Inn: 200 Gil || Sanctuary: 400 Gil | |||
|- | |||
! L6 [[../White magic/]]: 20,000 (13,000) Gil || L6 [[../Black magic/]]: 20,000 (13,000) Gil | |||
|- | |||
| Stona, Exit, Protera, Invisira || Thundaga, Death, Quake, Stun | |||
|} | |||
{| {{prettytable|style=font-size:0.8em}} | |||
! [[../Weapons/]] || [[../Armor/]] || [[../Items/]] || [[../Items/]] (DoS/AE) | |||
|- | |||
| Mythril Knife: 800 (640) Gil || Mythril Mail: 7500 (6000) Gil || Potion: 60 (40) Gil || Potion: 40 Gil | |||
|- | |||
| Mythril Sword: 4000 (3200) Gil || Mythril Shield: 2500 (2000) Gil || Antidote: 75 (50) Gil || Hi-Potion: 150 Gil | |||
|- | |||
| Mythril Hammer: 2500 (2000) Gil || Buckler: 2500 (2000) Gil || Tent: 250 (125) Gil || Ether: 150 Gil | |||
|- | |||
| Mythril Axe: 4500 (3600) Gil || Mythril Helm: 2500 (2000) Gil || Cottage: 3000 (2000) Gil || Tent: 160 Gil | |||
|- | |||
| || Mythril Gloves: 2500 (2000) Gil || || Phoenix Down: 500 Gil | |||
|} | |||
== | {{sidebar|width=250px|title=Choosing spells|contents=At this point in the game, you should start relying more on spells than items and sanctuaries. You may have to pass up valuable spells, though, because none of your party members are the right class. In Crescent Lake, if you have to pass up Stona or Exit, keep in mind that your party member's class will change, perhaps allowing you to purchase the spells later in the game.}} | ||
=== The Sages === | |||
Enter the forest path near the black magic shop to meet Lukahn, the sage mentioned in Cornelia. Talk to Lukahn and the other 11 sages. Here at last you learn how the four crystals lost their light. The four fiends seized their power and are now turning it to their own vile purposes. If you defeated Lich, Lukahn will give you a canoe. The vessel allows you to travel through shallow water, giving you access to your next destination, Mt. Gulg. | |||
From the beginning of the game, the fate of the four crystals held by the Light Warriors has been a mystery. Now in the presence of these wise men, some of the truth is revealed. Having defeated Lich already, you will notice that one of the crystals has regained its light. But the three other crystals remain dark. You will have to defeat each of the four elemental forces before each crystal shines again, and even then your task will not be entirely complete. Also keep in mind that Lich is the weakest of the four fiends. But don't let this knowledge dishearten you. Each time you defeat a fiend, you recover some of the lost power of the orbs. | |||
''Note: At this point in the game, you also have access to the {{s|Locations|Ice Cavern}}. Some players prefer to initiate the steps that lead to the acquisition of the Airship. It will be difficult to accomplish if your level is too low, but if you succeed, you can embark on quests that will net you a huge collection of powerful equipment, and make tackling Mt. Gulg a less daunting task. If you wish to attempt this first, skip ahead to the next chapter, [[../The Airship/]], and return here when you have completed [[../The Trials/]].'' | |||
== {{s|Locations|Mt. Gulg}} == | |||
Enter the river northwest of Crescent Lake. Use the map at the top of the page as you navigate your way to Mt. Gulg to avoid getting lost in the twists and turns. Many turns lead nowhere, and if you paddle up them, you'll lose time and HP in battles. Be prepared—the river holds new monsters that you will have to defeat to reach Mt. Gulg with your party intact. Remember that most water enemies are weak to Lightning magic. | |||
Just as you did at the Marsh Cave, save your game before entering the Volcano (use a Tent or Cottage on the NES, or a Memo on the PlayStation). If your party dies inside, you'll be able to come right back. The hot lava floors will drain HP with each step. Be prepared with a full load of Potions (Heal). | |||
The smoldering Mt. Gulg will test your abilities and keep you on your toes. Explore every area to collect the multitude of treasures the mountain has to offer, but be ready to fight—powerful monsters lurk in every corner. Use the maps here to guide you through the maze of rooms and hallways, and eventually to Marilith (Kary), the Fiend of Fire. Defeat her to relight the Fire Crystal. | |||
=== Floor 1 === | === Floor 1 === | ||
[[File:Final Fantasy 1 map dungeno Mt Gulg F1.png|frame|right|Mt. Gulg F1]] | |||
You arrive inside Mt. Gulg through the mouth at the top of the volcano. You won't find any treasure on the level of the entrance. However, you will make another painful discovery. | |||
To make your way through Mt. Gulg, you will be forced to walk across hot lava. Every step you take diminishes each party member's HP by one. When you stand still, however, your party takes no damage. Enemies will leave you alone while your feet are getting scorched by the lava. When you want to avoid confrontations, stay in the hot zone longer than necessary. It may actually save HP in the long run. | |||
From the entrance, ignore the lower portion of the floor, and walk across the lava on the top to reach staircase <font color="blue">'''A'''</font>, which takes you deeper into the mountain. | |||
{{-}} | |||
=== Floor 2 === | === Floor 2 === | ||
[[File:Final Fantasy 1 map dungeno Mt Gulg F2.png|frame|left|Mt. Gulg F2]] | |||
{| | |||
| | |||
* <font color="red">'''A'''</font>: 795 Gil | |||
* <font color="red">'''B'''</font>: 750 Gil | |||
* <font color="red">'''C'''</font>: NES - Giant Sword, DoS - Great Sword | |||
* <font color="red">'''D'''</font>: 4150 Gil | |||
* <font color="red">'''E'''</font>: NES - Silver Helmet, DoS - Mythril Helm | |||
* <font color="red">'''F'''</font>: 1520 Gil | |||
* <font color="red">'''G'''</font>: NES - Silver Gauntlet, DoS - Mythril Gloves | |||
* <font color="red">'''H'''</font>: 1760 Gil | |||
* <font color="red">'''I'''</font>: NES - Silver Helmet, DoS - Mythril Helm | |||
| | |||
* <font color="red">'''J'''</font>: 1520 Gil | |||
* <font color="red">'''K'''</font>: NES - Silver Shield, DoS - Mythril Shield | |||
* <font color="red">'''L'''</font>: 1455 Gil | |||
* <font color="red">'''M'''</font>: NES - Silver Axe, DoS - Mythril Axe | |||
* <font color="red">'''N'''</font>: NES - Heal, DoS - Hi-Potion | |||
* <font color="red">'''O'''</font>: NES - Cabin, DoS - Tent | |||
* <font color="red">'''P'''</font>: 1975 Gil | |||
* <font color="red">'''Q'''</font>: NES - Pure, DoS - Antidote | |||
* <font color="red">'''R'''</font>: NES - Heal, DoS - Phoenix Down | |||
|} | |||
Mt. Gulg often gives you the option of skipping areas that are full of valuable treasures. Don't let your impatience get the best of you. Large amounts of Gil abound in Mt. Gulg, including powerful armor and weapons especially suited for use in the fiery realm of the volcano. Take your time; Marilith (Kary) the Fire Fiend isn't going anywhere. | |||
As you might guess, the best way to defeat creatures of fire is with ice. Ice spells are particularly effective in the volcano. The Ice Brand, which you'll find on the second portion of the fourth floor, is by far the best weapon for your Fighter. As for armor, you can find Ice Armor if you take the time to explore the Ice Cave, which protects you from the hot scorching attacks of many monster, including the Fiend of Fire herself. NulBlaze is a great spell to have available here as well. Don't waste your magic on weaker foes; conventional attacks work fine against most of the enemies. | |||
=== Floor 3 === | === Floor 3 === | ||
[[File:Final Fantasy 1 map dungeno Mt Gulg F3.png|frame|right|Mt. Gulg F3]] | |||
The third floor of the volcano is split into two distinct sections. When you arrive from the second floor through staircase <font color="blue">'''B'''</font>, you will be contained in the narrow corridor at the bottom of the map. You'll have to travel to the right to reach staircase <font color="blue">'''C'''</font> which takes you down to the next floor. After passing through it, you will return through staircase <font color="blue">'''D'''</font>, and must navigate your way around to <font color="blue">'''E'''</font> in order to make your way to the heart of the mountain. There is no treasure to be found anywhere on this floor. | |||
Throughout your exploration, be on the lookout for a member of the Cockatrice family, the | |||
[[../Enemies#Pyros|Pyrolisks]]. They possess the ability to kill a party member instantly. If you don't have the Life spell, be sure to bring plenty of Phoenix Downs in case you run into any of these deadly birds. They are tough, but weak to [[../Black magic#Spell listings|Ice magic]], so Blizzara is an excellent choice of spell to use against them. | |||
{{-}} | |||
=== Floor 4 === | |||
[[File:Final Fantasy 1 map dungeno Mt Gulg F4.png|frame|left|Mt. Gulg F4]] | |||
{| | |||
| <font size="1"> | |||
* <font color="red">'''A'''</font>: 2750 Gil | |||
* <font color="red">'''B'''</font>: NES - Soft, DoS - Gold Needle | |||
* <font color="red">'''C'''</font>: 1760 Gil | |||
* <font color="red">'''D'''</font>: 7340 Gil | |||
* <font color="red">'''E'''</font>: Flame Shield | |||
* <font color="red">'''F'''</font>: NES - Ice Sword, DoS - Ice Brand | |||
* <font color="red">'''G'''</font>: NES - Pure, DoS - Antidote | |||
* <font color="red">'''H'''</font>: 880 Gil | |||
| <font size="1"> | |||
* <font color="red">'''I'''</font>: 10 Gil | |||
* <font color="red">'''J'''</font>: 155 Gil | |||
* <font color="red">'''K'''</font>: NES - House, DoS - Cottage | |||
* <font color="red">'''L'''</font>: 2000 Gil | |||
* <font color="red">'''M'''</font>: NES - Ice Sword, DoS - Ice Brand | |||
* <font color="red">'''N'''</font>: NES - Wooden Staff, DoS - Staff | |||
* <font color="red">'''O'''</font>: 1250 Gil | |||
|} | |||
Like the floor above, this floor is broken into two distinct sections. You will first arrive from Floor 3 through staircase <font color="blue">'''C'''</font>, and must make your way down to <font color="blue">'''D'''</font>. This will bring you back up to the second portion of the third floor. You will return to this floor through staircase <font color="blue">'''E'''</font>, where you can resume collecting treasure. | |||
You'll have to engage in some unavoidable battles in Mt. Gulg to get some of the treasure chests. Many treasure rooms are guarded by powerful monsters who always appear in the same place. Knowing this, you can be prepared for their attacks and sometimes you can avoid them altogether. Some monsters attack as soon as you enter the room. Others inhabit only a single spot inside. If you step into a treasure room and are not attacked right away, try going around the edge of the room. Doing so may help you avoid whatever guardian monster is lurking there. The chests that yield a Staff and 1250 Gil are guarded by Fire Lizards. Equip the Ice Brand against them. Avoid them altogether if your HP and MP are low, and come back for the treasures later. | |||
= | When you are ready, make your way to the staircase at the bottom of the floor, <font color="blue">'''F'''</font> to access the final level of the volcano. | ||
=== Floor 5 === | |||
[[File:Final Fantasy 1 map dungeno Mt Gulg F5.png|frame|right|Mt. Gulg F5]] | |||
* <font color="red">'''A'''</font>: Flame Mail | |||
* <font color="red">'''B, C, & D'''</font>: NES - Soft, DoS - Gold Needle | |||
The lowest floor is broken up into eight chambers found in every direction from the center. You will definitely want to explore the chamber to the left of the entrance. However, the remaining chambers are either clear of treasure, or the chests will likely be empty if you already found the Gold Needle (Soft) from the chest on the floor above. When you are prepared, heal your party members up to full strength, and step inside the chamber in the lower left corner. | |||
[[File:FFI boss Marilith.gif|thumb|left|Marilith]] | |||
*'''HP''': NES - 600, DoS - 1440 | |||
*'''Experience Points''': 2475 | |||
*'''Gil''': 3000 | |||
[[../Bosses#Marilith 1|Marilith]] (Kary) is not ''weak'' to Ice so much as she does not ''resist'' it in the same way as she resists Fire and Lightning. She is, however, vulnerable to a number of other things. Keep her powerful fire spells at bay by using Silence, and cast NulBlaze to decrease the amount of damage to your party members greatly. You may have to cast spells like Confuse and Sleep a couple of times before they stick, but the effect is worth the effort. Equipped with the Ice Sword, a Fighter can inflict a lot of damage, but you can boost that by using Haste. | |||
Once you succeed in putting out Marilith's flame, it's time to recover the crystal, the second of four. Step forward and touch the orb. As before with Lich, the Light Warriors will be transported outside (except in Dawn of Souls GBA version, where the portal can glitch and be invisible. The portal is behind the red crystal, and will portal you to the outside.) Now two of your crystals have recovered their glow. Return to Crescent Lake now to learn new information. | |||
{{Footer Nav|game=Final Fantasy|prevpage=The Crystal of Earth|nextpage=The Airship}} | |||
Latest revision as of 16:55, 3 August 2023
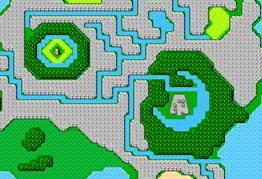
The destiny of the four Warriors of Light is now certain. They must relight the four crystals, or the world will be covered in darkness. With the lighting of the Earth Crystal, Marilith (Kary), the Fiend of Fire, has been awakened before her time. The Warriors must travel to the other side of the world and into the heart of Mt. Gulg, where Marilith's lair is, to defeat her and light the second crystal.
The Light Warriors now turn their attention to the East. There they will find a land of many rivers, the great volcano Mt. Gulg, a cave of ice, and a desert. They will meet Lukahn who foresaw their coming, and learn of still more mysteries from the wise Circle of Sages in the town of Crescent Lake.
Crescent Lake[edit]
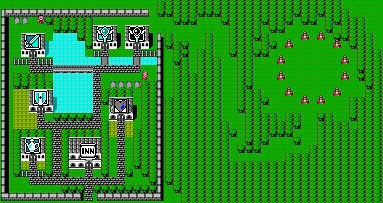
There are two ways to reach Crescent Lake, your first destination after lighting the Earth Crystal. You can sail southeast from the Cavern of Earth and travel all the way around the southern continents, or you can head due west across the open water until you reach land. Prepare to face much stronger enemies on the other side of the world. Fight your way to Crescent Lake to speak with the sages and obtain a means of traversing the sprawling rivers.
The smiths of Crescent Lake are renowned for their fine work. Both weapons and armor are here. Most important are the Sages. Lukahn and the Sages have much to tell you about the four fiends affecting the Earth, and Lukahn gives you another transportation device: a canoe.
| Inn: 200 Gil | Sanctuary: 400 Gil |
|---|---|
| L6 White magic: 20,000 (13,000) Gil | L6 Black magic: 20,000 (13,000) Gil |
| Stona, Exit, Protera, Invisira | Thundaga, Death, Quake, Stun |
| Weapons | Armor | Items | Items (DoS/AE) |
|---|---|---|---|
| Mythril Knife: 800 (640) Gil | Mythril Mail: 7500 (6000) Gil | Potion: 60 (40) Gil | Potion: 40 Gil |
| Mythril Sword: 4000 (3200) Gil | Mythril Shield: 2500 (2000) Gil | Antidote: 75 (50) Gil | Hi-Potion: 150 Gil |
| Mythril Hammer: 2500 (2000) Gil | Buckler: 2500 (2000) Gil | Tent: 250 (125) Gil | Ether: 150 Gil |
| Mythril Axe: 4500 (3600) Gil | Mythril Helm: 2500 (2000) Gil | Cottage: 3000 (2000) Gil | Tent: 160 Gil |
| Mythril Gloves: 2500 (2000) Gil | Phoenix Down: 500 Gil |
The Sages[edit]
Enter the forest path near the black magic shop to meet Lukahn, the sage mentioned in Cornelia. Talk to Lukahn and the other 11 sages. Here at last you learn how the four crystals lost their light. The four fiends seized their power and are now turning it to their own vile purposes. If you defeated Lich, Lukahn will give you a canoe. The vessel allows you to travel through shallow water, giving you access to your next destination, Mt. Gulg.
From the beginning of the game, the fate of the four crystals held by the Light Warriors has been a mystery. Now in the presence of these wise men, some of the truth is revealed. Having defeated Lich already, you will notice that one of the crystals has regained its light. But the three other crystals remain dark. You will have to defeat each of the four elemental forces before each crystal shines again, and even then your task will not be entirely complete. Also keep in mind that Lich is the weakest of the four fiends. But don't let this knowledge dishearten you. Each time you defeat a fiend, you recover some of the lost power of the orbs.
Note: At this point in the game, you also have access to the Ice Cavern. Some players prefer to initiate the steps that lead to the acquisition of the Airship. It will be difficult to accomplish if your level is too low, but if you succeed, you can embark on quests that will net you a huge collection of powerful equipment, and make tackling Mt. Gulg a less daunting task. If you wish to attempt this first, skip ahead to the next chapter, The Airship, and return here when you have completed The Trials.
Mt. Gulg[edit]
Enter the river northwest of Crescent Lake. Use the map at the top of the page as you navigate your way to Mt. Gulg to avoid getting lost in the twists and turns. Many turns lead nowhere, and if you paddle up them, you'll lose time and HP in battles. Be prepared—the river holds new monsters that you will have to defeat to reach Mt. Gulg with your party intact. Remember that most water enemies are weak to Lightning magic.
Just as you did at the Marsh Cave, save your game before entering the Volcano (use a Tent or Cottage on the NES, or a Memo on the PlayStation). If your party dies inside, you'll be able to come right back. The hot lava floors will drain HP with each step. Be prepared with a full load of Potions (Heal).
The smoldering Mt. Gulg will test your abilities and keep you on your toes. Explore every area to collect the multitude of treasures the mountain has to offer, but be ready to fight—powerful monsters lurk in every corner. Use the maps here to guide you through the maze of rooms and hallways, and eventually to Marilith (Kary), the Fiend of Fire. Defeat her to relight the Fire Crystal.
Floor 1[edit]
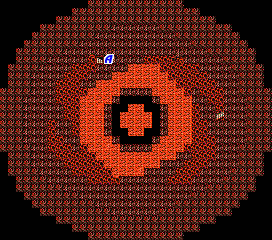
You arrive inside Mt. Gulg through the mouth at the top of the volcano. You won't find any treasure on the level of the entrance. However, you will make another painful discovery.
To make your way through Mt. Gulg, you will be forced to walk across hot lava. Every step you take diminishes each party member's HP by one. When you stand still, however, your party takes no damage. Enemies will leave you alone while your feet are getting scorched by the lava. When you want to avoid confrontations, stay in the hot zone longer than necessary. It may actually save HP in the long run.
From the entrance, ignore the lower portion of the floor, and walk across the lava on the top to reach staircase A, which takes you deeper into the mountain.
Floor 2[edit]
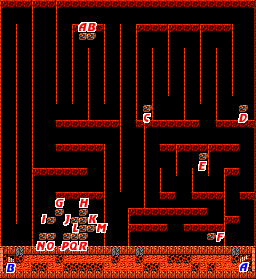
|
|
Mt. Gulg often gives you the option of skipping areas that are full of valuable treasures. Don't let your impatience get the best of you. Large amounts of Gil abound in Mt. Gulg, including powerful armor and weapons especially suited for use in the fiery realm of the volcano. Take your time; Marilith (Kary) the Fire Fiend isn't going anywhere.
As you might guess, the best way to defeat creatures of fire is with ice. Ice spells are particularly effective in the volcano. The Ice Brand, which you'll find on the second portion of the fourth floor, is by far the best weapon for your Fighter. As for armor, you can find Ice Armor if you take the time to explore the Ice Cave, which protects you from the hot scorching attacks of many monster, including the Fiend of Fire herself. NulBlaze is a great spell to have available here as well. Don't waste your magic on weaker foes; conventional attacks work fine against most of the enemies.
Floor 3[edit]
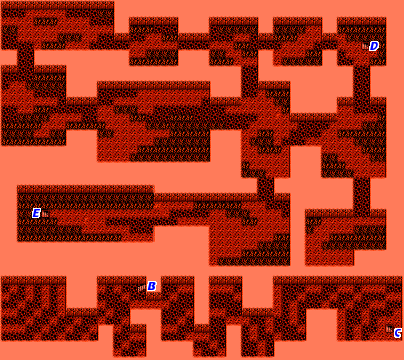
The third floor of the volcano is split into two distinct sections. When you arrive from the second floor through staircase B, you will be contained in the narrow corridor at the bottom of the map. You'll have to travel to the right to reach staircase C which takes you down to the next floor. After passing through it, you will return through staircase D, and must navigate your way around to E in order to make your way to the heart of the mountain. There is no treasure to be found anywhere on this floor.
Throughout your exploration, be on the lookout for a member of the Cockatrice family, the Pyrolisks. They possess the ability to kill a party member instantly. If you don't have the Life spell, be sure to bring plenty of Phoenix Downs in case you run into any of these deadly birds. They are tough, but weak to Ice magic, so Blizzara is an excellent choice of spell to use against them.
Floor 4[edit]
|
|
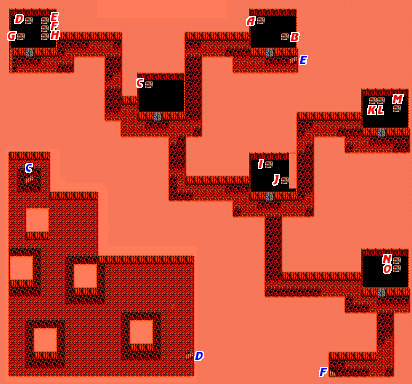
Like the floor above, this floor is broken into two distinct sections. You will first arrive from Floor 3 through staircase C, and must make your way down to D. This will bring you back up to the second portion of the third floor. You will return to this floor through staircase E, where you can resume collecting treasure.
You'll have to engage in some unavoidable battles in Mt. Gulg to get some of the treasure chests. Many treasure rooms are guarded by powerful monsters who always appear in the same place. Knowing this, you can be prepared for their attacks and sometimes you can avoid them altogether. Some monsters attack as soon as you enter the room. Others inhabit only a single spot inside. If you step into a treasure room and are not attacked right away, try going around the edge of the room. Doing so may help you avoid whatever guardian monster is lurking there. The chests that yield a Staff and 1250 Gil are guarded by Fire Lizards. Equip the Ice Brand against them. Avoid them altogether if your HP and MP are low, and come back for the treasures later.
When you are ready, make your way to the staircase at the bottom of the floor, F to access the final level of the volcano.
Floor 5[edit]
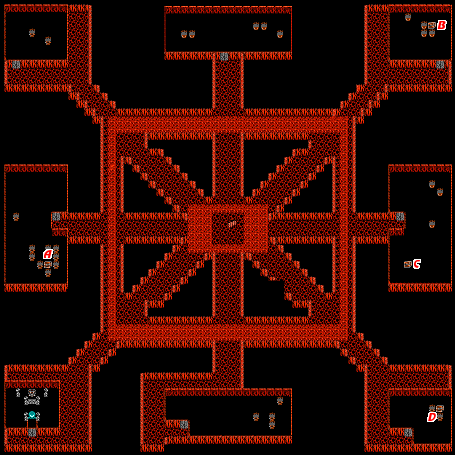
- A: Flame Mail
- B, C, & D: NES - Soft, DoS - Gold Needle
The lowest floor is broken up into eight chambers found in every direction from the center. You will definitely want to explore the chamber to the left of the entrance. However, the remaining chambers are either clear of treasure, or the chests will likely be empty if you already found the Gold Needle (Soft) from the chest on the floor above. When you are prepared, heal your party members up to full strength, and step inside the chamber in the lower left corner.

- HP: NES - 600, DoS - 1440
- Experience Points: 2475
- Gil: 3000
Marilith (Kary) is not weak to Ice so much as she does not resist it in the same way as she resists Fire and Lightning. She is, however, vulnerable to a number of other things. Keep her powerful fire spells at bay by using Silence, and cast NulBlaze to decrease the amount of damage to your party members greatly. You may have to cast spells like Confuse and Sleep a couple of times before they stick, but the effect is worth the effort. Equipped with the Ice Sword, a Fighter can inflict a lot of damage, but you can boost that by using Haste.
Once you succeed in putting out Marilith's flame, it's time to recover the crystal, the second of four. Step forward and touch the orb. As before with Lich, the Light Warriors will be transported outside (except in Dawn of Souls GBA version, where the portal can glitch and be invisible. The portal is behind the red crystal, and will portal you to the outside.) Now two of your crystals have recovered their glow. Return to Crescent Lake now to learn new information.

