m (link fix) |
(cleanup) |
||
| (35 intermediate revisions by 20 users not shown) | |||
| Line 1: | Line 1: | ||
{{Final Fantasy | {{Header Nav|game=Final Fantasy}} | ||
[[File:Final Fantasy I (NES) Chp5.jpg|thumb|right|Crescent Lake region]] | |||
'''''Before the Water Crystal shines again, the Warriors of Light will face challenges by air and by sea. They must prove to the Dragon King once and for all that they are true heroes by mastering the Citadel of Trials. Finally. they will need to plunge deep into the sea and explore the Sunken Shrine. There they will face Kraken in battle, and relight the crystal. But first, a new means of transportation must be discovered.''''' | |||
' | == {{s|Locations|Crescent Lake}} == | ||
After you've lit the Fire Crystal in Mt. Gulg, head back to Crescent Lake for rest and supplies. Celebrate your hard earned victory against Malirith (Kary) by talking to the sages and the few inhabitants to see if they have anything new to say. The man stationed in the upper left corner of town mentions that he searched for a special stone, the Levistone (Floater), in the Ice Cavern. The cave of which the man speaks is in the mountains to the North. | |||
== | == The {{s|Locations|Ice Cavern}} == | ||
Return to your boat at the dock northeast of town and sail for the dock to the north. You'll need to row your canoe along the river to reach the Cavern of Ice. The river's twists and turns will get you lost in a hurry. After you ditch your boat at the dock north of Crescent Lake, slip your canoe into the river and use the map above to find the route to the Cavern of Ice. It's a good idea to use some kind of shelter and save your game right outside of the cavern. | |||
Like the lava in Mt. Gulg, the ice-ridden areas of the floor will damage your party members with every step. Monsters will not engage you in battle while you are moving across the ice, so tread the areas to avoid confrontations. Fire is your friend against the ice-wielding enemies in the cavern. You will also encounter Cockatrices in here, so bring plenty of Gold Needles (Soft) in order to keep your party members functioning. Seek out the Levistone and find your way to the exit before you run out of HP and MP. | |||
== [[Final Fantasy | === Floor 1a === | ||
[[File:Final Fantasy 1 map cave Ice F1a.png|frame|left|Ice Cavern F1a]] | |||
The entrance to the Ice Cavern is fairly linear with no treasure to discover. Your only goal is to reach stairway <font color="blue">'''A'''</font> to access the floor below. You can see the other portion of the floor beyond the rocks, but a cave-in has blocked the path off. You'll have to find another way around to access that area. | |||
=== Floor | You'll encounter a great number of ice based enemies. Frost Wolves often hunt in large packs, and the White (Frost) Dragon uses Blizzard magic against you. Just as you attacked Fire monsters with Ice spells and weapons, Ice monsters are susceptible to attack by fire. Fira, and especially Fiaraga (if you have it at this point) will melt the opposition. | ||
{{-}} | |||
=== Floor 2a and 3a === | |||
[[File:Final Fantasy 1 map cave Ice F2a.png|frame|left|Ice Cavern F2a]] | |||
[[File:Final Fantasy 1 map cave Ice F3a.png|frame|right|Ice Cavern F3a]] | |||
When you reach the second floor, it may appear like you have a big decision to make, but a thorough examination of the floor will reveal that both paths ultimately arrive at the same destination, staircase <font color="blue">'''B'''</font>, which will take you down to the floor below. There is still no treasure to be discovered yet. | |||
=== Floor | When you arrive there, all you will find is a tiny section of dungeon that immediately transports you back up one flight via staircase <font color="blue">'''C'''</font>. It's doubtful that you will even have time to get attacked here. | ||
{{-}} | |||
=== Floor 2b === | |||
[[File:Final Fantasy 1 map cave Ice F2b.png|frame|right|Ice Cavern F2b]] | |||
*<font color="red">'''A'''</font>: Flame Sword | |||
*<font color="red">'''B'''</font>: NES - Floater, GBA - Levistone | |||
*<font color="red">'''C'''</font>: Clothes | |||
Finally, an opportunity to collect treasure. When you make it down to the bottom of the floor and up into the chamber above, you will notice three treasure chests and a floor marked with a collection of holes. If you step on to any one of these holes, you will fall down and arrive at the top of the map below. | |||
Out of the three treasure chests, there are two that you can access immediately. Of those two, one (<font color="red">'''A'''</font>) is a powerful weapon, the Flame Sword, which you should equip immediately. The other (<font color="red">'''C'''</font>) is the relatively useless Clothes. To make matters worse, the Clothes are defended by powerful Dark Wizards (Mages), who have the ability to cast Kill, and instantly wipe out one of your party members. Think twice before collecting it. | |||
The third chest, <font color="red">'''B'''</font>, is completely surrounded by pits. You'll have to locate another means of reaching it. When you're done examining the treasures, drop down any of the pits to continue your journey through the cavern. | |||
=== Floor 3b === | === Floor 3b === | ||
[[File:Final Fantasy 1 map cave Ice F3b.png|frame|left|Ice Cavern F3b]] | |||
run | *<font color="red">'''A'''</font>: NES - Silver Gauntlet, GBA - Mythril Gloves | ||
*<font color="red">'''B'''</font>: Ice Armor | |||
*<font color="red">'''C'''</font>: 7900 Gil | |||
*<font color="red">'''D'''</font>: 5450 Gil | |||
*<font color="red">'''E'''</font>: 180 Gil | |||
*<font color="red">'''F'''</font>: 9900 Gil | |||
*<font color="red">'''G'''</font>: 5000 Gil | |||
*<font color="red">'''H'''</font>: 12350 Gil | |||
By falling through the pits in the floor above, you will land in the chamber at the top of this floor. While it's quite expansive, there are really only three areas of interest: the two treasure rooms at the top and bottom of the floor, and the staircase (<font color="blue">'''D'''</font>) that takes you all the way back up to the first floor. | |||
The treasure room at the top contains two useful pieces of armor, but an encounter point will force you to fight White (Frost) Dragons. You'll hit the encounter point twice if you want both treasures. Be wary of the dragons' Ice Storm attack—it will damage all party members heavily. Fight them using the Wyrmkiller and Fire attacks. The treasure room at the bottom contains six chests, all overflowing with Gil. Once you've cleaned it out, head back up and to the right and follow the pathway around to reach the stairs. | |||
{{-}} | |||
=== Floor 1b === | |||
[[File:Final Fantasy 1 map cave Ice F1b.png|frame|right|Ice Cavern F1b]] | |||
*<font color="red">'''A'''</font>: NES - Heal, GBA - Ether | |||
*<font color="red">'''B'''</font>: 10,000 Gil | |||
*<font color="red">'''C'''</font>: 9500 Gil | |||
*<font color="red">'''D'''</font>: NES - Tent, GBA - Sleeping Bag | |||
*<font color="red">'''E'''</font>: Ice Shield | |||
You will arrive on the opposite side of the cave-in that blocked your progress on the first floor. There are a couple of treasure chests to examine, but most important of all is the pit (<font color="blut">'''E'''</font>) just below the set of three chests in the right chamber. If you have plenty of health and are prepared for a big fight, jump in. If you're not sure you're ready and feel that you should head outside and return to town, take staircase <font color="blut">'''F'''</font> to exit the cave. Just remember that you will have to repeat your steps to return to the pit. | |||
Jumping down the pit will return you to [[#Floor_2b|Floor 2b]], and position you near the third treasure chest that you could not access before. Stepping in front of it will cause the guardian of the treasure to attack you, the {{s|Bosses|Evil Eye}}. | |||
[[File:FFI boss Evil Eye.gif|thumb|left|Evil Eye]] | |||
*'''HP''': 162 | |||
*'''Experience Points''': 3225(PS: 806) | |||
*'''Gil''': 3225 | |||
You'll need to take out the Evil Eye quickly before it unleashes its flurry of spells. The boss doesn't have any particular weakness, but it doesn't have a lot of HP either. Equip your best fighter with the Rune Sword and cast Haste on him if possible. A quick round of strong physical attacks should diminish its power. The Life spell may come in handy if the Eye succeeds in casting an instant-kill spell on one of your party members. | |||
If you are capable of taking out the Evil Eye before it attacks you, you have an unprecedented opportunity. Few foes grant more Experience points than it, and it shows up whenever you stand in front of the treasure. If you are doing a challenge run of the game, such as a solo run, this is a great opportunity to reach the maximum level in a matter of minutes. | |||
Once you have defeated the Evil Eye, claim the {{s|Key items|Levistone}} (Floater) and fall through the cracks and retrace your steps to Floor 1b. From there, take staircase <font color="blue">'''F'''</font> to exit the cave and return to Crescent Lake for healing and supplies. | |||
{{-}} | |||
== [[../Locations#Lykion Desert|Ryukahn Desert]] == | |||
Since the fall of the great civilization in the North, the Desert of Ryukahn has kept a secret buried beneath its burning sands. Now, armed with the Levistone, the Light Warriors can seek out and raise the Airship. Their quest to become warriors of the sky is almost complete. | |||
After obtaining the Levistone from the Cavern of Ice, sail south to the Ryukahn Desert. You'll have the ability to raise the airship from the sands by using the Levistone while you're there. To reach Ryukahn Desert, you'll need to drop anchor at the mouth of a river that lies south of Crescent Lake along the eastern border of the continent. Besides ports, these openings are the only places you can reach land from your ship. Then jump onto the piece of land immediately to your left. Hike to the middle of the desert and access the item menu. Use the Levistone and the Airship will magically rise from the sands. | |||
The airship is a very powerful vehicle. You won't encounter random enemies while you're piloting it, so you can travel from one place to the next at great speed. Flying the airship opens up many new areas and allows you easy access to places you've already been. The airship does not allow you to reach ''every'' portion on the map, however. You can only land on smooth green areas. | |||
{{Footer Nav|game=Final Fantasy|prevpage=The Crystal of Fire|nextpage=The Trials}} | |||
Latest revision as of 17:01, 3 August 2023
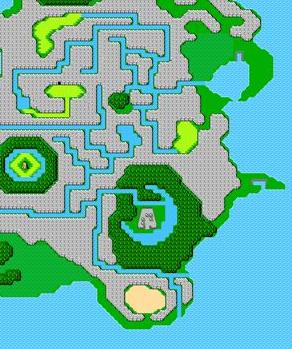
Before the Water Crystal shines again, the Warriors of Light will face challenges by air and by sea. They must prove to the Dragon King once and for all that they are true heroes by mastering the Citadel of Trials. Finally. they will need to plunge deep into the sea and explore the Sunken Shrine. There they will face Kraken in battle, and relight the crystal. But first, a new means of transportation must be discovered.
Crescent Lake[edit]
After you've lit the Fire Crystal in Mt. Gulg, head back to Crescent Lake for rest and supplies. Celebrate your hard earned victory against Malirith (Kary) by talking to the sages and the few inhabitants to see if they have anything new to say. The man stationed in the upper left corner of town mentions that he searched for a special stone, the Levistone (Floater), in the Ice Cavern. The cave of which the man speaks is in the mountains to the North.
The Ice Cavern[edit]
Return to your boat at the dock northeast of town and sail for the dock to the north. You'll need to row your canoe along the river to reach the Cavern of Ice. The river's twists and turns will get you lost in a hurry. After you ditch your boat at the dock north of Crescent Lake, slip your canoe into the river and use the map above to find the route to the Cavern of Ice. It's a good idea to use some kind of shelter and save your game right outside of the cavern.
Like the lava in Mt. Gulg, the ice-ridden areas of the floor will damage your party members with every step. Monsters will not engage you in battle while you are moving across the ice, so tread the areas to avoid confrontations. Fire is your friend against the ice-wielding enemies in the cavern. You will also encounter Cockatrices in here, so bring plenty of Gold Needles (Soft) in order to keep your party members functioning. Seek out the Levistone and find your way to the exit before you run out of HP and MP.
Floor 1a[edit]
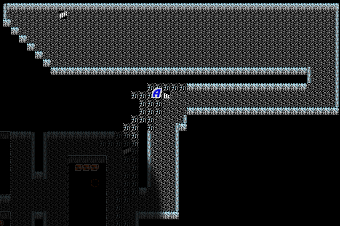
The entrance to the Ice Cavern is fairly linear with no treasure to discover. Your only goal is to reach stairway A to access the floor below. You can see the other portion of the floor beyond the rocks, but a cave-in has blocked the path off. You'll have to find another way around to access that area.
You'll encounter a great number of ice based enemies. Frost Wolves often hunt in large packs, and the White (Frost) Dragon uses Blizzard magic against you. Just as you attacked Fire monsters with Ice spells and weapons, Ice monsters are susceptible to attack by fire. Fira, and especially Fiaraga (if you have it at this point) will melt the opposition.
Floor 2a and 3a[edit]
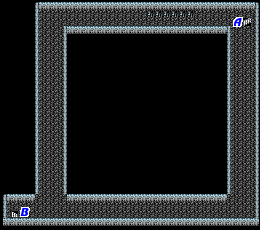

When you reach the second floor, it may appear like you have a big decision to make, but a thorough examination of the floor will reveal that both paths ultimately arrive at the same destination, staircase B, which will take you down to the floor below. There is still no treasure to be discovered yet.
When you arrive there, all you will find is a tiny section of dungeon that immediately transports you back up one flight via staircase C. It's doubtful that you will even have time to get attacked here.
Floor 2b[edit]
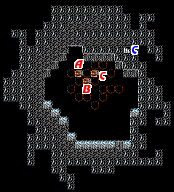
- A: Flame Sword
- B: NES - Floater, GBA - Levistone
- C: Clothes
Finally, an opportunity to collect treasure. When you make it down to the bottom of the floor and up into the chamber above, you will notice three treasure chests and a floor marked with a collection of holes. If you step on to any one of these holes, you will fall down and arrive at the top of the map below.
Out of the three treasure chests, there are two that you can access immediately. Of those two, one (A) is a powerful weapon, the Flame Sword, which you should equip immediately. The other (C) is the relatively useless Clothes. To make matters worse, the Clothes are defended by powerful Dark Wizards (Mages), who have the ability to cast Kill, and instantly wipe out one of your party members. Think twice before collecting it.
The third chest, B, is completely surrounded by pits. You'll have to locate another means of reaching it. When you're done examining the treasures, drop down any of the pits to continue your journey through the cavern.
Floor 3b[edit]

- A: NES - Silver Gauntlet, GBA - Mythril Gloves
- B: Ice Armor
- C: 7900 Gil
- D: 5450 Gil
- E: 180 Gil
- F: 9900 Gil
- G: 5000 Gil
- H: 12350 Gil
By falling through the pits in the floor above, you will land in the chamber at the top of this floor. While it's quite expansive, there are really only three areas of interest: the two treasure rooms at the top and bottom of the floor, and the staircase (D) that takes you all the way back up to the first floor.
The treasure room at the top contains two useful pieces of armor, but an encounter point will force you to fight White (Frost) Dragons. You'll hit the encounter point twice if you want both treasures. Be wary of the dragons' Ice Storm attack—it will damage all party members heavily. Fight them using the Wyrmkiller and Fire attacks. The treasure room at the bottom contains six chests, all overflowing with Gil. Once you've cleaned it out, head back up and to the right and follow the pathway around to reach the stairs.
Floor 1b[edit]
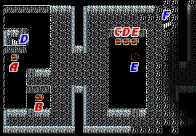
- A: NES - Heal, GBA - Ether
- B: 10,000 Gil
- C: 9500 Gil
- D: NES - Tent, GBA - Sleeping Bag
- E: Ice Shield
You will arrive on the opposite side of the cave-in that blocked your progress on the first floor. There are a couple of treasure chests to examine, but most important of all is the pit (E) just below the set of three chests in the right chamber. If you have plenty of health and are prepared for a big fight, jump in. If you're not sure you're ready and feel that you should head outside and return to town, take staircase F to exit the cave. Just remember that you will have to repeat your steps to return to the pit.
Jumping down the pit will return you to Floor 2b, and position you near the third treasure chest that you could not access before. Stepping in front of it will cause the guardian of the treasure to attack you, the Evil Eye.

- HP: 162
- Experience Points: 3225(PS: 806)
- Gil: 3225
You'll need to take out the Evil Eye quickly before it unleashes its flurry of spells. The boss doesn't have any particular weakness, but it doesn't have a lot of HP either. Equip your best fighter with the Rune Sword and cast Haste on him if possible. A quick round of strong physical attacks should diminish its power. The Life spell may come in handy if the Eye succeeds in casting an instant-kill spell on one of your party members.
If you are capable of taking out the Evil Eye before it attacks you, you have an unprecedented opportunity. Few foes grant more Experience points than it, and it shows up whenever you stand in front of the treasure. If you are doing a challenge run of the game, such as a solo run, this is a great opportunity to reach the maximum level in a matter of minutes.
Once you have defeated the Evil Eye, claim the Levistone (Floater) and fall through the cracks and retrace your steps to Floor 1b. From there, take staircase F to exit the cave and return to Crescent Lake for healing and supplies.
Ryukahn Desert[edit]
Since the fall of the great civilization in the North, the Desert of Ryukahn has kept a secret buried beneath its burning sands. Now, armed with the Levistone, the Light Warriors can seek out and raise the Airship. Their quest to become warriors of the sky is almost complete.
After obtaining the Levistone from the Cavern of Ice, sail south to the Ryukahn Desert. You'll have the ability to raise the airship from the sands by using the Levistone while you're there. To reach Ryukahn Desert, you'll need to drop anchor at the mouth of a river that lies south of Crescent Lake along the eastern border of the continent. Besides ports, these openings are the only places you can reach land from your ship. Then jump onto the piece of land immediately to your left. Hike to the middle of the desert and access the item menu. Use the Levistone and the Airship will magically rise from the sands.
The airship is a very powerful vehicle. You won't encounter random enemies while you're piloting it, so you can travel from one place to the next at great speed. Flying the airship opens up many new areas and allows you easy access to places you've already been. The airship does not allow you to reach every portion on the map, however. You can only land on smooth green areas.

