(→Attack: bracket) |
m (copy edit) |
||
| Line 14: | Line 14: | ||
The minimap for this region is already explored, as such you can plan your attack to your satisfaction. | The minimap for this region is already explored, as such you can plan your attack to your satisfaction. | ||
Take your initial time to prepare - on normal you have three minutes, while on hard you have two minutes, and on easy you have three and a half | Take your initial time to prepare - on normal you have three minutes, while on hard you have two minutes, and on easy you have three and a half minutes. Don't expect to create a defensive choke point; while the enemy has to go through one main route to reach you, you can't seal it off beyond a simple attack force. | ||
Once the preparation phase is complete (or you kill a Villager), Mal'Ganis teleports into the middle of the city (just to the north-east of the dark-grey X) and knocks down a City Building that was previously tagged as invulnerable. He demonstrates his power to convert Villagers; you may want to skip the cutscene if you've seen it before, as it slows him down by a few seconds. | Once the preparation phase is complete (or you kill a Villager), Mal'Ganis teleports into the middle of the city (just to the north-east of the dark-grey X) and knocks down a City Building that was previously tagged as invulnerable. He demonstrates his power to convert Villagers; you may want to skip the cutscene if you've seen it before, as it slows him down by a few seconds. | ||
| Line 31: | Line 31: | ||
The best way to win is to attack the City Buildings, and setup your units accordingly. Build a Blacksmith and start building Riflemen, as they allow you to more quickly dispatch Villagers before they become zombified. | The best way to win is to attack the City Buildings, and setup your units accordingly. Build a Blacksmith and start building Riflemen, as they allow you to more quickly dispatch Villagers before they become zombified. | ||
If you can, get a second team in the field. This serves as a backup in case one gets slowed down when it encounters Mal'Ganis, but also doubles the rate at which you | If you can, get a second team in the field. This serves as a backup in case one gets slowed down when it encounters Mal'Ganis, but also doubles the rate at which you kill enemies. | ||
Try to memorize the following micromanagement pattern: | Try to memorize the following micromanagement pattern: | ||
| Line 56: | Line 56: | ||
== Attack waves == | == Attack waves == | ||
The Purple AI player will send | The Purple AI player will send its first attack within 4-5 minutes and keep sending waves after 4-5 minutes. On hard difficulty, you get attacked by four ghouls within 2 minutes, the attack rate is increased to once every 3 minutes. | ||
The following waves are worth noting: | The following waves are worth noting: | ||
| Line 95: | Line 95: | ||
== Treasures == | == Treasures == | ||
* A small Enforcer camp is located on the north edge of the map to the west of your base; you can get a '''Scroll of Town Portal''', and one of the Tents | * A small Enforcer camp is located on the north edge of the map to the west of your base; you can get a '''Scroll of Town Portal''', and one of the Tents contains a '''Tome of Strength +2'''. | ||
* There is a zoo on the left side of town (zoo animals are in orange). Destroy the gate where two Owlbears are staying. The place is infested with vermin. One of them is named "Filson the Rat", and you can't kill it by any normal units, including Arthas. Send in a Mortar Team and use "Attack Ground" on the Rat. The Rat will die and drop a '''Talisman of Evasion'''. | * There is a zoo on the left side of town (zoo animals are in orange). Destroy the gate where two Owlbears are staying. The place is infested with vermin. One of them is named "Filson the Rat", and you can't kill it by any normal units, including Arthas. Send in a Mortar Team and use "Attack Ground" on the Rat. The Rat will die and drop a '''Talisman of Evasion'''. | ||
*The Goblin Merchant to the west of your base sells '''Potions of Healing''', '''Potions of Mana''', '''Scrolls of Healing''', '''Scrolls of Protection''', '''Wands of Negation''', '''Gems of True Seeing''' and '''Scrolls of Town Portal'''. | *The Goblin Merchant to the west of your base sells '''Potions of Healing''', '''Potions of Mana''', '''Scrolls of Healing''', '''Scrolls of Protection''', '''Wands of Negation''', '''Gems of True Seeing''' and '''Scrolls of Town Portal'''. | ||
Revision as of 05:27, 17 February 2015
Chapter Introduction
Early the next morning, on the outskirts of Stratholme...
Mission Objectives
- Main Quest - The Culling
-
- Destroy plagued villager houses
- Kill 100 zombies
- Stop Mal'Ganis from claiming 100 zombies
Strategy

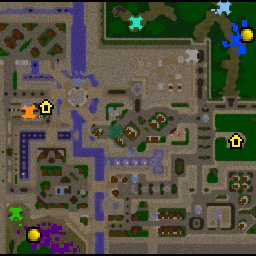
The minimap for this region is already explored, as such you can plan your attack to your satisfaction.
Take your initial time to prepare - on normal you have three minutes, while on hard you have two minutes, and on easy you have three and a half minutes. Don't expect to create a defensive choke point; while the enemy has to go through one main route to reach you, you can't seal it off beyond a simple attack force.
Once the preparation phase is complete (or you kill a Villager), Mal'Ganis teleports into the middle of the city (just to the north-east of the dark-grey X) and knocks down a City Building that was previously tagged as invulnerable. He demonstrates his power to convert Villagers; you may want to skip the cutscene if you've seen it before, as it slows him down by a few seconds.
There are two important concepts during this mission: attack and defense. The first is more important than the second, but you shouldn't forgo the latter.
Defense
You need to defend your base from attacks, but not too heavily. The initial wave is repelled by about six Footmen and the stock Tower (but for good measure, build an additional one), and you can repel the following wave by adding two Riflemen to the mix, possibly four.
Once you have at least 50-75 kills, discard the defense and focus on attacking. At that point, you should be trying to finish the objective rather than bottling up.
You should only repel an absolute maximum of four waves. After defeating the fourth wave forget about defence and perform an all-out attack on the city.
Attack
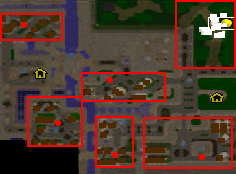
The best way to win is to attack the City Buildings, and setup your units accordingly. Build a Blacksmith and start building Riflemen, as they allow you to more quickly dispatch Villagers before they become zombified.
If you can, get a second team in the field. This serves as a backup in case one gets slowed down when it encounters Mal'Ganis, but also doubles the rate at which you kill enemies.
Try to memorize the following micromanagement pattern:
- Attack the City Building. Note that you must use the hotkey or command button to do so.
- When the screen shakes, check your attack force(s). If the City Building is knocked down, force attack the four Villagers and the next City Building you want to nail.
- Ignore the immediate attack alert from that team (unless you also see Mal'Ganis is nearby), and continue building for base forces.
Mal'Ganis
Mal'Ganis is a Level 6 Dreadlord on easy, Level 7 on normal, both with 3 Levels of Sleep and 1 Level of Carrion Swarm. On hard, he's Level 8 and has 3 Levels of Carrion Swarm for extra damage. He starts with a few Ghouls, but as the chapter progresses, he'll end up having a dozen units. (Ghouls, Necromancers, Meat Wagons and Abominations.)
If you manage to take him out, he will recover in three minutes (or 90 seconds on hard, four minutes on easy). This guide recommends avoiding Mal'Ganis. Once Arthas has killed 21 and 51 Villagers, Mal'Ganis will temporarily stop claiming Villagers and instead hunt the player for a while. Mal'Ganis won't attack your base though.

He has five entry points when he respawns or otherwise needs to teleport:
- The decorative fountain in the center of town.
- The decorative fountain in the south-east corner.
- The decorative fountain in the south-west corner.
- The north-west corner, in the middle of the buildings.
- The south-west corner that's just east of the undead base.
Attack waves
The Purple AI player will send its first attack within 4-5 minutes and keep sending waves after 4-5 minutes. On hard difficulty, you get attacked by four ghouls within 2 minutes, the attack rate is increased to once every 3 minutes.
The following waves are worth noting:
| Wave | Easy/Normal | Hard |
|---|---|---|
| 1 | 4 Ghouls. | |
| 2 | 3 Ghouls. | 6 Ghouls and 1 Abomination. |
| Cannibalize and Unholy Strength. | Cannibalize and Unholy Strength. | |
| 3 | 3 Ghouls and 1 Abomination. | 8 Ghouls, 1 Meat Wagon and 2 Abominations. |
| Unholy Armor. | Unholy Armor. | |
| 4 | 6 Ghouls and 2 Abominations. | 10 Ghouls, 1 Necromancer and 2 Abominations. |
| Skeletal Longevity and Necromancer Adept Training. | Skeletal Longevity, Improved Unholy Strength and Necromancer Adept Training. | |
| 5 | 4 Ghouls, 2 Necromancers and 1 Meat Wagon. | 8 Ghouls, 2 Necromancers, 2 Meat Wagons and 2 Abominations. |
| Improved Unholy Armor, Disease Cloud Aura and Necromancer Master Training. | ||
| 6 | 10 Ghouls. | 12 Ghouls. |
| 7 | 1 Meat Wagon and 4 Abominations. | 6 Ghouls, 2 Necromancers, 2 Meat Wagons and 2 Abominations. |
| Ghoul Frenzy. |
While the AI continues sending waves after this point, you've likely already failed the mission by the time those waves arrive.
The base in the south-west corner cannot run out of resources, and destroying it does not impede Mal'Ganis from completing his objective (he is respawned from his own special base, which is unreachable and invulnerable.)
Treasures
- A small Enforcer camp is located on the north edge of the map to the west of your base; you can get a Scroll of Town Portal, and one of the Tents contains a Tome of Strength +2.
- There is a zoo on the left side of town (zoo animals are in orange). Destroy the gate where two Owlbears are staying. The place is infested with vermin. One of them is named "Filson the Rat", and you can't kill it by any normal units, including Arthas. Send in a Mortar Team and use "Attack Ground" on the Rat. The Rat will die and drop a Talisman of Evasion.
- The Goblin Merchant to the west of your base sells Potions of Healing, Potions of Mana, Scrolls of Healing, Scrolls of Protection, Wands of Negation, Gems of True Seeing and Scrolls of Town Portal.
Points of Interest
- If you move Arthas to the fountain in the center of the city, Arthas gives a small speech.
- There is a zoo on the left side of town.
- If you lose due to Mal'Ganis claiming 100 Zombies, you get a unique defeat attack wave, in which your base is attacked by super-powered Zombies of Mal'Ganis.