Jump to navigation
Jump to search


m (Text replacement - "Infobox_SMW_Level" to "SMW/Level") |
(cleanup) |
||
| (5 intermediate revisions by 5 users not shown) | |||
| Line 1: | Line 1: | ||
{{Header Nav|game=Super Mario World}} | {{Header Nav|game=Super Mario World}} | ||
{{SMW/Level | {{SMW/Level | ||
| | |name=Donut Plains 1 | ||
| | |type=Above-ground | ||
|entrance = [[ | |entrance=[[../Iggy's Castle/]] | ||
|exit = [[ | |exit=[[../Donut Plains 2/]] | ||
|secret | |secret=[[../Donut Secret 1/]] | ||
| | |timer=400 | ||
}} | }} | ||
Donut Plains 1 is the first stage of Donut Plains. This is the first level where you'll find the | Donut Plains 1 is the first stage of Donut Plains. This is the first level where you'll find the {{s|Items|Cape Feather}}, allowing you to fly. | ||
{{Scrolling map|SMW-DP1-1.png}} | {{Scrolling map|SMW-DP1-1.png}} | ||
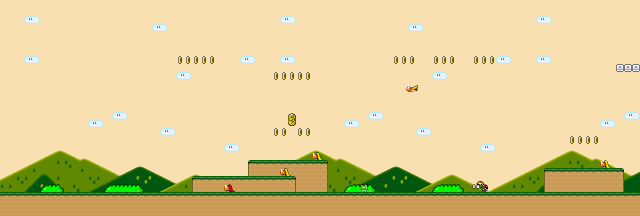
* The level starts with a bunch of Super Koopas flying towards you. Stomp the one with a flashing cape (jump off Yoshi if you have him); you'll receive a feather and turn into Cape Mario! | * The level starts with a bunch of Super Koopas flying towards you. Stomp the one with a flashing cape (jump off Yoshi if you have him); you'll receive a feather and turn into Cape Mario! {{SMW/DC|Near the first set of Super Koopas.}} | ||
* There are several coins in the air scattered throughout the level. With the cape, you can easily fly up and collect the coins. However, some Super Koopas are up there as well, so look out. | * There are several coins in the air scattered throughout the level. With the cape, you can easily fly up and collect the coins. However, some Super Koopas are up there as well, so look out. | ||
{{Scrolling map|SMW-DP1-2.png}} | {{Scrolling map|SMW-DP1-2.png}} | ||
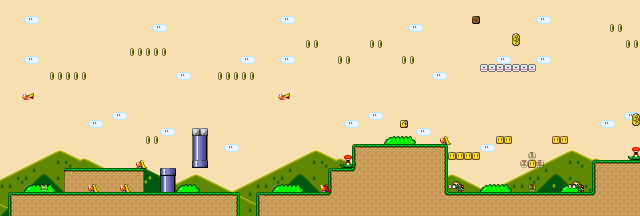
* There is another Super Koopa with a flashing cape here where you can snatch a feather. There's a third one before the silver pipe. | * There is another Super Koopa with a flashing cape here where you can snatch a feather. There's a third one before the silver pipe. | ||
* The Volcano Lotus Plant can be a bit troublesome. Jump over it as the fire is soaring down through the ground. | * The Volcano Lotus Plant can be a bit troublesome. Jump over it as the fire is soaring down through the ground. Spin attacking with the cape will also kill it. | ||
* {{SMW/DC|After the plant, jump from the platform with the single Super Koopa to reach it.}} | |||
* The upside-down blue pipe leads to a luck-based bonus game. It can only be reached if you have enabled the yellow switch blocks. You will return at the second upside-down blue pipe further down in the level. | * The upside-down blue pipe leads to a luck-based bonus game. It can only be reached if you have enabled the yellow switch blocks. You will return at the second upside-down blue pipe further down in the level. | ||
{{Scrolling map|SMW-DP1-3.png}} | {{Scrolling map|SMW-DP1-3.png}} | ||
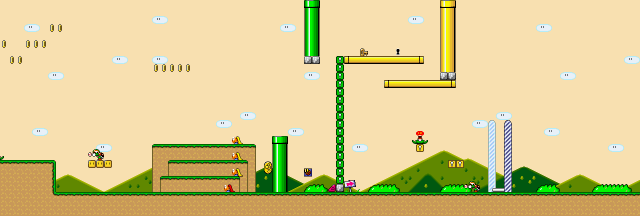
* The upright pipe takes you to another bonus area | * The upright pipe takes you to another bonus area. You will return at the upside-down blue pipe right next to it. | ||
* You can grab Yoshi from the single ? block in this section. | * You can grab Yoshi from the single ? block in this section. | ||
* Try to not fall into the pit with the two Pitchin' Chucks. Their baseballs are quite difficult to avoid down there. However, there is a reward for brave adventurers who venture down there: jump in a counter-clockwise fashion around the single turn block in the pit starting from 12 o'clock to receive a 1-up mushroom. | * Try to not fall into the pit with the two Pitchin' Chucks. Their baseballs are quite difficult to avoid down there. However, there is a reward for brave adventurers who venture down there: jump in a counter-clockwise fashion around the single turn block in the pit starting from 12 o'clock to receive a 1-up mushroom. | ||
* {{SMW/DC|Jump into the pit with the Pitchin' Chucks and hit the fourth turn block from the left to reveal a vine. Climb up to get to the cloud platform high above.}} | |||
* {{SMW/DC|Above a Volcano Lotus Plant just after the previous Dragon Coin.}} | |||
{{Sidebar|title=Bonus Area|width=100%|contents= | |||
{{Scrolling map|SMW-DP1-bonus.png}} | {{Scrolling map|SMW-DP1-bonus.png}} | ||
* This is an area where you can try out your flying skills. Grab the feather in the pit, then use the ramp to run up the pipes. Take off once at the top and try to collect as many coins as you can. If you're good, you will be able to get one or more 1-ups in this section. Enter the pipe at the very end to leave the area. | * This is an area where you can try out your flying skills. Grab the feather in the pit, then use the ramp to run up the pipes. Take off once at the top and try to collect as many coins as you can. If you're good, you will be able to get one or more 1-ups in this section. Enter the pipe at the very end to leave the area.}} | ||
{{Scrolling map|SMW-DP1-4.png}} | {{Scrolling map|SMW-DP1-4.png}} | ||
* A Super Koopa gives you one last opportunity to get a feather in this level. | * A Super Koopa gives you one last opportunity to get a feather in this level. | ||
* {{SMW/DC|Next to the green pipe.}} | |||
* The ramp does nothing as long as the green switch blocks aren't activated; you will simply pass through the green switch blocks. Once they are, however, you'll have to run up and go through the little pipe maze to get to the exit. | * The ramp does nothing as long as the green switch blocks aren't activated; you will simply pass through the green switch blocks. Once they are, however, you'll have to run up and go through the little pipe maze to get to the exit. | ||
* If you have activated the yellow switch blocks, the Volcano Lotus Plant can be easily bypassed by running under it. As well, a platform helps you get maximum points from the goal tape. | * If you have activated the yellow switch blocks, the Volcano Lotus Plant can be easily bypassed by running under it. As well, a platform helps you get maximum points from the goal tape. | ||
==Secret Exit== | ==Secret Exit== | ||
This is the first level in the game to feature a secret exit. These hidden exits enable sidepaths on the overworld and allow you to traverse areas that are unreachable | This is the first level in the game to feature a secret exit. These hidden exits enable sidepaths on the overworld and allow you to traverse areas that are otherwise unreachable. In the vast majority of cases, secret exits are indicated by a keyhole; you'll need to find the key in the level and put it in the keyhole to complete the level and open the secret exit. | ||
In this level, the key and the keyhole are right next to each other! However, they are on top of the pipe maze and not normally reachable. You have two options: | In this level, the key and the keyhole are right next to each other! However, they are on top of the pipe maze and not normally reachable. You have two options: | ||
* You can wait until you complete the Green Switch Palace later on. This way, the green switch blocks will be enabled, and you can simply run up the ramp to get to | * You can wait until you complete the Green Switch Palace later on. This way, the green switch blocks will be enabled, and you can simply run up the ramp to get to the key and keyhole. | ||
* If you are confident in your flying skills, you can simply fly up to the pipe maze and get to the key and keyhole this way. | * If you are confident in your flying skills, you can simply fly up to the pipe maze and get to the key and keyhole this way. | ||
* An easier option could be to grab the Yoshi under the maze and get enough speed with Cape feather then jump off Yoshi. | |||
Carry the key to the keyhole to unlock the secret exit. | |||
{{Footer Nav|game=Super Mario World|prevpage=Iggy's Castle|nextpage=Donut Secret 1}} | {{Footer Nav|game=Super Mario World|prevpage=Iggy's Castle|nextpage=Donut Plains 2|customnext=[[../Donut Secret 1/]]}} | ||
Latest revision as of 04:07, 11 August 2023
| Donut Plains 1 | |
|---|---|
| Level type | Above-ground |
| Entrance | |
| Exit | |
| Secret Exit | Donut Secret 1 |
| Time at Start | 400 |
Donut Plains 1 is the first stage of Donut Plains. This is the first level where you'll find the Cape Feather, allowing you to fly.

- The level starts with a bunch of Super Koopas flying towards you. Stomp the one with a flashing cape (jump off Yoshi if you have him); you'll receive a feather and turn into Cape Mario!
 Near the first set of Super Koopas.
 - There are several coins in the air scattered throughout the level. With the cape, you can easily fly up and collect the coins. However, some Super Koopas are up there as well, so look out.

- There is another Super Koopa with a flashing cape here where you can snatch a feather. There's a third one before the silver pipe.
- The Volcano Lotus Plant can be a bit troublesome. Jump over it as the fire is soaring down through the ground. Spin attacking with the cape will also kill it.
- After the plant, jump from the platform with the single Super Koopa to reach it.
- The upside-down blue pipe leads to a luck-based bonus game. It can only be reached if you have enabled the yellow switch blocks. You will return at the second upside-down blue pipe further down in the level.

- The upright pipe takes you to another bonus area. You will return at the upside-down blue pipe right next to it.
- You can grab Yoshi from the single ? block in this section.
- Try to not fall into the pit with the two Pitchin' Chucks. Their baseballs are quite difficult to avoid down there. However, there is a reward for brave adventurers who venture down there: jump in a counter-clockwise fashion around the single turn block in the pit starting from 12 o'clock to receive a 1-up mushroom.
- Jump into the pit with the Pitchin' Chucks and hit the fourth turn block from the left to reveal a vine. Climb up to get to the cloud platform high above.
- Above a Volcano Lotus Plant just after the previous Dragon Coin.

- This is an area where you can try out your flying skills. Grab the feather in the pit, then use the ramp to run up the pipes. Take off once at the top and try to collect as many coins as you can. If you're good, you will be able to get one or more 1-ups in this section. Enter the pipe at the very end to leave the area.

- A Super Koopa gives you one last opportunity to get a feather in this level.
- Next to the green pipe.
- The ramp does nothing as long as the green switch blocks aren't activated; you will simply pass through the green switch blocks. Once they are, however, you'll have to run up and go through the little pipe maze to get to the exit.
- If you have activated the yellow switch blocks, the Volcano Lotus Plant can be easily bypassed by running under it. As well, a platform helps you get maximum points from the goal tape.
Secret Exit[edit]
This is the first level in the game to feature a secret exit. These hidden exits enable sidepaths on the overworld and allow you to traverse areas that are otherwise unreachable. In the vast majority of cases, secret exits are indicated by a keyhole; you'll need to find the key in the level and put it in the keyhole to complete the level and open the secret exit.
In this level, the key and the keyhole are right next to each other! However, they are on top of the pipe maze and not normally reachable. You have two options:
- You can wait until you complete the Green Switch Palace later on. This way, the green switch blocks will be enabled, and you can simply run up the ramp to get to the key and keyhole.
- If you are confident in your flying skills, you can simply fly up to the pipe maze and get to the key and keyhole this way.
- An easier option could be to grab the Yoshi under the maze and get enough speed with Cape feather then jump off Yoshi.
Carry the key to the keyhole to unlock the secret exit.