(some content from https://strategywiki.org/w/index.php?title=Super_Mario_World/Bosses&oldid=1008226)
(6 intermediate revisions by 5 users not shown)
Line 1:
Line 1:
{{Header Nav|game=Super Mario World}}
{{Header Nav|game=Super Mario World}}
* Part 1
{{SMW/Level
** Bring a mushroom or a cape.
|name=Ludwig's Castle
** Wait for the [[Super Mario World/Enemies#Bony Beetle|Magi Koopas]] to hide and jump on it.
|type=Castle
** Dodge the first [[Super Mario World/Enemies#Ball 'n' Chain|giant mace]], then there are the two other ones that are much harder to avoid.
|entrance=* [[../Butter Bridge 2/]]
* If you don't already have a spare power-up, pick up the mushroom to the right of the door to Part 2.
* [[../Cookie Mountain/]]
* Part 2
|exit=[[../Forest of Illusion 1/]]
** As soon as you get through the door, run. There's a spiked ceiling rushing down. As soon as the ceiling is just above the ON switch, turn it OFF. Dodge the [[Super Mario World/Enemies#Thwomp|Thwomps]] and fireballs.
|timer=300
** The ceiling will come down again, and the path between the lava pit and the safety zone is huge! Dash extra quickly!
}}
* Part 3
The final level before leaving the Twin Bridges area is Ludwig von Koopa's Castle.
** This room is similar to Part 1 of Iggy's Castle, but this time you advance vertically.
** Hit the Koopas on the fences. Move to the right for a "?" block with a cape (or a mushroom if you're small).
** You will need to jump from one fence to another this time. However, you can still score a 1-Up by disrupting fence Koopas. Jump some more fences until you get to the final door.
* Part 4 (Ludwig's Room)
** This room is two screens wide, so at first you won't see [[Super Mario World/Bosses#Ludwig von Koopa|Ludwig]].
** Dodge his fire balls and jump on him. He'll retreat into his shell and jump.
** If you're short on time, or if you don't like to waste time, make sure you Ludwig doesn't go halfway offscreen. After he jumps, repeat the process 3 times until he is defeated.
{{Footer Nav|game=Super Mario World}}
==Walkthrough==
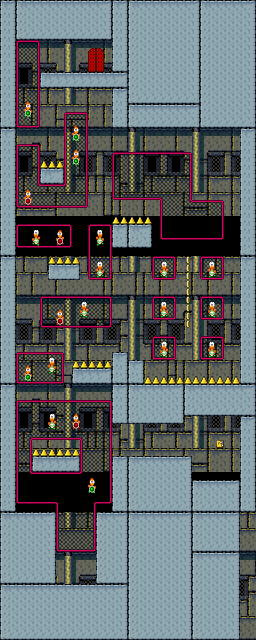
{{Scrolling map|SMW-BBCastle-1.png}}
* Bony Beetles roam these passageways, and they're a bit of a nuisance. Jump on them while their spikes are not up, else you will just get hurt. Once they collapse, quickly run through before they reassemble. Or, as Cape Mario, use your cape to easily get rid of them
* The lone Ball and Chain at the beginning is easy to avoid, but the other set is a bit more challenging. Run past the first two once you see a clear path, pass the third one and duck under the fourth one as it passes by. This should allow you to get through the area without getting hurt.
* There is a secret here most people don't know about. One ceiling tile, near the door at the end, is not solid. (It's the square-shaped part of the ceiling.) You can jump through and climb the structure up to a pipe, where you can play the bonus game. You will arrive at the same place the door would've led you anyway, so it's not a shortcut or anything.
* Collect the mushroom at the end if you need it, then enter the door to the second area.
{{Scrolling map|SMW-BBCastle-2.png}}
* You will start out on the right side. As soon as you appear, the ceiling comes down to crush you!
* The only way to rescue is to run to the left. Even though you're under pressure, you shouldn't just jump blindly over those lava pits; you will just run into the Podoboos. Even if you wait for them to get back down into the lava, you should just barely have enough time.
* Once you see the ON switch, wait until the ceiling comes near (if it isn't already) and jump at it to turn it off. The ceiling will rise back up, giving you some much-needed breathing room. However, once it's back up, it will just come rushing down again, so use the time to make it to the door at the very end!
* After four more lava pits, there are no other obstacles, so you can just run forward without having to fear of running into anything. Enter the door at the end to get to the third area.
{{Scrolling map|SMW-BBCastle-3.png}}
* This room has climbing nets like in Iggy's Castle, but it's oriented vertically rather than horizontally.
* On the first climbing net, you can jump off to the right and grab the feather from the ? block in the alcove if you need it.
* As for jumping between the nets, you should preferably wait until the Koopas are behind the net (or at least somewhere where they can't just run into you). If you fall off, spikes will make sure your descent hurts a lot.
* The boss door's on the left side, so don't bother jumping over to the right. Once there, enter the boss door to face the boss of this castle.
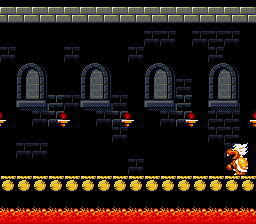
===BOSS: Ludwig von Koopa===
[[File:SMW-BBCastle-4.png|right|Ludwig von Koopa]]
When you first appear here, the room will appear to be empty. Run forward to spot Ludwig. Similar to Iggy Koopa, he spits fireballs at you. You must dodge his fireballs by either jumping or ducking and stomp him while he is firing them. Once you've gotten a hit in, he will get into his shell and spin while trying to hit you, like Morton Koopa. After a few seconds he will jump out shoot fireballs again. Ludwig can be defeated by jumping on him three times or by shooting a dozen fireballs at him with Fire Mario.
After three hits, Ludwig will be history. Mario destroys his castle and move on to the Forest of Illusion.
{{Footer Nav|game=Super Mario World|customprev=[[../Butter Bridge 2/]]|prevpage=Cookie Mountain|nextpage=Forest of Illusion}}
Bony Beetles roam these passageways, and they're a bit of a nuisance. Jump on them while their spikes are not up, else you will just get hurt. Once they collapse, quickly run through before they reassemble. Or, as Cape Mario, use your cape to easily get rid of them
The lone Ball and Chain at the beginning is easy to avoid, but the other set is a bit more challenging. Run past the first two once you see a clear path, pass the third one and duck under the fourth one as it passes by. This should allow you to get through the area without getting hurt.
There is a secret here most people don't know about. One ceiling tile, near the door at the end, is not solid. (It's the square-shaped part of the ceiling.) You can jump through and climb the structure up to a pipe, where you can play the bonus game. You will arrive at the same place the door would've led you anyway, so it's not a shortcut or anything.
Collect the mushroom at the end if you need it, then enter the door to the second area.
You will start out on the right side. As soon as you appear, the ceiling comes down to crush you!
The only way to rescue is to run to the left. Even though you're under pressure, you shouldn't just jump blindly over those lava pits; you will just run into the Podoboos. Even if you wait for them to get back down into the lava, you should just barely have enough time.
Once you see the ON switch, wait until the ceiling comes near (if it isn't already) and jump at it to turn it off. The ceiling will rise back up, giving you some much-needed breathing room. However, once it's back up, it will just come rushing down again, so use the time to make it to the door at the very end!
After four more lava pits, there are no other obstacles, so you can just run forward without having to fear of running into anything. Enter the door at the end to get to the third area.
This room has climbing nets like in Iggy's Castle, but it's oriented vertically rather than horizontally.
On the first climbing net, you can jump off to the right and grab the feather from the ? block in the alcove if you need it.
As for jumping between the nets, you should preferably wait until the Koopas are behind the net (or at least somewhere where they can't just run into you). If you fall off, spikes will make sure your descent hurts a lot.
The boss door's on the left side, so don't bother jumping over to the right. Once there, enter the boss door to face the boss of this castle.
When you first appear here, the room will appear to be empty. Run forward to spot Ludwig. Similar to Iggy Koopa, he spits fireballs at you. You must dodge his fireballs by either jumping or ducking and stomp him while he is firing them. Once you've gotten a hit in, he will get into his shell and spin while trying to hit you, like Morton Koopa. After a few seconds he will jump out shoot fireballs again. Ludwig can be defeated by jumping on him three times or by shooting a dozen fireballs at him with Fire Mario.
After three hits, Ludwig will be history. Mario destroys his castle and move on to the Forest of Illusion.