Jump to navigation
Jump to search
m (footer nav link) |
(revamp) |
||
| Line 1: | Line 1: | ||
{{Header Nav|game=Super Mario World}} | {{Header Nav|game=Super Mario World}} | ||
{{Infobox_SMW_Level | |||
|level name=Iggy's Castle | |||
|image= | |||
|level type=Castle | |||
|entrance=[[Super Mario World/Donut Plains 4|Donut Plains 4]] | |||
|exit=[[Super Mario World/Vanilla Dome 1|Vanilla Dome 1]] | |||
|secret exit=''None'' | |||
|time at start=400 | |||
}} | |||
==Walkthrough== | |||
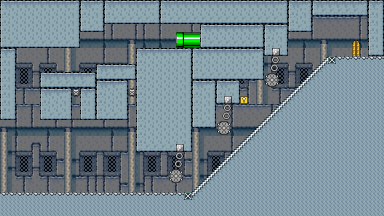
* | {{Scrolling map|SMW-DPCastle-1.png}} | ||
* As soon as the level starts, [[Super Mario World/Enemies#Thwimp|Thwimps]] will come falling from above. These simply jump back and forth, and you can easily run under them to avoid them. | |||
* Ball and Chains are guarding the conveyor belt. You'll need to avoid them to safely get up. If you have activated the yellow switch blocks, you can get a mushroom on the way. | |||
* | * Enter the door at the end to arrive at the second area. | ||
* | * If you are Cape Mario, fly up at the very beginning to get to a secret passage. Enter the pipe there and you'll be able to play the bonus game. This also serves as a shortcut to the third area! | ||
* | |||
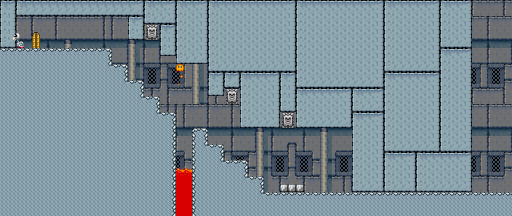
** | {{Scrolling map|SMW-DPCastle-2.png}} | ||
* You'll appear at the bottom right and must make your way to the door at the top-left. | |||
* The Thwomps can't be outrun as easily as their smaller brethren. Stand near them so they fall down, then pass under them as they get back up. | |||
** | * Dry Bones can be stomped, but they'll just crumble and get back up after a while. You can only defeat them with your cape. In any case, enter the door to get to the third area. | ||
* | |||
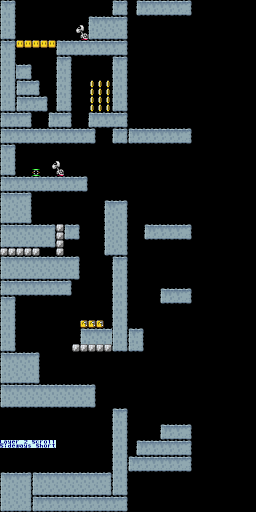
* | {{Scrolling map|SMW-DPCastle-3.png}} | ||
* In this vertical stage, you need to get from the bottom all the way to the top. The stones move from the left to the right and can be used as stepping stones to get to the top, but they can squish you as well if you are not careful. | |||
* The middle ? block out of the group of three contains a feather. | |||
* You'll have to use the Springboard to launch you further up. The right path just contains a few coins, while the left path allows you to continue your ascent. | |||
* The second turn block from the right contains a vine. Use it to climb to the alcove seen in the next section of the map and jump in the middle to reveal a hidden ? block with a 1-up mushroom inside. | |||
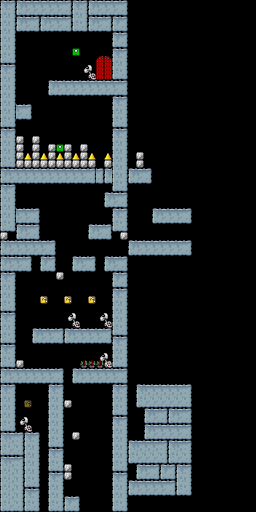
{{Scrolling map|SMW-DPCastle-4.png}} | |||
* To the right, you can snag another hidden 1-up mushroom by walking towards the single Dry Bones hiding in an alcove. | |||
* If you have activated the green switch blocks, you'll get some help near the top. One block will cover a spike, making it a bit easier to cross the spike pit. Another block will provide you with a feather right before the boss door. | |||
===BOSS: Morton Koopa Jr.=== | |||
[[File:SMW-DPCastle-5.png]] | |||
* Morton's strategy is to climb to the ceiling and jump on you from above. To defeat him, you must stomp him three times while he is on the ground. | |||
* The easiest way to do this is to simply jump on him as soon as the fight starts. If you're good, he won't even make it to the ceiling by the time you've defeated him. | |||
* Cape Mario gets an extra bonus here, as he can simply soar and wait until Morton's invulnerability time has expired, and then immediately land on his head again. | |||
After Morton is history, Mario destroys his castle in a cutscene. Your next destination is Vanilla Dome. | |||
{{Footer Nav|game=Super Mario World|prevpage=Donut Plains 4|nextpage=Vanilla Dome 1|nextname=Vanilla Dome}} | {{Footer Nav|game=Super Mario World|prevpage=Donut Plains 4|nextpage=Vanilla Dome 1|nextname=Vanilla Dome}} | ||
Revision as of 14:03, 25 July 2013
Walkthrough

- As soon as the level starts, Thwimps will come falling from above. These simply jump back and forth, and you can easily run under them to avoid them.
- Ball and Chains are guarding the conveyor belt. You'll need to avoid them to safely get up. If you have activated the yellow switch blocks, you can get a mushroom on the way.
- Enter the door at the end to arrive at the second area.
- If you are Cape Mario, fly up at the very beginning to get to a secret passage. Enter the pipe there and you'll be able to play the bonus game. This also serves as a shortcut to the third area!

- You'll appear at the bottom right and must make your way to the door at the top-left.
- The Thwomps can't be outrun as easily as their smaller brethren. Stand near them so they fall down, then pass under them as they get back up.
- Dry Bones can be stomped, but they'll just crumble and get back up after a while. You can only defeat them with your cape. In any case, enter the door to get to the third area.

- In this vertical stage, you need to get from the bottom all the way to the top. The stones move from the left to the right and can be used as stepping stones to get to the top, but they can squish you as well if you are not careful.
- The middle ? block out of the group of three contains a feather.
- You'll have to use the Springboard to launch you further up. The right path just contains a few coins, while the left path allows you to continue your ascent.
- The second turn block from the right contains a vine. Use it to climb to the alcove seen in the next section of the map and jump in the middle to reveal a hidden ? block with a 1-up mushroom inside.

- To the right, you can snag another hidden 1-up mushroom by walking towards the single Dry Bones hiding in an alcove.
- If you have activated the green switch blocks, you'll get some help near the top. One block will cover a spike, making it a bit easier to cross the spike pit. Another block will provide you with a feather right before the boss door.
BOSS: Morton Koopa Jr.

- Morton's strategy is to climb to the ceiling and jump on you from above. To defeat him, you must stomp him three times while he is on the ground.
- The easiest way to do this is to simply jump on him as soon as the fight starts. If you're good, he won't even make it to the ceiling by the time you've defeated him.
- Cape Mario gets an extra bonus here, as he can simply soar and wait until Morton's invulnerability time has expired, and then immediately land on his head again.
After Morton is history, Mario destroys his castle in a cutscene. Your next destination is Vanilla Dome.