The '''Normal Strategy''' is when you go through the level rather slowly, doing everything on the way. This may exclude such things as getting coins or stomping on enemies not in the way and you never fly over the entire level or even just parts of it.
===Start at the Beginning===
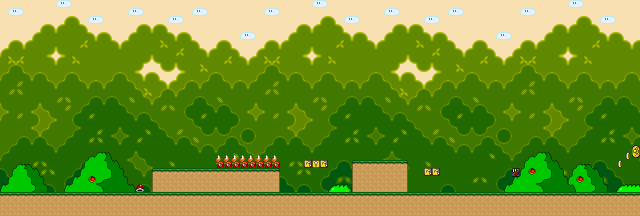
{{Scrolling map|SMW-YI2-1.png}}
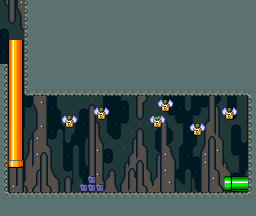
Run past two ledges until you reach two item boxes. A [[Super Mario World/Characters#Yoshi|Yoshi]] is in the second of the two; hit it to release him. Keep running and stomp on a Koopa under a set of coins.<small>[[#Dragon Coin #1|DC#1]]</small> Stomp on another Koopa under another Dragon coin as you keep running. <small>[[#Dragon Coin #2|DC#2]]</small> Run up the set of stairs and avoid a [[Super Mario World/Enemies#Chargin' Chuck|Chargin' Chuck]] at the top of the stairs, where another Dragon coin is just a jump away. <small>[[#Dragon Coin #3|DC#3]]</small>
* At the beginning, you'll see an empty shell lying on the ground. Grab it, jump onto the ledge and kick it forward into the group of marching Koopa Troopas. If the shell hits all of them, you'll get a 1-Up.
* At the group of two ? blocks, jump at the right one to find Yoshi. Jump on him to continue the adventure together. Eat all the red berries in this level to get a free mushroom after the 10th one.
* {{SMW/DC|After the first message block, hovering above a red shell. It is accompanied by a few coins.}}
===Start at the Midway Gate===
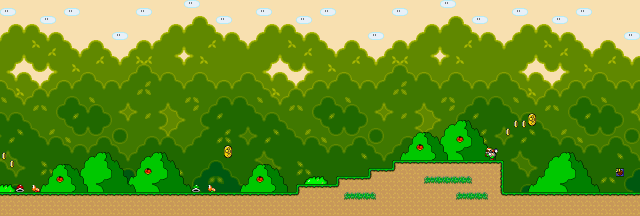
{{Scrolling map|SMW-YI2-2.png}}
After you pass the midway point, jump over two pipes until you reach three item boxes. If you have lost your Yoshi, hit the center box to get another one; if you still have a Yoshi, hit it to get an extra life. After you pass the item boxes, you will see two small ledges and one big one in the middle. Jump up on the second small ledge and you will see two yellow boxes. Hit the second box to cause a beanstalk to sprout. Abandon your Yoshi if you have one and climb up the stalk to reach a line of clouds, where another Dragon coin is located. <small>[[#Dragon Coin #4|DC#4]]<big> Jump down, retrieve your Yoshi, and drop to ground level. Keep running straight on the ground until you reach a ledge and you cannot go straight anymore. Jump on the ledge, then jump up another one on top of it. Avoid the [[Super Mario World/Enemies#Monty Mole|Monty Mole]] that pops up out of the cliff, and jump up while you are on the top level to get another Dragon coin. <small>[[#Dragon Coin #5|DC#5]]<big> If you have pressed the yellow switch at the [[Super Mario World/Yellow Switch Palace|Yellow Switch Palace]] already, hit the yellow box if you have nothing in reserve to get a mushroom.
* Yoshi can swallow colored Koopa shells for special effects. The red shell you can find here lets Yoshi spew fire that destroys all enemies on its way. Use this to easily plow your way through the level.
* {{SMW/DC|Just a bit behind the first Dragon Coin, above a green shell.}}
* {{SMW/DC|Behind the first Chargin' Chuck. Jump from the high ledge to reach it.}}
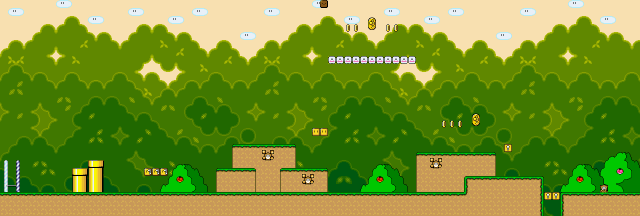
Avoid the following gap (if the yellow boxes are not visible), and continue on straight. Avoid another Monty Mole, and jump over a pipe. Avoid ''another'' mole, and jump over ''another'' pipe. After that, you will reach two pipes, a silver and green one. Either attack the [[Super Mario World/Enemies#Jumpin' Piranha Plant|Jumpin' Piranha Plant]] with fireballs or a cape, or just avoid it. After the plant, you will see the "P" item that changes coins into blocks in the center of a grid of boxes. Line up directly under it and hit the bottom center block with your head to cause it to drop. Step on the "P" block to make all the coins turn into blocks. You will see a row of coins that have been turned into blocks. Avoid the [[Super Mario World/Enemies#Chargin' Chuck|Chargin' Chuck]] by jumping on the blocks, and jump off the end of them to reach the finish line!
{{Scrolling map|SMW-YI2-3.png}}
* The middle out of the three ? blocks contains another Yoshi if you lost him earlier. If you do have him, you'll receive a 1-up mushroom instead.
* The Monty Moles can be eaten by Yoshi even while they're still burying out of the ground. There are two turn blocks near the second one, the right one contains a vine leading to a cloud platform which has some coins. {{SMW/DC|On the cloud platform.}}
* {{SMW/DC|Just before the single pit. Fall down from the cloud platform to land right at its place.}}
==Dragon Coin Strategy==
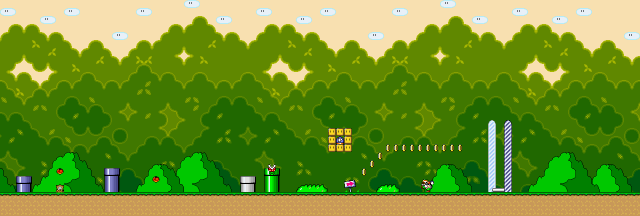
{{Scrolling map|SMW-YI2-4.png}}
The '''Dragon Coin Strategy''' is when you get all the dragon coins (simple enough). You beat everything normally, but your primary goal is to get the dragon coins.
There are multiple floating blocks up high. Most of them have coins, but one contains a 1-up mushroom. You can reach the blocks by jumping while you are running which is a bit tricky, instead you can use the blue blocks on the ground and kick them up against the floating blocks. If you have Yoshi, you can also just jump off Yoshi in mid-air, which will take you high enough to touch the blocks.}}
* The first pipe here leads to the bonus area (pictured at the right). The bonus area exits to the silver pipe near the end of the level. The player can enter this area as many times as they like, within the time limit, and get multiple 1-Up's from this floating block as it spawns each time Mario enters the area.
* At the end, a P-Switch is enclosed in turn blocks. Jump at them from below to cause the P-Switch to fall down, then step on it. This will cause the coins in front of you to turn into blocks, allowing you to bypass the Chargin' Chuck and touch the goal tape at the very top.
To do this, follow the above walkthrough and at each of the links, get the dragon coin.
{{Footer Nav|game=Super Mario World|prevpage=Yoshi's House|nextpage=Yoshi's Island 3}}
===Dragon Coin #1===
Dragon Coin #1 is after the blue speakerbox and with a few other regular coins. Simply jump up to get it.
===Dragon Coin #2===
Dragon Coin #2 is a short distance from coin #1. Again, jump up to retrieve it.
===Dragon Coin #3===
Dragon Coin #3 is after the set of stairs with the first Chargin' Chuck with a few other coins. Jump off the ledge to get it.
===Dragon Coin #4===
Dragon Coin #4 is after the midway point, where there are two small ledges on each side of a big ledge. Find the two boxes on the right ledge and hit the second box. Climb up the beanstalk that sprouts to reach a line of clouds and the fourth Dragon Coin.
===Dragon Coin #5===
Dragon Coin #5 is on top of the ledge following the ones used to get coin #4. Jump up onto the top of the ledge and jump again to get it.
==Quick Strategy==
The '''Quick Strategy''' focuses on speed. Coins, points, lives, or anything else are of no importance. Ideally, you'll pass the entire level in 40 game seconds (360 left)
==Lives Strategy==
The '''Lives Strategy''' focuses on getting lives, and at the same time, stays as safe as possible. A rule of thumb is, if you can get a life, then be in greater danger than before, that is worth it, because if you die, you don't lose any lives and if you survive, you gain a life. The lives strategy also goes for mushrooms, fire flowers, and cape feathers as well because they save lives.
==Secrets==
The first small blue pipe in the level can be entered, and inside, there are four blue blocks that can be picked up by holding Y and tossed up into flying item boxes by pressing up and letting go of Y, which can give extra lives or coins.
==Enemies==
This is a list of the enemies that appear on '''Yoshi's Island 2''', in order that they appear first:
* 11 [[Super Mario World/Enemies#Koopa|Koopas]]
* 1 [[Super Mario World/Enemies#Jumpin' Piranha Plant|Jumpin' Piranha Plants]]
* 2 [[Super Mario World/Enemies#Chargin' Chuck|Chargin' Chuck]]
* 5 [[Super Mario World/Enemies#Monty Mole|Monty Moles]] (Though more can appear from the holes left behind)
==Items==
This is a list of the items you can get on '''Yoshi's Island 2''', in order that they appear first:
* 1 Mushroom (if yellow switch was pressed)
* 1 Yoshi egg
* 1 Yoshi egg
* 1 Mushroom (if yellow switch was pressed)
* 1 "P" block
{{Footer Nav|game=Super Mario World|prevpage=Yellow Switch Palace|nextpage=Yoshi's Island 3}}
Yoshi's Island 2 is the second level on Yoshi's Island.
At the beginning, you'll see an empty shell lying on the ground. Grab it, jump onto the ledge and kick it forward into the group of marching Koopa Troopas. If the shell hits all of them, you'll get a 1-Up.
At the group of two ? blocks, jump at the right one to find Yoshi. Jump on him to continue the adventure together. Eat all the red berries in this level to get a free mushroom after the 10th one.
After the first message block, hovering above a red shell. It is accompanied by a few coins.
Yoshi can swallow colored Koopa shells for special effects. The red shell you can find here lets Yoshi spew fire that destroys all enemies on its way. Use this to easily plow your way through the level.
Just a bit behind the first Dragon Coin, above a green shell.
Behind the first Chargin' Chuck. Jump from the high ledge to reach it.
The middle out of the three ? blocks contains another Yoshi if you lost him earlier. If you do have him, you'll receive a 1-up mushroom instead.
The Monty Moles can be eaten by Yoshi even while they're still burying out of the ground. There are two turn blocks near the second one, the right one contains a vine leading to a cloud platform which has some coins. On the cloud platform.
Just before the single pit. Fall down from the cloud platform to land right at its place.
Bonus Area
Bonus Area
There are multiple floating blocks up high. Most of them have coins, but one contains a 1-up mushroom. You can reach the blocks by jumping while you are running which is a bit tricky, instead you can use the blue blocks on the ground and kick them up against the floating blocks. If you have Yoshi, you can also just jump off Yoshi in mid-air, which will take you high enough to touch the blocks.
The first pipe here leads to the bonus area (pictured at the right). The bonus area exits to the silver pipe near the end of the level. The player can enter this area as many times as they like, within the time limit, and get multiple 1-Up's from this floating block as it spawns each time Mario enters the area.
At the end, a P-Switch is enclosed in turn blocks. Jump at them from below to cause the P-Switch to fall down, then step on it. This will cause the coins in front of you to turn into blocks, allowing you to bypass the Chargin' Chuck and touch the goal tape at the very top.


 After the first message block, hovering above a red shell. It is accompanied by a few coins.


