entrance = [[Super Mario World/Yoshi's Island/Yoshi's Island 4|Yoshi's Island 4]] |
|image=SMW Yoshi's Island 3.png
exit = [[Super Mario World/Yoshi's Island/Yoshi's Island 2|Yoshi's Island 2]] |
|type=Elevated
secret_exit = ''None'' |
|entrance=[[../Yoshi's Island 2/]]
|exit=[[../Yoshi's Island 4/]]
|timer=300
}}
}}
Yoshi's Island 3 is the third level on Yoshi's Island.
[[Image:Yoshi's Island 3.PNG|thumb|An overhead view of Yoshi's Island, with Yoshi's Island 3 in red.]]
{{Scrolling map|SMW-YI3-1.png}}
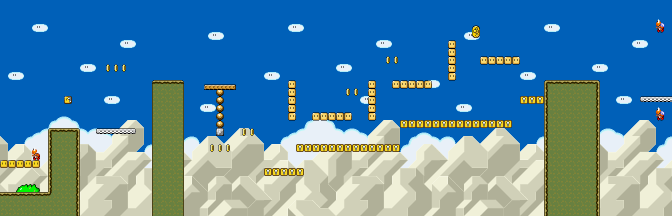
* This level will be much easier if you completed the Yellow Switch Palace and activated the yellow switch blocks. They will block most of the pits in this level, preventing you from falling down.
* The wooden platform swings around depending on where on the platform Mario is standing. When it's at the very right do a swift jump to safety to the right.
* If the yellow switch blocks are there, you can get two mushrooms here: one is past the first wooden platform, from there fall down the pit and you'll be able to get another mushroom. If not, you'll have to do without these, but you'll get an opportunity to snag a power-up later in this level.
* The turn blocks you see here expand and contract horizontally. You'll need to predict their movements correctly so you don't fall down into the abyss. {{SMW/DC|Above the first set of turn blocks.}} With the yellow switch blocks, this level will be much more forgiving.
* The second ? block from the group of two ? blocks has Yoshi if you don't have him, or a 1-up mushroom if you do.
Yoshi's Island 3 is the third level on [[SMW: Yoshi's Island|Yoshi's Island]].
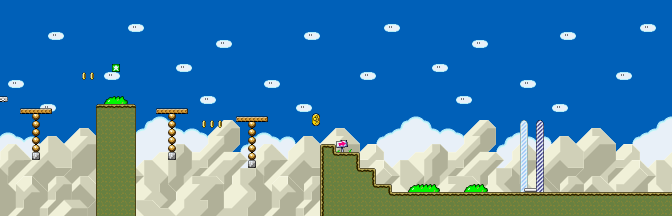
Use the P-Switch here to turn the coins into blocks, forming a bridge that allows you to safely cross the lava pit. {{SMW/DC|At the end of the lava pit.}}}}
* The platforms you find here move back and forth - the first one from left to right, the second one from top to bottom. Use these to cross the pit safely.
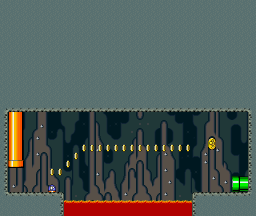
* After the lone Koopa Troopa, fall down the pit to discover a yellow pipe which leads to a bonus area (pictured at the right). You'll return at the red pipe before the midway gate.
* If you chose to not go through the bonus area, you'll have to jump from one wooden platform to the next to cross the pit, which is a tricky manoeuvre. Take your time and carefully jump across.
* {{SMW/DC|Next to the midway gate.}}
{{-}}
{{Scrolling map|SMW-YI3-3.png}}
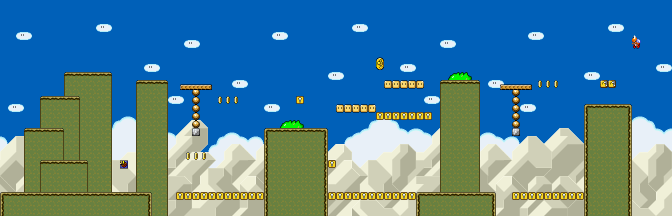
* The lone ? block offers a flower, a much-needed upgrade especially for players who don't have the yellow switch blocks to aid them.
* After the next wooden platform, you'll find turn blocks that alternate between expanding and contracting vertically and horizontally. Anticipate which way they're going next to cross the pit safely. {{SMW/DC|At the end of the second set of turn blocks.}}
==Walkthrough==
{{Scrolling map|SMW-YI3-4.png}}
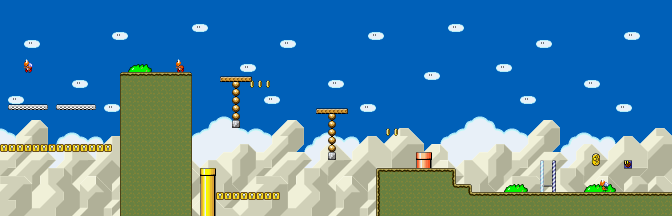
* If you have collected 30 coins in this level, the green star block will give you a 1-up mushroom as a reward. It's difficult to do this, and only recommended if you're an experienced player.
* {{SMW/DC|Just before the end of the level, hovering above the last pit.}}
===Normal Strategy===
{{Footer Nav|game=Super Mario World|prevpage=Yoshi's Island 2|nextpage=Yoshi's Island 4}}
The '''Normal Strategy''' is when you go through the level rather slowly, doing everything on the way. This may exclude such things as getting coins or stomping on enemies not in the way and you never fly over the entire level or even just parts of it.
====Start at the Beginning====
Begin by jumping up the series of platforms until you reach the top of the cliff. Jump onto the brown platform and wait until it swings close enough to the next cliff before you jump onto it. Hit the yellow item box to get a mushroom (if you have already hit the yellow switch). Jump onto the row of blocks that extend and retract, and stay on the middle block. Jump up to get a Dragon Coin.<small>[[#Dragon Coin #1|DC#1]]<big> Jump onto the next series of retracting blocks, then jump onto another cliff, and then onto another brown platform, which will carry you over to another cliff. There are two item boxes on this cliff. Hit the second one to get a [[SMW: Yoshi|Yoshi]]. Jump onto the moving white platform, then jump onto another one and then onto another cliff. You will see two brown rotating platforms ahead of you. Jump onto the forst one and wait until it carries you to the bottom (do not jump onto the second one). You will see a yellow pipe underneath you. Jump onto the pipe and press down to enter it. Once inside, hit the "P" block to turn all the coins into blocks. Run across the blocks to get another Dragon Coin <small>[[#Dragon Coin #2|DC#2]]<big> and jump off the other side to get to the green pipe. Go into the green pipe, and you will emerge out of a reddish pipe. Run straight forward to get to the midway gate.
====Start at the Midway Gate====
After you pass the midway point, keep running until you see a Dragon Coin. <small>[[#Dragon Coin #3|DC#3]]</small> Jump up to get it. Next, jump onto the blocks with the red [[SMW: Koopa|Koopa]] on them and then jump up to the top of the cliff where an item box is. If you have a mushroom already, this box will give you a Fire Flower. Jump onto the moving white platform, then onto the cliff, then onto the rotating brown platform, and finally onto a set of retracting blocks. Keep moving along the sets of blocks until you reach a Dragon Coin on the final set. <small>[[#Dragon Coin #4|DC#4]]<big> Jump up to get it. Jump onto the cliff, then jump off again to get to another white platform, then again to a brown rotating platform. Jump off the brown one onto a cliff with a green star box on it. After you hit the box, jump onto two more rotating platforms and get the Dragon Coin at the end of them. <small>[[#Dragon Coin #5|DC#5]]<big> Jump onto the final piece of land and run all the way to the finish.
===Dragon Coin Strategy===
The '''Dragon Coin Strategy''' is when you get all the dragon coins (simple enough). You beat everything normally, but your primary goal is to get the dragon coins.
To do this, follow the above walkthrough and at each of the links, get the dragon coin.
====Dragon Coin #1====
Dragon Coin #1 is located at the first set of expanding and retracting blocks, just at the end.
====Dragon Coin #2====
Dragon Coin #2 is where the first two consecutive brown platforms are. Jump down from the first platform to reach a yellow pipe. Go into the pipe and use the "P" block to change the coins into blocks, so you can walk over them and get the coin.
====Dragon Coin #3====
Dragon Coin #3 is after the set of stairs with the first Chargin' Chuck with a few other coins. Jump off the ledge to get it.
====Dragon Coin #4====
Dragon Coin #4 is at the next set of expanding and retracting blocks, at the end.
====Dragon Coin #5====
Dragon Coin #5 is right before the final piece of land with the finish line; you will probably be able to get it while jumping from the last rotating platform onto the piece of land.
===Quick Strategy===
The '''Quick Strategy''' focuses on speed. Coins, points, lives, or anything else are of no importance.
===Lives Strategy===
The '''Lives Strategy''' focuses on getting lives, and at the same time, stays as safe as possible. A rule of thumb is, if you can get a life, then be in greater danger than before, that is worth it, because if you die, you don't lose any lives and if you survive, you gain a life. The lives strategy also goes for mushrooms, fire flowers, and cape feathers as well because they save lives.
==Enemies==
This is a list of the enemies that appear on '''Yoshi's Island 3''', in order that they appear first:
* 7 [[SMW: Koopa|Koopas]]
==Items==
This is a list of the items you can get on '''Yoshi's Island 3''', in order that they appear first:
* 1 Mushroom (if yellow switch was pressed)
* 1 Yoshi egg
* 1 "P" block
* 1 Mushroom/Fire Flower (depending on current status)
<big>[[Super Mario World|Return to Table of Contents]]
Yoshi's Island 3 is the third level on Yoshi's Island.
This level will be much easier if you completed the Yellow Switch Palace and activated the yellow switch blocks. They will block most of the pits in this level, preventing you from falling down.
The wooden platform swings around depending on where on the platform Mario is standing. When it's at the very right do a swift jump to safety to the right.
If the yellow switch blocks are there, you can get two mushrooms here: one is past the first wooden platform, from there fall down the pit and you'll be able to get another mushroom. If not, you'll have to do without these, but you'll get an opportunity to snag a power-up later in this level.
The turn blocks you see here expand and contract horizontally. You'll need to predict their movements correctly so you don't fall down into the abyss. Above the first set of turn blocks. With the yellow switch blocks, this level will be much more forgiving.
The second ? block from the group of two ? blocks has Yoshi if you don't have him, or a 1-up mushroom if you do.
Bonus Area
Bonus Area
Use the P-Switch here to turn the coins into blocks, forming a bridge that allows you to safely cross the lava pit. At the end of the lava pit.
The platforms you find here move back and forth - the first one from left to right, the second one from top to bottom. Use these to cross the pit safely.
After the lone Koopa Troopa, fall down the pit to discover a yellow pipe which leads to a bonus area (pictured at the right). You'll return at the red pipe before the midway gate.
If you chose to not go through the bonus area, you'll have to jump from one wooden platform to the next to cross the pit, which is a tricky manoeuvre. Take your time and carefully jump across.
Next to the midway gate.
The lone ? block offers a flower, a much-needed upgrade especially for players who don't have the yellow switch blocks to aid them.
After the next wooden platform, you'll find turn blocks that alternate between expanding and contracting vertically and horizontally. Anticipate which way they're going next to cross the pit safely. At the end of the second set of turn blocks.
If you have collected 30 coins in this level, the green star block will give you a 1-up mushroom as a reward. It's difficult to do this, and only recommended if you're an experienced player.
Just before the end of the level, hovering above the last pit.
 At the end of the lava pit.