Notmyhandle (talk | contribs) (Image -> File) |
Notmyhandle (talk | contribs) (missed one; Image -> File) |
||
| Line 21: | Line 21: | ||
Now enter the Keep and go left. Kill one of Batlin Companion and go right to attack 2 of Batlin's Companion and Palos. While 2 of them died fast, Palos cannot be killed and Batlin will come in and say that Cantra is dead and the last Bane is his. He and Palos will then dissapear. Check the Desk in the next Room for Protection Scroll, Invisibility Scroll and Telekinesis Scroll. If you hadn't buyed Invisibility, then transcribe this one in the Book. Go up the Stairs and the Earth Serpent will speak to you and telling you to go the Temple and searching for the Eye of the Moon. | Now enter the Keep and go left. Kill one of Batlin Companion and go right to attack 2 of Batlin's Companion and Palos. While 2 of them died fast, Palos cannot be killed and Batlin will come in and say that Cantra is dead and the last Bane is his. He and Palos will then dissapear. Check the Desk in the next Room for Protection Scroll, Invisibility Scroll and Telekinesis Scroll. If you hadn't buyed Invisibility, then transcribe this one in the Book. Go up the Stairs and the Earth Serpent will speak to you and telling you to go the Temple and searching for the Eye of the Moon. | ||
{{-}}{{sidebar|width=200px|title=Beatrix|contents=If Shamino dies after you've spoken to her, then Beatrix will heal him and give him a Book and then depart to the Netherworld.}} | {{-}}{{sidebar|width=200px|title=Beatrix|contents=If Shamino dies after you've spoken to her, then Beatrix will heal him and give him a Book and then depart to the Netherworld.}} | ||
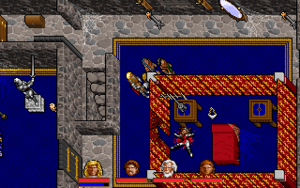
[[ | [[File:Ultima_VII_-_SI_-_Cantra_dead.png|left|thumb|Too Late!]] | ||
The Room to the Left have 44 Gold Coins and the Chest only have some Armors. Go near Cantra Corpse and a Monk from Monk Isle will show up and take the Corse to Monk Isle. Use the Hound Whistle again and let it track Batlin's Medaillon. He will then point to the North. At (28S, 3E) is the Entrance to the Cave to the [[Ultima_VII_Part_Two:_Serpent_Isle/Frozen Lands|Frozen Lands]]. | The Room to the Left have 44 Gold Coins and the Chest only have some Armors. Go near Cantra Corpse and a Monk from Monk Isle will show up and take the Corse to Monk Isle. Use the Hound Whistle again and let it track Batlin's Medaillon. He will then point to the North. At (28S, 3E) is the Entrance to the Cave to the [[Ultima_VII_Part_Two:_Serpent_Isle/Frozen Lands|Frozen Lands]]. | ||
{{-}} | {{-}} | ||
Revision as of 17:44, 4 May 2012
Great Forest
Go North to the Village at (0S, 66E) to meet Draygan. He will warn you from Morghrim and tell lies to how he came to Power. Talk to Beryl to hear what truly happened and how Draygan is invincible, but tell you to treat a Arrow with King's Savior to put Draygan to sleep. She also tell you where Morghrim live. In the Mine are some Gold Nugget and Gold Bar to grab. There is also a secret Passage leading right to a Chamber with 99 Monetari, 99 Filari, 99 Guilders, Lighting Whip, Fire Wand and Lighting Wand. The Secret Passage is below the Chest with 2 Rings inside.
In other House are 20 Arrows and Magic Gauntlets. You need the normal Arrow to be treated with King's Savior. Go to Morghrim's House at (54S, 23W) and talk with him. He will tell you more on Hound of Doskar, Orb of Elerion, King's Savior and Ultima VIII: Pagan. In his House is some Jewelry and Potions. You will find about 15 King's Savior at (35S, 42W). Use it on Normal Arrows to change it in Sleep Arrows.
Go back in Village and shoot Draygan with the Sleep Arrow and get Great Helm, Magic Leggings and Orb of Elerion from the Corpse. Forest Master Morghrim will appear and want the Orb of Elerion back so give it to him. In return you will receive the Whistle to call ![]() Hound of Doskar.
Hound of Doskar.
Shamino's Castle

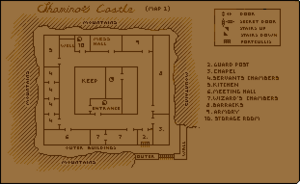
Drop the Wooden Sword on the Ground and use the Hound Whistle to call a Hound of Doskar. Let it track the Wooden Sword and it will point to the east where the Castle is. The Castle is at (3N, 99E) and if you come near it, Shamino will remember it and will draw a Map of the Castle if you wish so and he will tell you of a secret Passage to the Castle. The Secret Entrance is at (2S, 78E) so enter it through the Fake wall between the Stump. There is only one Path to take to the Stairs below.

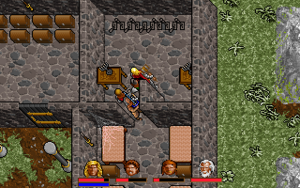
Go North all the Way to a Cyclops. Kill him and get the Magic Shield, Magic Helm, 25 Magic Bolts, 19 Bolts from the Chest. Go South, West and North to the Stairs. You will then be greeted by Ghost Beatrix. Click on the Wall to the South to open the Way into Castle. Go West and enter the Kitchen, but the Oven are trapped. The Corpse have a Diary that tell you what he was doing with Batlin and how they hunted down Banes. The Meeting Hall has another Trap. If you go near the Podium the Statue of Armor will come to Life and attack you. In Barracks a bunch of Undeads will attack you. Go North and click on the Wall to gain access to the Switch Room. Pull down all Lever to unlock all Doors in Castle. The Chests in Barracks are mostly locked and only contain normal Armor. In Chapel Beatrix will appear again and attack Shamino for abandoning her and disapear again.
In Wizard's Champer Beatrix appear once more to attack Shamino and vanish again. Get the Red Key from the invisible Chest in Bedroom. It open the Door to the Chest and 3 Scrolls which are: Detect Trap Scroll, Light Scroll and Mass Cure Scroll. The other Chests have lots of Reagents to take. In Servant's Chambers is nothing of Interest except of Spiders. In Armory are 8 Chests of which 4 front Chests are empty and the back Chests cannot be picked so you have to destroy them. There are some Armors, Magic Axe, Fire Wand, Dragonslayer Sword and a Note from Beatrix. The Armory is also where we meet Beatrix a third Time.
Now enter the Keep and go left. Kill one of Batlin Companion and go right to attack 2 of Batlin's Companion and Palos. While 2 of them died fast, Palos cannot be killed and Batlin will come in and say that Cantra is dead and the last Bane is his. He and Palos will then dissapear. Check the Desk in the next Room for Protection Scroll, Invisibility Scroll and Telekinesis Scroll. If you hadn't buyed Invisibility, then transcribe this one in the Book. Go up the Stairs and the Earth Serpent will speak to you and telling you to go the Temple and searching for the Eye of the Moon.

The Room to the Left have 44 Gold Coins and the Chest only have some Armors. Go near Cantra Corpse and a Monk from Monk Isle will show up and take the Corse to Monk Isle. Use the Hound Whistle again and let it track Batlin's Medaillon. He will then point to the North. At (28S, 3E) is the Entrance to the Cave to the Frozen Lands.
Opportunities
Ruined Camp
At (30S, 48E) you will find some dead Corpse and living Wolf. Kill them all and read the Journal on the Barrel. At the end of the Journal you will read the Name Draygan.
Hidden Cave
At (S, E) is another hidden Cave behind a Tree. Inside are 32 Guilders, some Gems, Magic Bow, 34 Magic Arrows and some Food to get.
Hollow Tree
At (26S, 19E) is a Hollow Tree with 50 Filari inside it.
Hollow Tree
At (20S, 44E) is 2 Mandrake Roots to find.
Hollow Tree
At (15S, 49E) is a Decorative Sword and 23 Burst Arrows.
Hamlinberg
In one of 4 House at (25S, 45E) are some Potions and 21 Burst Arrows. In another House have 12 Magic Arrows. In the third House is some Mandrake Roots.
Hazards Lodge
At (17S, 28E) is a Trapper House. Kill the Trapper inside and get on second Etage to pick up some Mandrake Roots and more Trapper. Both Chest by the Beds are trapped so destroy it. The right one has 6 Lockpicks. Pick the Chest for 5 Cloaks. You will need it soon, but leave the Gwani Cloak there. The Note tell you that Hazard took the Glass Sword, which belongs to you, to the North. On the Table by the Entrance are a Key and some Potions.