StarCraft/Protoss mission 6: Into the Darkness
| Protoss mission 6: Into the Darkness | |
|---|---|
| Location | Char Installation |
| Special Units |
|
| New Units | None |
| New Enemy Units | Zerg Infested Terran |
| Special Structures | Beacons (dispersed throughout the map) |
| Objectives | |
| |
From beginning to the Protoss Teleport Beacon[edit]
This scenario is a lot more difficult than the other installation missions you've played so far. You get a different hero and face many more enemies and traps to fight through.

You start in the upper left corner of the map. Just follow the path for a while, using your Zealots to easily dispatch the Hydralisks and Zerglings that stand in your way (by the way, your Zealots are equipped with the leg implants, and are fully upgraded to level 3 in weapons, armor, and shields even if you neglected to do so in the previous mission). Soon you'll come to some stairs; descend it to the lowered area, and proceed, being careful to stick to the upper wall of the room. This is because there's an Infested Terran lurking in the area above the lower wall (the first of many), and if he sees you he'll come down and attack. At this point in the mission, you have no useful ranged units (Tassadar has a ranged attack, but it's hardly more than a Mutalisk's range), so it's tricky to take these out before they explode. As you play this mission, remember that these Infested Terrans deal 500 damage, which means Tassadar can be killed in one fell swoop (explosion, rather). More information on how to avoid this later.

Go into the next room and go slightly north. Among the grisly remains (get used to them, by the way), you'll find a team of five Marines, sitting around and willing to give you a hand. You have a choice here: if you take them along, you will have a significant boost in firepower (and these are not the only Terrans available on the map) and therefore will be able to make it through most of the mission more easily, but the Marines will also trigger some traps along the way that cannot be triggered by your Protoss units. These traps usually consist only of several Zerglings and Infested Terrans, though, so it's probably a better idea to just take them along. As you fight with the Marines, remember that they don't have regenerating shields like your Zealots, nor do they have friendly Medics such as in Brood War; therefore, try to have your Protoss units take damage for the Marines if at all possible.

In the southwest corner of the same room, you'll find some burrowed Hydralisks. You could take them out with the Zealots and Marines, but it's much easier to just Psi Storm them away. After they're dead, continue through the door they were guarding (yes, this is a detour, but it's worth it). After dispatching another set of Hydralisks, you'll find four more Marines in the room at the end. Add these to your party and go back to where you found the first five Marines; from there, start again to the southeast.

Now that you have ranged firepower (assuming that you're taking the Terrans as you go), you have ways to get around things. Take the next door that you come to, for example: on the other side, three or four Zerglings are buried to each side of the door. You could barge in with the Zealots, but it's a much smarter idea to lure the Zerglings out by going near their position (without going through the door; just get as close as you can while still on this side), then having the Marines shoot 'em up (they can shoot through doors). Zerg units cannot open doors, so your own units will not suffer a scratch. Rinse and repeat for the other side.

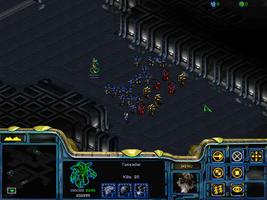
Carefully enter the room. There are some Zerglings and—more critically—an Infested Terran on the far side, and if you don't want to risk massive Marine losses, you'll have to do a similar luring trick as before. This time, position all the Marines to one side of the room (stay close to the door that you came through) and Tassadar on the other. Tell both to Hold Position, then send in the quick-footed Zealots to grab the attention of the Zerglings and Infested Terran before running away. The enemy units will get caught in a "gauntlet" of crossfire, and if you positioned the units right, the Infested Terran should die before it reaches either the Marines or Tassadar. Refer to the screenshots for more positioning clarification.

Continue down the path, and stop when you come to a split path. One continues the way you were going, and the other (through two doors) leads northeast. As you can probably guess, the latter is a detour for more units. As soon as you go through these doors, you'll get ambushed by some Zerglings; dispatch them and go a little bit further to the northeast, until you come to a wide walkway across the chasm, leading northwest (there are more Zerg where the Zergligns came from, but there's no reason to waste time on them). Go down that path, and kill the Hydralisks along the way. Before ascending the stairs, destroy the turret that pops up with your Marines (Zealots are not good for this, because they have take more damage while taking them out). When you're on the upper level, step on the Beacon with any of your units, and you'll get reinforcements in the form of two Zealots and a Dragoon that appear in the Teleportation Field.
As you backtrack, don't bother going further into the top right corner of the map—it leads to an area that looks similar to the Teleportation Field at first, but actually holds nothing but lots of enemy Zerglings. Just return to the double doors and resume your trek.
From the Protoss Teleport Beacon to the Unlock Door Beacon[edit]
Now that you have a good number of ranged units, here's a strategy that will save you headaches from Infested Terrans. When advancing through corridors, always lead with Zealots, then if the coast is clear, have the Marines and the Dragoon follow, with Tassadar coming last. If you see any Infested Terrans (or any enemy, really) with the Zealots, get them to chase you and run back to the Marines; your ranged units will smoke whatever it is before they know what happened. You might be cutting it a bit close with those Infested Terrans if there are lots of enemies to kill, so save often. Tassadar doesn't really need to do anything past this point, other than maybe a Psionic Storm or two at appropriate times.

Advance through the corridor, killing everything that stands in your way. Soon, you'll find your party at a crossroad. Going straight will get you further into the map, and the southeast path gets you some more units, but before you go either of these ways, you must take the northwest path, at the end of which lies the beacon that will unlock a mission-critical door for you. This corridor contains a Marine-exclusive trap; the Protoss units will pass unscathed, but any number of Marines will trigger several Zerglings and an Infested Terran. There are a few ways to get past this part without incurring large amounts of damage:
- Have a Marine go down the corridor until he says "Do you hear that?", at which point the aforementioned Zerg will pop up. The Zerglings are burrowed further down the corridor and the Infested Terran a bit behind your Marine; try to have it return to where the rest of the party is so they can blast the enemies to oblivion. If the Zerglings try to burrow back, send in Tassadar and give them a good taste of Psionic Storm.
- Do the same thing as above, but just sacrifice the Marine against the Infested Terran. You'll probably want to do this if you can't seem to get your Marine back alive.
- Leave all the Marines at the crossroads, and proceed into the corridor with just your Protoss units. You'll avoid the confrontation entirely this way, but keep in mind that there's going to be a fair amount of fighting before you get to the beacon—including Infested Terrans that don't have to be triggered.
After you're through the corridor and have taken out the other Infested Terrans, you'll come to a chasm much like the one near the Teleportation Field. Again, take the wide walkway in the middle, destroy the sneaky turret with the Marines, and step on the beacon. You'll be notified that the door is now unlocked.
From the Unlock Door Beacon to the Holding Cell[edit]

Backtrack to the crossroads. As mentioned before, the southeast path will lead to more units, so you should probably take it. You'll only have to proceed a short while when you unveil a large group of Marines standing haplessly. At the same time, a huge number of Zerglings will Unburrow out of the area around them. Just ignore the Zerglings, and focus on getting as many of your newfound Marines out of there as possible; meanwhile, the rest of your units will kill any Zerglings that try to pursue. You should have at least a dozen Marines now; you might have up to sixteen if you were fast. Going further into the trap area will not reveal anything more than about fifty burrowed Zerglings, so don't bother.

Go back to the crossroads again, and this time continue the way you were going originally. However, lead with the Marines here. This is because there are two flame turrets and two missile turrets hidden in the wall almost immediately after you enter the corridor, and as mentioned before, Zealots are not as effective against these (interestingly, Tassadar can take turrets out without much trouble). When all four are gone, go back to the previous strategy of leading with Zealots, because there are three Infested Terrans in this corridor. If the whole bait-and-kill thing is getting old for you, consider an alternate approach where Tassadar casts Hallucination on one of the Zealots, and each of the two dopplegangers created sacrifices itself against an Infested Terran. Tassadar has a lot of energy, so this is actually viable. When you reach the stairs, the Dragoon will not be able to ascend (the Dragoon CAN actually go up the stairs, though getting it up the first few steps can be difficult); instead of having it lurk there, send it to the very beginning of the map. There's a reason for this, coming up later.
A little bit down the road are two floor-mounted turrets; blast them with the Marines, or use Psionic Storm to do it without taking damage. Now you'll be at the door you unlocked earlier. Before barging in with the party, have the ranged units Hold Position outside the door, and inch Tassadar forward into the hallway until you can see some Hydralisks and Zerglings; then, have him cast Psionic Storm just a bit behind the Hydralisks. There's actually an Infested Terran behind them, and if your casting was accurate he will die. If not, lure the weakened Terran into the welcoming gunfire of your Marines. Want to use the Hallucination trick again? Cast it on a Zealot again, and send them both to the Infested Terran. If you're lucky, you can actually make the Terran blow up all the other Zerg around him. If not, mop up with your units.

Now, those Zerg were guarding a door. Go inside and all the way to the end of the room; you'll find more Terrans, this time including three Marines, four Firebats, and a Ghost. Every single one will come in handy in just a minute.
Sending a unit (Terran or not) into the corner right around where you are now will trigger a massive Zerg rush, consisting of dozens of Zerglings, several Hydralisks, and another Infested Terran (don't worry, this is the last one). This thing can be extremely hard to defeat, but there are two strategies that make it easy for you.
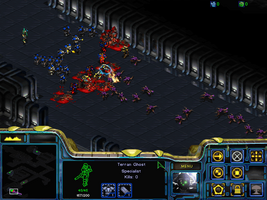
1. Make a "wall" with your units to keep the Zerg from flanking you, and run them into a bloodbath. This requires that you had at least a dozen Marines before finding the latest reinfocements. If you did, set up a wall blocking the corridor, with Zealots and Firebats in the front row, Marines bringing up as many additional rows as you can make, and Tassadar in the back (refer to the screenshot for an example). When you have it, send the Ghost down the corridor until you hear that horrific Zerg awakening sound, at which point you should tell it to Cloak immediately.
The Zerg will ignore the Ghost and run towards your barricade, where the Zealots and Firebats' higher health and massive damage output will aid the more numerous Marines' firepower in quickly bringing the Zerglings down (if it looks like the line's about to break, have Tassadar cast a quick Psionic Storm—but careful, you can fry your own units with that spell!). The fly in the ointment here is that pesky Infested Terran, which can blow up almost that entire barricade by himself while your units are distracted killing other Zerg. To prevent this, have the Ghost de-Cloak after the Terran passes him by, shoot at him, and Cloak again when he tries to attack him; do this several times (until his energy runs out, really) and you'll buy enough time for the other units to kill everyone else. However, at this point in the mission it doesn't really matter even if you lose a lot of units to the Terran; a turret encounter is the only thing you have to fight through after this, and as long as Tassadar is alive, he can take care of that by himself if needed.
2. If you're low on units, you most likely won't be able to execute the above strategy. In this case, back up all your units into the furthest corner of that side room (where you found the Firebats and stuff), and then trigger the swarm with the Ghost again. As long as none of your units are standing too close to the main hallway, the Zerg will ignore you and keep going until the end of the map. This is why you had to send the Dragoon back earlier; if it's standing at a point close enough to the stairs, the Zerg will attack it and then come right back to where they started. If you sent the Dragoon to the beginning of the map, the Zerg will not have enough time to come back even if they decide to do so.
-
Your wall should look roughly like this.
-
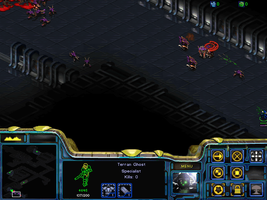
While the bloodbath commences...
-
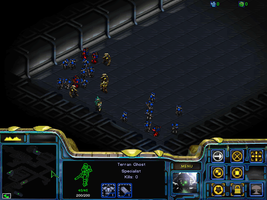
Use the Ghost to distract the Infested Terran.
-
Or you can simply hide here and wait for the swarm to pass.


When the swarm has passed or been killed, proceed into the cell block. Ignore the locked doors, and keep going until the end. You'll come to a room with a beacon, guarded by six floor-mounted guns; even if only Tassadar has survived, these can be taken out easily with either Storm or Tassadar's attack. Step on the beacon to unlock one of the cell doors, and step on the beacon in that cell to rescue Zeratul and the Dark Templar. Enjoy the temporary victory, and make sure to listen to the cutscene (which can't be skipped anyway).

Alternative strategy[edit]
Make extensive use of Hallucination. Not only do hallucinated Zealots make excellent scouts, but they are also a free way to deal with the Infested Terrans—and any other Zerg that you can get caught in the blast radius. However, note that they will not activate any triggers (but will rescue units), so if you come to a door, backtrack and look for alternate paths or hidden burrowed Zerg. Since you'll know exactly where the Zerg are burrowed, you can inch forward in those areas to split even the large groups into groups of two or three Zerglings that will be dead before they leave much impact on your Zealots' shields. When you come across an Infested Terran, simply tell one of the hallucinations to stop, and it'll explode harmlessly. In the situations where there are other Zerg about, try to run both of your units into them so that the detonation kills a few.
This strategy will cause you to spend some time waiting for Tassadar's energy to replenish, but overall will lead to a much easier time in completing the mission.