| Line 50: | Line 50: | ||
|- | |- | ||
|{{SSBB Move|u|b}} | |{{SSBB Move|u|b}} | ||
|Spin Attack||You can charge this attack on the ground to a certain extent. It's also useful for recoveries in the air. | |Spin Attack||You can charge this attack on the ground to a certain extent. It's also useful for recoveries in the air. Knocks enemies away with the ground attack, but keeps them in for a multi-hit with the air attack, with the last hit knocking the enemy away. | ||
|- | |- | ||
|{{SSBB Move|d|b}} | |{{SSBB Move|d|b}} | ||
|Bomb|| | |Bomb||He pulls out a lit bomb. This counts as a held item, so if you already have an item in hand, you can't use this move. This is basically just a bob-omb, but with less damage and much less knockback. | ||
|} | |} | ||
Revision as of 20:27, 13 July 2009

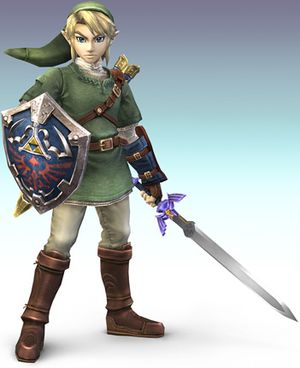
Link has been a favorite since the original Super Smash Bros., and he still shines today. Although his jumps lack in comparison to Toon Link's, his attacks are much more powerful. His down smash is good for a quick attack to both sides, in case you are surrounded. The upward smash is great for dealing damage, creating combinations, and KO-ing opponents because it hits three times and the final strike has a lot of knockback. His sideways smashes have a nice reach, and if you press the attack button again (you can vary your timing to be tricky), he will do a second, more powerful slice than the first one. In addition, link's midair down attack is very powerful, dealing heavy damage with awesome diagonal knockback. Try using a short jump and go straight into the attack, this makes it hard for the opponent to dodge it. Careful, though, as Link is very vulnerable if this attack misses.
- Weight
Link is a middleweight who struggles when it comes to throwing opponents. However, his projectiles give him fantastic edge-guarding capabilities and his final smash is almost a one-hit KO. His speed isn't too bad, not too fast and not too slow and despite being in the lower tier for attack power, his attacks give him better offence than expected. He can deal a good amount of damage and he'll last a little while too.
- Projectiles
Link's Arrows are very fast and can go a long distance when charged. While they may not do as much damage as his bombs or have the aiming capabilities of the Boomarang, the arrow's advantage is their inncredible range, which can be used to strike opponents from the other edge of the stage. If you have Link attempt to pull out an arrow and push backwards on the control stick RIGHT AFTER (Just long enough so Link doesn't throw the Boomarang) he will charge his arrow while facing the opposite direction. Very helpful when being chased, and many characters can do this with their own standing Specials as well.
The boomerang is one of link's best projectiles in a one-on-one match, this is not due to the damage it causes, but the effects the boomerang has. On its way back, it draws players closer to you, allowing you to hit them with a smash attack but it's primary use is in edge-guarding strategies. By learning the distance the boomerang moves you can accurately push opponents back because at the end of the boomerang's path, it pushes enemies back without hurting them. This could be useful when the opponent is trying to recover as you can push them back, making it harder for them. You can use this strategy after curving the boomerang as well to make it easier for you to push the opponents back. His Boomarang can also blow many of the items off of a stage with good aim. Helpful when you really don't want certain items to be lying around.
Bombs are useful in both one-on-one and free-for-all matches, in one-on-one matches, throw the bomb so that it will explode straight away if the opponent catches it. If the opponent is out of reach throw the bomb in mid-air to give it some extra distance. Against a reflector using character, throw the bomb so that it lands just in front of the character, as the enemy can reflect the bomb, but not the explosion. In a free-for-all, throw bombs into groups of enemies to deal a lot of damage to a lot of people. You could also throw it off the edge of a cliff as an edge-guarding tactic as it would be hard for the enemy to dodge if you aimed the bomb well. Also, if you airdodge while holding a Bomb and push the 'Standard Attack' button you will drop the Bomb directly below Link. While it may not differ much from just throwing it downward, you can do this very close to an opponent thanks to the air-dodge. Their is a trick some people employ with Link that is very difficult to pull off but can greatly improve his recovery. What you do is hold a bomb before you get launched off the stage and do his Spin attack like usual, but IF the bomb blows up in your hands after the Spin Attack you will be able to attack again, allowing for another Spin Attack or Clawshot.
- Recovery
The spin attack is a good recovery move and a good move to use if the opponent is in mid-air. Try to connect the final spin of the sword when you use this technique as it deals the most damage and sends foes flying. Avoid using this move on the ground, however, as it leaves you vulnerable to attacks and takes a long time to execute in comparison to other attacks. There is a combo lets Link use the Spin Attack more effectively, just do the first two swings of his standard combo and instead of doing the third slash, activate the Spin Attack to send the foe flying. This lets Link 'trap' the foe with his first two hits so that he can't run from the Spin Attack.
Standard attacks
Press Down + 2 when in the air to make him dive down with his sword and stab foes below.
He uses his master sword for many melee attacks.
Special Attacks
Grab & Throws
Taunts
| Wii Remote + Nunchuk | Wii Remote (sideways) | Wii Classic Controller | GameCube Controller | Taunt |
|---|---|---|---|---|
| Twirls his sword twice and sheaths it, like he does in Twilight Princess. | ||||
| ( |
Summons the fairy that served as a pointer in the Wii edition of The Legend of Zelda: Twilight Princess. | |||
| Stands on one foot and poses, like his taunt in the original Super Smash Bros. |
Final Smash

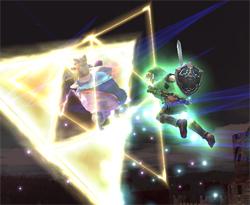
Triforce Slash: Link creates two giant Triforce symbols that trap a character while Link slashes them repeatedly. Two or three characters can be trapped by lining them up before activating the Triforce slash.
Link's final smash, is best activated when an opponent is in the air, as this makes it hard for them to dodge it. If the opportunity arises, however, don't be afraid to activate it on the ground. This final smash can be very useful in killing multiple opponents as other enemies can get caught in the attack if they are grouped together. Use this to your advantage in free for alls and team battles so that you can make the most of the final smash.
Also note that Link's Final Smash can be cancelled in certain landscapes. If the target is behind a diagonal pass-through wall and Link is on the side that's solid, his Final Smash will stop before getting off a single strike. Be careful of this when on Custom Stages.