Notmyhandle (talk | contribs) (→Underground: commas) |
(Page revamped) |
||
| Line 1: | Line 1: | ||
{{Header Nav|game=Pokémon Gold and Silver}} | {{Header Nav|game=Pokémon Gold and Silver}} | ||
{{floatingtoc}} | {{floatingtoc}} | ||
'''After you've defeated seven Gym Leaders, Team Rocket will take over the Radio Tower in Goldenrod City. You'll have to go back to the Radio Tower and the Underground to finish off Team Rocket. There are lots of Team Rocket members in the Tower.''' | |||
== Big trouble in Goldenrod == | |||
The path to the next badge is clear. Professor Elm needs your help in Goldenrod City. Fly down there, pick a roster of strong fighters, and infiltrate the Radio Tower. | |||
=== Floor 1 === | |||
==Floor 1== | [[File:Pokemon GSC map Radio Tower F1.png|frame|right|Floor 1]] | ||
*'''Rocket Grunt''':[[File:Pokemon GSC Rocket Grunt♂.png|left]] | *'''Rocket Grunt''':[[File:Pokemon GSC Rocket Grunt♂.png|left]] | ||
**{{bp|Raticate|24|595}}, | **{{bp|Raticate|24|595}}, | ||
**{{bp|Raticate|24|595}}, | **{{bp|Raticate|24|595}}, | ||
**'''[[File:Pokebuck.png]]960''' | **'''[[File:Pokebuck.png]]960''' | ||
=== Floor 2 === | |||
[[File:Pokemon GSC map Radio Tower F2.png|frame|right|Floor 2]] | |||
==Floor 2== | |||
*'''Rocket Grunt''':[[File:Pokemon GSC Rocket Grunt♀.png|left]] | *'''Rocket Grunt''':[[File:Pokemon GSC Rocket Grunt♀.png|left]] | ||
**{{bp|Arbok|26|819}} | **{{bp|Arbok|26|819}} | ||
| Line 38: | Line 35: | ||
**{{bp|Muk|25|840}} | **{{bp|Muk|25|840}} | ||
**'''[[File:Pokebuck.png]]1000''' | **'''[[File:Pokebuck.png]]1000''' | ||
=== Floor 3 === | |||
[[File:Pokemon GSC map Radio Tower F3.png|frame|right|Floor 3]] | |||
==Floor 3== | You need a key to open the shutters and use the stairs on the right. Until you get one, use the stairs in the middle of the building. After you defeat Team Rocket, the woman closest to the shutters will reward you with '''TM 11''' (Sunny Day). | ||
*'''Rocket Grunt''':[[File:Pokemon GSC Rocket Grunt♂.png|left]] | *'''Rocket Grunt''':[[File:Pokemon GSC Rocket Grunt♂.png|left]] | ||
| Line 59: | Line 55: | ||
**{{bp|Rattata|23|276}} | **{{bp|Rattata|23|276}} | ||
**'''[[File:Pokebuck.png]]920''' | **'''[[File:Pokebuck.png]]920''' | ||
=== Floor 4 === | |||
[[File:Pokemon GSC map Radio Tower F4.png|frame|right|Floor 4]] | |||
==Floor 4== | |||
*'''Rocket Grunt''':[[File:Pokemon GSC Rocket Grunt♂.png|left]] | *'''Rocket Grunt''':[[File:Pokemon GSC Rocket Grunt♂.png|left]] | ||
**{{bp|Zubat|22|252}}, | **{{bp|Zubat|22|252}}, | ||
| Line 76: | Line 67: | ||
**'''[[File:Pokebuck.png]]3000''' | **'''[[File:Pokebuck.png]]3000''' | ||
=== Floor 5 === | |||
==Floor 5== | [[File:Pokemon GSC map Radio Tower F5.png|frame|right|Floor 5]] | ||
After fighting through five floors of Rockets, you can challenge the fake director for the '''Basement Key'''. After you defeat him, he will tell you that the real station manager is being held in the locked-off area of the Underground. Use the key he gives you to open the locked door in the tunnel. | |||
*'''Rocket Executive''':[[File:Pokemon GSC Rocket Executive♂.png|left]] | *'''Rocket Executive''':[[File:Pokemon GSC Rocket Executive♂.png|left]] | ||
**{{bp|Koffing|30|732}}, | **{{bp|Koffing|30|732}}, | ||
| Line 89: | Line 79: | ||
**'''[[File:Pokebuck.png]]2160''' | **'''[[File:Pokebuck.png]]2160''' | ||
== Go underground == | |||
Head back to the Underground area where you can get haircuts for your Pokémon and walk down to the locked door. Use the Basement Key to open the door then enter the Basement. | |||
=== Another rival ambush === | |||
Your rival will reveal himself in the Underground area, and there's no avoiding a battle this time. He is still improving his team of Pokémon. This time, he's got five Pokémon, including the Dark- and Ice-type {{bp|Sneasel}}. Fighting-types are best against Sneasel, but you will be fine if you use Rock- or Fire-types instead. | |||
== | |||
== | |||
{{ | |||
[[File:Pokemon GSC Rival.png|50px|left]] | [[File:Pokemon GSC Rival.png|50px|left]] | ||
'''Rival''': [[File:Pokebuck.png]]1920 | '''Rival''': [[File:Pokebuck.png]]1920 | ||
| Line 110: | Line 90: | ||
*{{bp|Sneasel|32|902}} | *{{bp|Sneasel|32|902}} | ||
*{{bp|Feraligatr}}/{{bp|Typhlosion}}/{{bp|Meganium}} (Starter) (Level 32, 1440 EXP) | *{{bp|Feraligatr}}/{{bp|Typhlosion}}/{{bp|Meganium}} (Starter) (Level 32, 1440 EXP) | ||
=== Flip the switches === | |||
[[File:Pokemon GSC map Goldenrod underground B2.png|right]] | |||
The three switches along the north wall of this floor interact with each other in odd ways, so if you want to accomplish anything, you'll have to flip them in the right order. To get down to the door, you'll need to flip them in order from left to right. You'll need different combinations to reach the items, but they're not really worth the effort. If you get confused or messed up, return to the floor above—the switches will reset. After you talk to the Station Manager, flip the switch closest to the door to get out. | |||
;Items | |||
* Full Heal (accessible via exit) | |||
* Smoke Ball (turn off the middle switch, and then the left switch) | |||
{{-}} | |||
{| | |||
! colspan="6" align="center" style="background:#407040; color:#ffffff;" | Trainers in the Underground | |||
|- | |||
|valign="top" | [[File:Pokemon GSC Rocket Grunt♂.png|left]] | |||
|valign="top" | '''Rocket Grunt''': [[File:Pokebuck.png]]1080 | |||
*{{bp|Rattata|27|324}} | |||
|valign="top" | [[File:Pokemon GSC Rocket Grunt♂.png|left]] | |||
|valign="top" | '''Rocket Grunt''': [[File:Pokebuck.png]]1000 | |||
*{{bp|Muk|23|772}} | |||
*{{bp|Koffing|23|561}} | |||
*{{bp|Rattata|25|304}} | |||
|valign="top" | [[File:Pokemon GSC Rocket Grunt♂.png|left]] | |||
|valign="top" | '''Rocket Grunt''': [[File:Pokebuck.png]]960 | |||
*{{bp|Koffing|24|584}} | |||
*{{bp|Muk|24|807}} | |||
|- | |||
|valign="top" | [[File:Pokemon GSC Burglar.png|left]] | |||
|valign="top" | '''Burglar Eddie''': [[File:Pokebuck.png]]2112 | |||
*{{bp|Growlithe|26|507}} | |||
*{{bp|Koffing|24|585}} | |||
|valign="top" | [[File:Pokemon GSC Burglar.png|left]] | |||
|valign="top" | '''Burglar Duncan''': [[File:Pokebuck.png]]2024 | |||
*{{bp|Koffing|23|561}} | |||
*{{bp|Magmar|25|894}} | |||
=== | *{{bp|Koffing|23|561}} | ||
|valign="top" | [[File:Pokemon GSC Rocket Grunt♀.png|left]] | |||
|valign="top" | '''Rocket Grunt''': [[File:Pokebuck.png]]1000 | |||
*{{bp|Gloom|25|706}} | |||
*{{bp|Gloom|25|706}} | |||
|} | |||
===Rescue the director and get the key=== | |||
[[File:Pokemon GSC map Goldenrod warehouse.png|right]] | |||
The director here will give you the '''Card Key''' that opens up the locked door on the 3rd floor of the Radio Tower. But before you rush back, head up to the basement of the Department Store and grab the money-doubling '''Amulet Coin'''. If you want any of the other items, leave and re-enter to make the crates shift. | |||
;Items | |||
*Ultra Ball | *Ultra Ball | ||
*Max Ether | *Max Ether | ||
*TM35 (Sleep Talk) | *TM35 (Sleep Talk) | ||
*Card Key | *Card Key | ||
{{-}} | |||
{| | |||
{{ | ! colspan="6" align="center" style="background:#407040; color:#ffffff;" | Trainers in the warehouse | ||
|- | |||
|valign="top" | [[File:Pokemon GSC Rocket Grunt♂.png|left]] | |||
|valign="top" | '''Rocket Grunt''': [[File:Pokebuck.png]]960 | |||
*{{bp|Raticate|24|594}} | |||
*{{bp|Golbat|24|872}} | |||
|valign="top" | [[File:Pokemon GSC Rocket Grunt♂.png|left]] | |||
|valign="top" | '''Rocket Grunt''': [[File:Pokebuck.png]]920 | |||
*{{bp|Grimer|26|501}} | |||
*{{bp|Weezing|23|846}} | |||
|valign="top" | [[File:Pokemon GSC Rocket Grunt♂.png|left]] | |||
|valign="top" | '''Rocket Grunt''': [[File:Pokebuck.png]]1000 | |||
*{{bp|Koffing|25|610}} | |||
*{{bp|Koffing|25|610}} | |||
|} | |||
=== Attention Shoppers === | |||
[[File:Pokemon GSC map Goldenrod underground B2.png|thumb|right]] | |||
If this area seems familiar, it's because it's the basement of the {{~|Goldenrod City}} Department Store. If you visit the Basement often, you should eventually be able to access every corner to pick up the items scattered about. | |||
=== | == Final battles in the Radio Tower == | ||
Use the Card Key top open the shutters on the third floor that block the way to the stairs.Then proceed to defeat Team Rocket's Leader and make Team Rocket call it quits. | |||
=== Floor 3 === | |||
[[File:Pokemon GSC map Radio Tower F3.png|frame|right|Floor 3]] | |||
*'''Rocket Grunt''': [[File:Pokebuck.png]]1040 | *'''Rocket Grunt''': [[File:Pokebuck.png]]1040 | ||
**{{bp|Raticate|24|595}} | **{{bp|Raticate|24|595}} | ||
**{{bp|Koffing|26|634}} | **{{bp|Koffing|26|634}} | ||
{{-}} | |||
{{ | === Floor 4 === | ||
=== | [[File:Pokemon GSC map Radio Tower F4.png|frame|right|Floor 4]] | ||
*'''Rocket Grunt'''♀: [[File:Pokebuck.png]]960 | *'''Rocket Grunt'''♀: [[File:Pokebuck.png]]960 | ||
**{{bp|Ekans|21|278}} | **{{bp|Ekans|21|278}} | ||
| Line 187: | Line 173: | ||
*'''Rocket Executive''': [[File:Pokebuck.png]]2592 | *'''Rocket Executive''': [[File:Pokebuck.png]]2592 | ||
**{{bp|Golbat|36|1310}} | **{{bp|Golbat|36|1310}} | ||
=== Floor 5 === | |||
The pair of Rockets on the fifth floor have tough rosters (they're heavy on Dark-type Pokémon, so Fighting and Bug Pokémon work best), but defeating them is the way to drive Team Rocket out of Goldenrod City for good. | |||
=== | [[File:Pokemon GSC map Radio Tower F3.png|frame|right|Floor 5]] | ||
*'''Rocket Executive'''♀: [[File:Pokebuck.png]]2304 | *'''Rocket Executive'''♀: [[File:Pokebuck.png]]2304 | ||
**{{bp|Arbok|32|998}} | **{{bp|Arbok|32|998}} | ||
| Line 199: | Line 185: | ||
**{{bp|Houndoom|35|1530}} | **{{bp|Houndoom|35|1530}} | ||
After | == Collect your rewards == | ||
After Team Rocket is defeated, the real Station Manager will return to his seat in the studio on the fifth floor. He'll reward you with the '''Rainbow Wing''' (Gold version), the '''Silver Wing''' (Silver version), or the '''Clear Bell''' (Crystal version). The wings are the keys to capturing {{bp|Ho-oh}} and {{bp|Lugia}} respectively, while the bell is the new key item that allows you to battle {{bp|Suicune}} in the Tin Tower. Professor Oak's co-host in the office on the fourth floor will give you another '''Pink Bow''', and the woman on the third floor will give you '''TM 11''' (Sunny Day). | |||
{{ | |||
{{Footer Nav|game=Pokémon Gold and Silver|prevpage= | {{Footer Nav|game=Pokémon Gold and Silver|prevpage=Rocket Hideout|nextpage=Route 44|customnext=[[Pokémon Gold and Silver/Return to Ecruteak City|Return to Ecruteak City (Crystal only)]]}} | ||
Revision as of 02:03, 4 April 2014
After you've defeated seven Gym Leaders, Team Rocket will take over the Radio Tower in Goldenrod City. You'll have to go back to the Radio Tower and the Underground to finish off Team Rocket. There are lots of Team Rocket members in the Tower.
Big trouble in Goldenrod
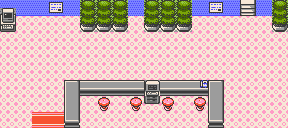
The path to the next badge is clear. Professor Elm needs your help in Goldenrod City. Fly down there, pick a roster of strong fighters, and infiltrate the Radio Tower.
Floor 1
Floor 2
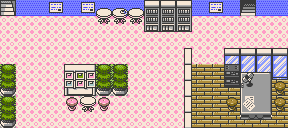
- Rocket Grunt:

- Arbok (lvl. 26, 819 EXP)
 1040
1040
Floor 3
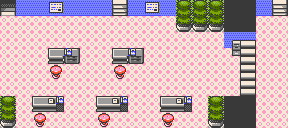
You need a key to open the shutters and use the stairs on the right. Until you get one, use the stairs in the middle of the building. After you defeat Team Rocket, the woman closest to the shutters will reward you with TM 11 (Sunny Day).
- Rocket Grunt:

- Weezing (lvl. 26, 963 EXP)
 1040
1040
Floor 4
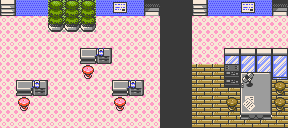
- Scientist Rich:

- Porygon (lvl. 30, 835 EXP)
 3000
3000
Floor 5
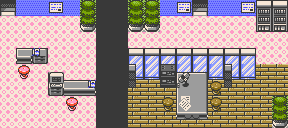
After fighting through five floors of Rockets, you can challenge the fake director for the Basement Key. After you defeat him, he will tell you that the real station manager is being held in the locked-off area of the Underground. Use the key he gives you to open the locked door in the tunnel.
Go underground
Head back to the Underground area where you can get haircuts for your Pokémon and walk down to the locked door. Use the Basement Key to open the door then enter the Basement.
Another rival ambush
Your rival will reveal himself in the Underground area, and there's no avoiding a battle this time. He is still improving his team of Pokémon. This time, he's got five Pokémon, including the Dark- and Ice-type Sneasel. Fighting-types are best against Sneasel, but you will be fine if you use Rock- or Fire-types instead.

- Golbat (lvl. 30, 1092 EXP)
- Magnemite (lvl. 28, 528 EXP)
- Haunter (lvl. 30, 810 EXP)
- Sneasel (lvl. 32, 902 EXP)
- Feraligatr/Typhlosion/Meganium (Starter) (Level 32, 1440 EXP)
Flip the switches
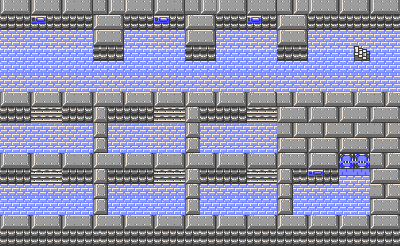
The three switches along the north wall of this floor interact with each other in odd ways, so if you want to accomplish anything, you'll have to flip them in the right order. To get down to the door, you'll need to flip them in order from left to right. You'll need different combinations to reach the items, but they're not really worth the effort. If you get confused or messed up, return to the floor above—the switches will reset. After you talk to the Station Manager, flip the switch closest to the door to get out.
- Items
- Full Heal (accessible via exit)
- Smoke Ball (turn off the middle switch, and then the left switch)
| Trainers in the Underground | |||||
|---|---|---|---|---|---|
Rocket Grunt:
|
Rocket Grunt: |
Rocket Grunt: | |||
| Burglar Eddie: |
Burglar Duncan: |
Rocket Grunt: | |||
Rescue the director and get the key
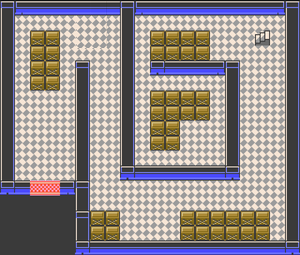
The director here will give you the Card Key that opens up the locked door on the 3rd floor of the Radio Tower. But before you rush back, head up to the basement of the Department Store and grab the money-doubling Amulet Coin. If you want any of the other items, leave and re-enter to make the crates shift.
- Items
- Ultra Ball
- Max Ether
- TM35 (Sleep Talk)
- Card Key
| Trainers in the warehouse | |||||
|---|---|---|---|---|---|
| Rocket Grunt: |
Rocket Grunt: |
Rocket Grunt: | |||
Attention Shoppers
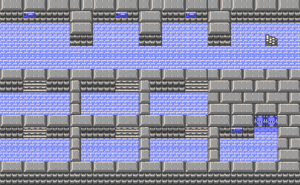
If this area seems familiar, it's because it's the basement of the Template:~ Department Store. If you visit the Basement often, you should eventually be able to access every corner to pick up the items scattered about.
Final battles in the Radio Tower
Use the Card Key top open the shutters on the third floor that block the way to the stairs.Then proceed to defeat Team Rocket's Leader and make Team Rocket call it quits.
Floor 3

Floor 4

- Rocket Grunt♀:
 960
960
- Rocket Executive:
 2592
2592
- Golbat (lvl. 36, 1310 EXP)
Floor 5
The pair of Rockets on the fifth floor have tough rosters (they're heavy on Dark-type Pokémon, so Fighting and Bug Pokémon work best), but defeating them is the way to drive Team Rocket out of Goldenrod City for good.

Collect your rewards
After Team Rocket is defeated, the real Station Manager will return to his seat in the studio on the fifth floor. He'll reward you with the Rainbow Wing (Gold version), the Silver Wing (Silver version), or the Clear Bell (Crystal version). The wings are the keys to capturing Ho-oh and Lugia respectively, while the bell is the new key item that allows you to battle Suicune in the Tin Tower. Professor Oak's co-host in the office on the fourth floor will give you another Pink Bow, and the woman on the third floor will give you TM 11 (Sunny Day).
