SupremeUmanu (talk | contribs) (Use {{pokemon trainer}} template) |
|||
| Line 7: | Line 7: | ||
The first puzzle is available from the start, and it isn't even a puzzle! All it requires is for you to use Cut on the trees that block your way in the maze. You'll need to battle some trainers, but the ultimate goal is to find the scroll located somewhere in the room that contains the password and then make your way to the door at the top right which requires the password. You don't have to memorise the password yourself, but you do have to find the scroll that has it. The room's layout varies between Ruby/Sapphire and Emerald. There is an Orange Mail near the exit, though it requires you to do more cutting to reach it. | The first puzzle is available from the start, and it isn't even a puzzle! All it requires is for you to use Cut on the trees that block your way in the maze. You'll need to battle some trainers, but the ultimate goal is to find the scroll located somewhere in the room that contains the password and then make your way to the door at the top right which requires the password. You don't have to memorise the password yourself, but you do have to find the scroll that has it. The room's layout varies between Ruby/Sapphire and Emerald. There is an Orange Mail near the exit, though it requires you to do more cutting to reach it. | ||
{{col|3|begin}} | |||
{{pokemon trainer | |||
|details='''Lass Sally''' | |||
*{{bp|Oddish|16}} | *{{bp|Oddish|16}} | ||
}} | |||
{{col|2}} | |||
{{pokemon trainer | |||
|details='''Lass Robin''' | |||
*{{bp|Skitty|14}} | *{{bp|Skitty|14}} | ||
*{{bp|Marill|14}} | *{{bp|Marill|14}} | ||
*{{bp|Shroomish|14}} | *{{bp|Shroomish|14}} | ||
}} | |||
{{col|3}} | |||
{{pokemon trainer | |||
|details='''Youngster Eddie''' | |||
*{{bp|Zigzagoon|14}} | *{{bp|Zigzagoon|14}} | ||
*{{bp|Zigzagoon|16}} | *{{bp|Zigzagoon|16}} | ||
}} | |||
{{col|3|end}} | |||
Complete the challenge and you get a Rare Candy. A very good prize, though it's a pity you can only get it once. | Complete the challenge and you get a Rare Candy. A very good prize, though it's a pity you can only get it once. | ||
| Line 27: | Line 35: | ||
Step on the switches to cover the holes leading to the scroll. Memorize the password on the scroll, and enter it at the door to win. This level also contains three Trainers, Wave Mail, and Harbor Mail. | Step on the switches to cover the holes leading to the scroll. Memorize the password on the scroll, and enter it at the door to win. This level also contains three Trainers, Wave Mail, and Harbor Mail. | ||
{{col|3|begin}} | |||
{{pokemon trainer | |||
|details='''School Kid Ted''' | |||
* {{bp|Ralts|17}} | * {{bp|Ralts|17}} | ||
}} | |||
{{col|2}} | |||
{{pokemon trainer | |||
|details='''School Kid Paul''' | |||
* {{bp|Numel|15}} | * {{bp|Numel|15}} | ||
* {{bp|Oddish|15}} | * {{bp|Oddish|15}} | ||
* {{bp|Wingull|15}} | * {{bp|Wingull|15}} | ||
}} | |||
{{col|3}} | |||
{{pokemon trainer | |||
|details='''School Kid Georgia''' | |||
* {{bp|Shroomish|16}} | * {{bp|Shroomish|16}} | ||
* {{bp|Beautifly|16}} | * {{bp|Beautifly|16}} | ||
}} | |||
{{col|3|end}} | |||
Completion of the level earns you a Timer Ball. | Completion of the level earns you a Timer Ball. | ||
| Line 47: | Line 63: | ||
This puzzle requires the Heat Badge and HM06, Rock Smash. There will be a room full of red and blue doors that close and open based on their color. Some switches are covered by Rocks that can be smashed. A Wood Mail and a Shadow Mail can be found. | This puzzle requires the Heat Badge and HM06, Rock Smash. There will be a room full of red and blue doors that close and open based on their color. Some switches are covered by Rocks that can be smashed. A Wood Mail and a Shadow Mail can be found. | ||
{{col|3|begin}} | |||
{{pokemon trainer | |||
|details='''Picnicker Martha''' | |||
* {{bp|Skitty|23}} | * {{bp|Skitty|23}} | ||
* {{bp|Swablu|23}} | * {{bp|Swablu|23}} | ||
}} | |||
{{col|2}} | |||
{{pokemon trainer | |||
|details='''Camper Justin''' | |||
*{{bp|Kecleon|24}} | *{{bp|Kecleon|24}} | ||
}} | |||
{{col|3}} | |||
{{pokemon trainer | |||
|details='''Hiker Alan''' | |||
* {{bp|Geodude|22}} | * {{bp|Geodude|22}} | ||
* {{bp|Graveler|23}} | * {{bp|Graveler|23}} | ||
* {{bp|Nosepass|22}} | * {{bp|Nosepass|22}} | ||
}} | |||
{{col|3|end}} | |||
Completing this puzzle grants the player a Hard Stone, which boosts the power of Rock-type moves by 20% when held. | Completing this puzzle grants the player a Hard Stone, which boosts the power of Rock-type moves by 20% when held. | ||
| Line 69: | Line 93: | ||
'''Trainers''' | '''Trainers''' | ||
{{col|3|begin}} | |||
{{pokemon trainer | |||
|details='''Black Belt Yuji''' | |||
* {{bp|Makuhita|26}} | * {{bp|Makuhita|26}} | ||
* {{bp|Machoke|26}} | * {{bp|Machoke|26}} | ||
}} | |||
{{col|2}} | |||
{{pokemon trainer | |||
|details='''Battle Girl Cora''' | |||
* {{bp|Meditite|27}} | * {{bp|Meditite|27}} | ||
}} | |||
{{col|3}} | |||
{{pokemon trainer | |||
|details='''Hiker Alan''' | |||
* {{bp|Breloom|27}} | * {{bp|Breloom|27}} | ||
}} | |||
{{col|3|end}} | |||
Completing this puzzle grants the Smoke Ball. | Completing this puzzle grants the Smoke Ball. | ||
| Line 108: | Line 142: | ||
The Mind Badge is necessary to unlock this puzzle. It is composed of flipping gates similar to those found in Fortree Gym. A Glitter Mail can be found | The Mind Badge is necessary to unlock this puzzle. It is composed of flipping gates similar to those found in Fortree Gym. A Glitter Mail can be found | ||
{{col|3|begin}} | |||
{{pokemon trainer | |||
|details='''Bird Keeper Benny''' | |||
* {{bp|Swellow|36}} | * {{bp|Swellow|36}} | ||
* {{bp|Pelipper|36}} | * {{bp|Pelipper|36}} | ||
* {{bp|Xatu|36}} | * {{bp|Xatu|36}} | ||
}} | |||
{{col|2}} | |||
{{pokemon trainer | |||
|details='''Pokémon Ranger Sophia''' | |||
* {{bp|Swablu|38}} | * {{bp|Swablu|38}} | ||
* {{bp|Roselia|38}} | * {{bp|Roselia|38}} | ||
}} | |||
{{col|3}} | |||
{{pokemon trainer | |||
|details='''Pokémon Ranger Sebastian''' | |||
* {{bp|Cacturne|39}} | * {{bp|Cacturne|39}} | ||
}} | |||
{{col|3|end}} | |||
Completing this puzzle will grant a Magnet, which powers up Electric-type moves. | Completing this puzzle will grant a Magnet, which powers up Electric-type moves. | ||
| Line 128: | Line 170: | ||
To attempt this puzzle, one must first earn the Rain Badge. This puzzle is composed of spinning tiles, similar to the one found in Mossdeep Gym. Switches must be pulled to adjust the direction of red tiles. A Tropic Mail can also be found in the room. | To attempt this puzzle, one must first earn the Rain Badge. This puzzle is composed of spinning tiles, similar to the one found in Mossdeep Gym. Switches must be pulled to adjust the direction of red tiles. A Tropic Mail can also be found in the room. | ||
{{col|3|begin}} | |||
{{pokemon trainer | |||
|details='''Psychic Joshua''' | |||
* {{bp|Kadabra|41}} | * {{bp|Kadabra|41}} | ||
* {{bp|Solrock|41}} | * {{bp|Solrock|41}} | ||
}} | |||
{{col|2}} | |||
{{pokemon trainer | |||
|details='''Hex Maniac Patricia''' | |||
* {{bp|Banette|42}} | * {{bp|Banette|42}} | ||
* {{bp|Lunatone|41}} | * {{bp|Lunatone|41}} | ||
}} | |||
{{col|3}} | |||
{{pokemon trainer | |||
|details='''Psychic Alexis''' | |||
* {{bp|Kirlia|40}} | * {{bp|Kirlia|40}} | ||
* {{bp|Xatu|40}} | * {{bp|Xatu|40}} | ||
* {{bp|Kadabra|40}} | * {{bp|Kadabra|40}} | ||
}} | |||
Completing this puzzle will grant a PP Max. | Completing this puzzle will grant a PP Max. | ||
| Line 149: | Line 198: | ||
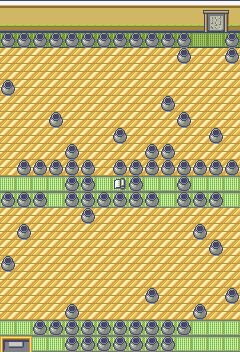
To attempt this puzzle, the final one offered at the Trick House, one must first defeat the Elite Four. Much like the ice puzzles in many games, this one has you sliding across the floor until you hit an obstacle. In this puzzle, you may find a Bead Mail and a Nugget. | To attempt this puzzle, the final one offered at the Trick House, one must first defeat the Elite Four. Much like the ice puzzles in many games, this one has you sliding across the floor until you hit an obstacle. In this puzzle, you may find a Bead Mail and a Nugget. | ||
{{col|3|begin}} | |||
{{pokemon trainer | |||
|details='''Cooltrainer Leroy''' | |||
* {{bp|Mawile|46}} | * {{bp|Mawile|46}} | ||
* {{bp|Starmie|46}} | * {{bp|Starmie|46}} | ||
}} | |||
{{col|2}} | |||
{{pokemon trainer | |||
|details='''Cooltrainer Vincent''' | |||
* {{bp|Sableye|44}} | * {{bp|Sableye|44}} | ||
* {{bp|Medicham|44}} | * {{bp|Medicham|44}} | ||
* {{bp|Sharpedo|44}} | * {{bp|Sharpedo|44}} | ||
}} | |||
{{col|3}} | |||
{{pokemon trainer | |||
|details='''Psychic Alexis''' | |||
* {{bp|Kirlia|45}} | * {{bp|Kirlia|45}} | ||
* {{bp|Manectric|45}} | * {{bp|Manectric|45}} | ||
}} | |||
Completing this puzzle will grant the Blue or Red Tent ornament, depending on the version of the game you're playing. | Completing this puzzle will grant the Blue or Red Tent ornament, depending on the version of the game you're playing. | ||
{{Footer Nav|game=Pokémon Ruby and Sapphire|prevpage=Route 110|nextpage=Mauville City}} | {{Footer Nav|game=Pokémon Ruby and Sapphire|prevpage=Route 110|nextpage=Mauville City}} | ||
Revision as of 20:21, 16 October 2014
The Trick House is owned by the Trick Master, who creates puzzles to challenge curious trainers. Every time you enter, the room appears empty, though you will feel like you're being watched. The trick here is to spot the small sparkle. Approach the spot the sparkle was coming from and you'll find the one and only, Trick Master! He'll praise you for your sharp eye and gives you access to the puzzle room, which is behind the scroll on the back wall. You can only do each puzzle once and in a set order, and new puzzles will be available after you defeat gym leaders. Each puzzle has a "gimmick" to them, which will be explained in more detail below.
Puzzle 1: Cut Maze
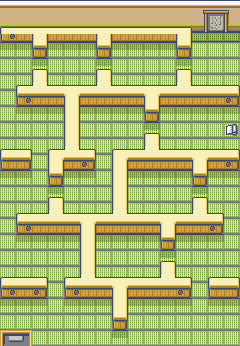
The first puzzle is available from the start, and it isn't even a puzzle! All it requires is for you to use Cut on the trees that block your way in the maze. You'll need to battle some trainers, but the ultimate goal is to find the scroll located somewhere in the room that contains the password and then make your way to the door at the top right which requires the password. You don't have to memorise the password yourself, but you do have to find the scroll that has it. The room's layout varies between Ruby/Sapphire and Emerald. There is an Orange Mail near the exit, though it requires you to do more cutting to reach it.
| Trainer | |
|---|---|
Lass Sally
| |
Complete the challenge and you get a Rare Candy. A very good prize, though it's a pity you can only get it once.
Puzzle 2: Hole Maze
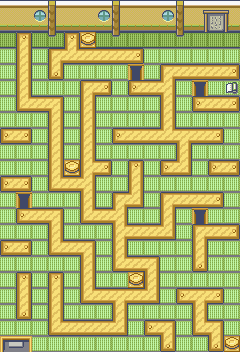
Step on the switches to cover the holes leading to the scroll. Memorize the password on the scroll, and enter it at the door to win. This level also contains three Trainers, Wave Mail, and Harbor Mail.
| Trainer | |
|---|---|
School Kid Ted
| |
Completion of the level earns you a Timer Ball.
Puzzle 3: Door Maze
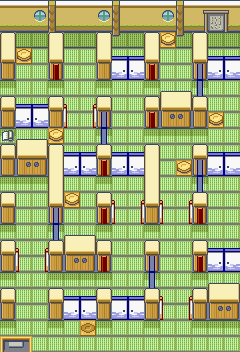
This puzzle requires the Heat Badge and HM06, Rock Smash. There will be a room full of red and blue doors that close and open based on their color. Some switches are covered by Rocks that can be smashed. A Wood Mail and a Shadow Mail can be found.
| Trainer | |
|---|---|
Camper Justin
| |
Completing this puzzle grants the player a Hard Stone, which boosts the power of Rock-type moves by 20% when held.
Puzzle 4: Strength Maze
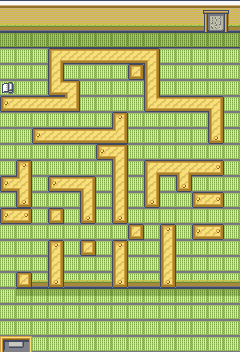
To complete this puzzle, the player will need the Balance badge and HM04, Strength. Boulders must be pushed aside in order to get across the room. However, pushing the boulders to the wrong places can block progress, forcing the player to restart. A Mech Mail can be found
Trainers
Completing this puzzle grants the Smoke Ball.
Puzzle 5: Trivia Quiz
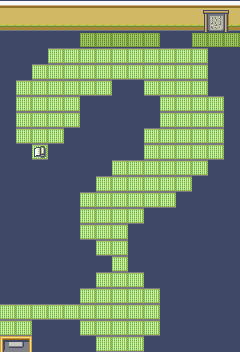
Puzzle 5 requires the Feather Badge. This puzzle is a bit different. Rather than navigating a maze of trainers, you are tasked with answering a series of questions. Answering any of the randomly generated questions incorrectly will send the player back to the start. The following are a list of the questions and answers in Ruby and Sapphire.
- One of these Pokémon uses Scratch. Which one is it? (Nincada)
- One of these Pokémon is not found on Route 103. Which one is it? (Nincada)
- One of these Pokémon is not of the Grass type. Which one is it? (Nincada)
- The Devon Researcher was looking for what Pokémon in Petalburg Woods? (Shroomish)
- Which of these Pokémon was chasing Prof. Birch? (Poochyena)
- Which costs more? Three {Poké Balls or one Super Potion? (Super Potion)
- Sell one Great Ball and buy one Potion. How much money remains? (Nothing)
- Sell one Escape Rope and buy one Burn Heal. How much remains? (Pokémon Dollar175)
- Do one Full Heal and Great Ball cost more than one Revive? (They will cost less.)
- Rustboro Gym Leader Roxanne used a Geodude. Was it male or female? (♀)
- In Dewford Hall, were there more men or women? (Males)
- The first trainer in Dewford Gym was male or female? (Female)
- How many signs are there in Lilycove City? (8)
- How many people give you berries at the Pretty Petal Flower Shop? (1)
- How many bikes does Rydel have on display outside his cycle shop? (8)
- Which Pokémon was offered for a trade at the Pokémon Trainer's School? (Seedot)
Completing this puzzle grants TM12, Taunt.
Puzzle 6: Angled Door Maze
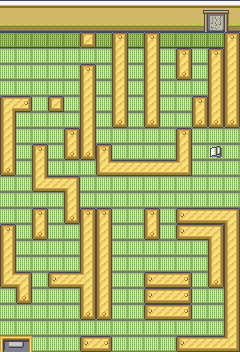
The Mind Badge is necessary to unlock this puzzle. It is composed of flipping gates similar to those found in Fortree Gym. A Glitter Mail can be found
| Trainer | |
|---|---|
Pokémon Ranger Sebastian
| |
Completing this puzzle will grant a Magnet, which powers up Electric-type moves.
Puzzle 7: Boost Tile or Rotating Maze
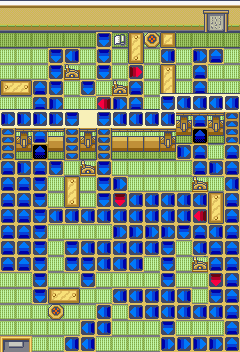
To attempt this puzzle, one must first earn the Rain Badge. This puzzle is composed of spinning tiles, similar to the one found in Mossdeep Gym. Switches must be pulled to adjust the direction of red tiles. A Tropic Mail can also be found in the room.
| Trainer | |
|---|---|
| Psychic Alexis | |
Completing this puzzle will grant a PP Max.
Puzzle 8: Sliding Maze
To attempt this puzzle, the final one offered at the Trick House, one must first defeat the Elite Four. Much like the ice puzzles in many games, this one has you sliding across the floor until you hit an obstacle. In this puzzle, you may find a Bead Mail and a Nugget.