Jump to navigation
Jump to search
Route 121
No edit summary |
m (→Trainers: fixed file link) |
||
| (5 intermediate revisions by 3 users not shown) | |||
| Line 1: | Line 1: | ||
{{Header Nav|game=Pokémon Ruby and Sapphire}} | {{Header Nav|game=Pokémon Ruby and Sapphire}} | ||
This | {| {{prettytable|notwide=1}} align="right" style="text-align:center" | ||
|+ New Pokémon | |||
! style="background-color:#a82c2a; color:#fff" | Ruby | |||
! style="background-color:#00036c; color:#fff" | Sapphire | |||
! style="background-color:#008000; color:#fff" | Emerald | |||
|- valign="center" | |||
| {{PokePic|Duskull}}{{bp|Duskull}}<br/>{{PokePic|Wailmer}}{{bp|Wailmer}} | |||
| colspan=2 | {{PokePic|Shuppet}}{{bp|Shuppet}}<br/>{{PokePic|Wailmer}}{{bp|Wailmer}} | |||
|} | |||
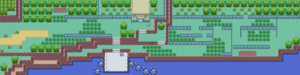
[[File:PRS%26E_Route_121.png|right|thumb|Route 121]] | |||
This route is going to be another one you'll likely frequent, as it holds the [[../Safari Zone/]], home to some Pokémon found nowhere else in Hoenn. Not only that, but it also acts as a junction between [[../Route 120/]], [[../Route 122/]], and [[../Lilycove City/]]. The final point of note with the route is on the eastern side of it - there's a small "maze" of fences that force your path into grass patches and trainers. It's recommended to head back to [[../Fortree City/]] to heal your Pokémon or stock up on items before traversing the route. | |||
From here, you can go either to Route 122 to continue the story with Team Magma and Aqua, visit the Safari Zone to catch some new Pokémon, or explore Lilycove City. The choice is yours! | |||
==Pokémon found== | ==Pokémon found== | ||
{| {{prettytable|text center=1}} | {| {{prettytable|text center=1}} | ||
! style="background-color:#a82c2a;color:#fff" | Ruby | ! style="background-color:#a82c2a;color:#fff" | Ruby | ||
! style="background-color:#a82c2a;color:#fff" | Level | |||
! style="background-color:#a82c2a;color:#fff" | Encounter Rate | ! style="background-color:#a82c2a;color:#fff" | Encounter Rate | ||
! style="background-color:#00036c;color:#fff" | Sapphire | |||
! style="background-color:#00036c;color:#fff" | Level | |||
! style="background-color:#00036c;color:#fff" | Encounter Rate | |||
! style="background-color:#008000;color:#fff" | Emerald | ! style="background-color:#008000;color:#fff" | Emerald | ||
! style="background-color:#008000;color:#fff" | Level | |||
! style="background-color:#008000;color:#fff" | Encounter Rate | ! style="background-color:#008000;color:#fff" | Encounter Rate | ||
|- | |- | ||
|| | | style="vertical-align:middle" | {{PokePic|Duskull}}{{bp|Duskull}} | ||
|20% | | style="vertical-align:middle" | 26, 28 | ||
|| | | style="vertical-align:middle" | 30% | ||
|20% | | style="vertical-align:middle" | {{PokePic|Shuppet}}{{bp|Shuppet}} | ||
|| | | style="vertical-align:middle" | 26, 28 | ||
|20% | | style="vertical-align:middle" | 30% | ||
| style="vertical-align:middle" | {{PokePic|Shuppet}}{{bp|Shuppet}} | |||
| style="vertical-align:middle" | 26, 28 | |||
| style="vertical-align:middle" | 30% | |||
|- | |||
| style="vertical-align:middle" | {{PokePic|Zigzagoon}}{{bp|Zigzagoon}} | |||
| style="vertical-align:middle" | 26 | |||
| style="vertical-align:middle" | 20% | |||
| style="vertical-align:middle" | {{PokePic|Zigzagoon}}{{bp|Zigzagoon}} | |||
| style="vertical-align:middle" | 26 | |||
| style="vertical-align:middle" | 20% | |||
| style="vertical-align:middle" | {{PokePic|Poochyena}}{{bp|Poochyena}} | |||
| style="vertical-align:middle" | 26 | |||
| style="vertical-align:middle" | 20% | |||
|- | |||
| style="vertical-align:middle" | {{PokePic|Linoone}}{{bp|Linoone}} | |||
| style="vertical-align:middle" | 26, 28 | |||
| style="vertical-align:middle" | 20% | |||
| style="vertical-align:middle" | {{PokePic|Linoone}}{{bp|Linoone}} | |||
| style="vertical-align:middle" | 26, 28 | |||
| style="vertical-align:middle" | 20% | |||
| style="vertical-align:middle" | {{PokePic|Mightyena}}{{bp|Mightyena}} | |||
| style="vertical-align:middle" | 26, 28 | |||
| style="vertical-align:middle" | 20% | |||
|- | |||
| style="vertical-align:middle" colspan="3" | {{PokePic|Oddish}}{{bp|Oddish}} | |||
| style="vertical-align:middle" colspan="3" | 26, 28 | |||
| style="vertical-align:middle" colspan="3" | 15% | |||
|- | |||
| style="vertical-align:middle" colspan="3" | {{PokePic|Wingull}}{{bp|Wingull}} | |||
| style="vertical-align:middle" colspan="3" | 26-28 | |||
| style="vertical-align:middle" colspan="3" | 9% | |||
|- | |- | ||
| | | style="vertical-align:middle" colspan="3" | {{PokePic|Gloom}}{{bp|Gloom}} | ||
| style="vertical-align:middle" colspan="3" | 28 | |||
| style="vertical-align:middle" colspan="3" | 5% | |||
| | |||
| | |||
| | |||
|- | |- | ||
| | | style="vertical-align:middle" colspan="3" | {{PokePic|Kecleon}}{{bp|Kecleon}} | ||
| style="vertical-align:middle" colspan="3" | 25 | |||
| style="vertical-align:middle" colspan="3" | 1% | |||
| | |||
| | |||
| | |||
|- | |- | ||
! style="background-color:#{{Pokemon color|Water light}};color:#fff" colspan="9" | Surfing | |||
| | |||
|- | |- | ||
| | | style="vertical-align:middle" colspan="3" | {{PokePic|Tentacool}}{{bp|Tentacool}} | ||
| style="vertical-align:middle" colspan="3" | 5-35 | |||
| style="vertical-align:middle" colspan="3" | 60% | |||
|5 | |||
| | |||
|- | |- | ||
| | | style="vertical-align:middle" colspan="3" | {{PokePic|Wingull}}{{bp|Wingull}} | ||
| style="vertical-align:middle" colspan="3" | 10-30 | |||
| style="vertical-align:middle" colspan="3" | 35% | |||
| | |||
|- | |- | ||
| | | style="vertical-align:middle" colspan="3" | {{PokePic|Pelipper}}{{bp|Pelipper}} | ||
| style="vertical-align:middle" colspan="3" | 25-30 | |||
| style="vertical-align:middle" colspan="3" | 5% | |||
| | |||
| | |||
| | |||
|- | |- | ||
! style="background-color:#{{Pokemon color|Water light}};color:#fff" colspan="9" | Old Rod | |||
! style="background-color:# | |||
|- | |- | ||
| | | style="vertical-align:middle" colspan="3" | {{PokePic|Magikarp}}{{bp|Magikarp}} | ||
| style="vertical-align:middle" colspan="3" | 5-10 | |||
| style="vertical-align:middle" colspan="3" | 70% | |||
| | |||
| | |||
|70% | |||
|- | |- | ||
| | | style="vertical-align:middle" colspan="3" | {{PokePic|Tentacool}}{{bp|Tentacool}} | ||
| style="vertical-align:middle" colspan="3" | 5-10 | |||
| style="vertical-align:middle" colspan="3" | 30% | |||
| | |||
| | |||
|30% | |||
|- | |- | ||
! style="background-color:# | ! style="background-color:#{{Pokemon color|Water}};color:#fff" colspan="9" | Good Rod | ||
|- | |- | ||
| | | style="vertical-align:middle" colspan="3" | {{PokePic|Magikarp}}{{bp|Magikarp}} | ||
| style="vertical-align:middle" colspan="3" | 10-30 | |||
| style="vertical-align:middle" colspan="3" | 60% | |||
| | |||
| | |||
|60% | |||
|- | |- | ||
| | | style="vertical-align:middle" colspan="3" | {{PokePic|Tentacool}}{{bp|Tentacool}} | ||
| style="vertical-align:middle" colspan="3" | 10-30 | |||
| style="vertical-align:middle" colspan="3" | 20% | |||
| | |||
| | |||
|20% | |||
|- | |- | ||
| | | style="vertical-align:middle" colspan="3" | {{PokePic|Wailmer}}{{bp|Wailmer}} | ||
| style="vertical-align:middle" colspan="3" | 10-30 | |||
| style="vertical-align:middle" colspan="3" | 20% | |||
| | |||
| | |||
|20% | |||
|- | |- | ||
! style="background-color:# | ! style="background-color:#{{Pokemon color|Water dark}};color:#fff" colspan="9" | Super Rod | ||
|- | |- | ||
| | | style="vertical-align:middle" colspan="3" | {{PokePic|Wailmer}}{{bp|Wailmer}} | ||
| style="vertical-align:middle" colspan="3" | 20-45 | |||
| style="vertical-align:middle" colspan="3" | 100% | |||
| | |||
| | |||
|100% | |||
|} | |} | ||
==Trainers== | ==Trainers== | ||
{{Pokemon Trainer Group | |||
Hex Maniac Tammy | |{{Pokemon Trainer Table | ||
Ralts | |game=RS | ||
Duskull | |trnr1= [[File:PKMN Emerald HexManiac.png|left]] Hex Maniac Tammy | ||
|pkmn1= {{PokePic|Ralts}}{{bp|Ralts|30}} <br/> {{PokePic|Duskull}}{{bp|Duskull|30}} | |||
Beauty Jessica | |rwrd1= [[File:Pokebuck.png]]720 | ||
Kecleon | |trnr2= [[File:Pokemon RS Beauty.png|left]] Beauty Jessica | ||
Seviper | |pkmn2= {{PokePic|Kecleon}}{{bp|Kecleon|30}} <br/> {{PokePic|Seviper}}{{bp|Seviper|30}} | ||
|rwrd2= [[File:Pokebuck.png]]2400 | |||
|trnr3= [[File:PKMN Emerald SrAndJr.png|left]] Sr. and Jr. Kate & Joy | |||
Spinda | |pkmn3= {{PokePic|Spinda}}{{bp|Spinda|30}} <br/> {{PokePic|Slaking}}{{bp|Slaking|30}} | ||
Slaking | |rwrd3= [[File:Pokebuck.png]]1024 | ||
|trnr4= [[File:PKMN Emerald Gentleman.png|left]] Gentleman Walter | |||
|pkmn4= {{PokePic|Manectric}}{{bp|Manectric|31}} | |||
|rwrd4= [[File:Pokebuck.png]]2480 | |||
|trnr5= [[File:PKMN Emerald PokéfanF.png|left]] Pokéfan Vanessa | |||
|pkmn5= {{PokePic|Pikachu}}{{bp|Pikachu|31}} | |||
|rwrd5= [[File:Pokebuck.png]]2480 | |||
{{ | |||
| | |||
| | |||
}} | }} | ||
|{{Pokemon Trainer Table | |||
|game=E | |||
|trnr1= [[File:PKMN Emerald BugManiac.png|left]] Bug Maniac Cale | |||
|pkmn1= {{PokePic|Dustox}}{{bp|Dustox|29}} <br/> {{PokePic|Beautifly}}{{bp|Beautifly|29}} | |||
|rwrd1= [[File:Pokebuck.png]]1740 | |||
|trnr2= [[File:PKMN Emerald HexManiac.png|left]] Hex Maniac Tammy | |||
|pkmn2= {{PokePic|Duskull}}{{bp|Duskull|29}} <br/> {{PokePic|Shuppet}}{{bp|Shuppet|29}} | |||
|rwrd2= [[File:Pokebuck.png]]696 | |||
|trnr3= [[File:Pokemon RS Beauty.png|left]] Beauty Jessica | |||
|pkmn3= {{PokePic|Kecleon}}{{bp|Kecleon|29}} <br/> {{PokePic|Seviper}}{{bp|Seviper|29}} | |||
|rwrd3= [[File:Pokebuck.png]]2320 | |||
|trnr4= [[File:PKMN Emerald SrAndJr.png|left]] Sr. and Jr. Kate & Joy | |||
|pkmn4= {{PokePic|Spinda}}{{bp|Spinda|30}} <br/> {{PokePic|Slaking}}{{bp|Slaking|32}} | |||
|rwrd4= [[File:Pokebuck.png]]1024 | |||
|trnr5= [[File:PKMN Emerald PokémonBreederF.png|left]] Pokémon Breeder Pat | |||
|pkmn5= {{PokePic|Poochyena}}{{bp|Poochyena|25}} <br/> {{PokePic|Shroomish}}{{bp|Shroomish|25}} <br/> {{PokePic|Electrike}}{{bp|Electrike|25}} <br/> {{PokePic|Marill}}{{bp|Marill|25}} <br/> {{PokePic|Sandshrew}}{{bp|Sandshrew|25}} <br/> {{PokePic|Gulpin}}{{bp|Gulpin|25}} | |||
|rwrd5= [[File:Pokebuck.png]]1000 | |||
|trnr6= [[File:PKMN Emerald PokémonBreederM.png|left]] Pokémon Breeder Myles | |||
|pkmn6= {{PokePic|Makuhita}}{{bp|Makuhita|25}} <br/> {{PokePic|Wingull}}{{bp|Wingull|25}} <br/> {{PokePic|Tropius}}{{bp|Tropius|25}} <br/> {{PokePic|Zigzagoon}}{{bp|Zigzagoon|25}} <br/> {{PokePic|Electrike}}{{bp|Electrike|25}} <br/> {{PokePic|Numel}}{{bp|Numel|25}} | |||
|rwrd6= [[File:Pokebuck.png]]1000 | |||
|trnr7= [[File:PKMN Emerald Gentleman.png|left]] Gentleman Walter | |||
|pkmn7= {{PokePic|Manectric}}{{bp|Manectric|29}} | |||
|rwrd7= [[File:Pokebuck.png]]2320 | |||
|trnr8= [[File:PKMN Emerald PokéfanF.png|left]] Pokéfan Vanessa | |||
|pkmn8= {{PokePic|Pikachu}}{{bp|Pikachu|30}} | |||
|rwrd8= [[File:Pokebuck.png]]2400 | |||
|trnr9= [[File:PKMN Emerald CoolTrainerM.png|left]] Cool Trainer Marcel | |||
|pkmn9= {{PokePic|Manectric}}{{bp|Manectric|29}} <br/> {{PokePic|Shiftry}}{{bp|Shiftry|29}} | |||
|rwrd9= [[File:Pokebuck.png]]1392 | |||
|trnr10= [[File:PKMN Emerald CoolTrainerF.png|left]] Cool Trainer Cristin | |||
|pkmn10= {{PokePic|Loudred}}{{bp|Loudred|29}} <br/> {{PokePic|Vigoroth}}{{bp|Vigoroth|29}} | |||
|rwrd10= [[File:Pokebuck.png]]1392 | |||
}}}} | |||
==Items== | ==Items== | ||
*{{bpi|Aspear Berry}} x2 - Soft soil patch near Route 120 | |||
*{{bpi|Chesto Berry}} x2 - Soft soil patch near Route 120 | |||
* | *{{bpi|Persim Berry}} x2 - Soft soil patch near Route 120 | ||
* Full | *{{bpi|Rawst Berry}} x2 - Soft soil patch near Route 120 | ||
*{{bpi|Nanab Berry}} x6 - Soft soil patch near Lilycove City | |||
*{{bpi|Carbos}} - Near Gentleman Walter in the fenced area | |||
*{{bpi|HP Up}} - South of Beauty Jessica, on the other side of the fence (Hidden) | |||
*{{bpi|Nugget}} - Area with flowers, north of Pokéfan Vanessa (Requires Cut) (Hidden) | |||
*{{bpi|Full Heal}} - Near Lilycove City, beyond a patch of grass in the fenced area (Hidden) | |||
*{{bpi|Zinc}} - South of the Safari Zone entrance (EMERALD ONLY) | |||
*{{bpi|Revive}} - Between Pokémon Breeders Pat and Myles in the fenced area (EMERALD ONLY) | |||
*{{bpi|Max Revive}} - Between Cool Trainers Marcel and Cristin in the fenced area (Hidden) (EMERALD ONLY) | |||
{{Footer Nav|game=Pokémon Ruby and Sapphire|prevpage=Scorched Slab|nextpage=Safari Zone}} | {{Footer Nav|game=Pokémon Ruby and Sapphire|prevpage=Scorched Slab|nextpage=Safari Zone}} | ||
Latest revision as of 20:34, 30 November 2023
| Ruby | Sapphire | Emerald |
|---|---|---|

This route is going to be another one you'll likely frequent, as it holds the Safari Zone, home to some Pokémon found nowhere else in Hoenn. Not only that, but it also acts as a junction between Route 120, Route 122, and Lilycove City. The final point of note with the route is on the eastern side of it - there's a small "maze" of fences that force your path into grass patches and trainers. It's recommended to head back to Fortree City to heal your Pokémon or stock up on items before traversing the route.
From here, you can go either to Route 122 to continue the story with Team Magma and Aqua, visit the Safari Zone to catch some new Pokémon, or explore Lilycove City. The choice is yours!
Pokémon found[edit]
| Ruby | Level | Encounter Rate | Sapphire | Level | Encounter Rate | Emerald | Level | Encounter Rate |
|---|---|---|---|---|---|---|---|---|
| 26, 28 | 30% | 26, 28 | 30% | 26, 28 | 30% | |||
| 26 | 20% | 26 | 20% | 26 | 20% | |||
| 26, 28 | 20% | 26, 28 | 20% | 26, 28 | 20% | |||
| 26, 28 | 15% | |||||||
| 26-28 | 9% | |||||||
| 28 | 5% | |||||||
| 25 | 1% | |||||||
| Surfing | ||||||||
| 5-35 | 60% | |||||||
| 10-30 | 35% | |||||||
| 25-30 | 5% | |||||||
| Old Rod | ||||||||
| 5-10 | 70% | |||||||
| 5-10 | 30% | |||||||
| Good Rod | ||||||||
| 10-30 | 60% | |||||||
| 10-30 | 20% | |||||||
| 10-30 | 20% | |||||||
| Super Rod | ||||||||
| 20-45 | 100% | |||||||
Trainers[edit]
| Ruby and Sapphire | ||
|---|---|---|
| Picture | Pokémon | Reward |
 | ||
 | ||
 | ||
 | ||
 | ||
| Emerald | ||
|---|---|---|
| Picture | Pokémon | Reward |
 | ||
| ||
| ||
| ||
 | ||
 | ||
| ||
| ||
 | ||
 | ||
Items[edit]
- Aspear Berry x2 - Soft soil patch near Route 120
- Chesto Berry x2 - Soft soil patch near Route 120
- Persim Berry x2 - Soft soil patch near Route 120
- Rawst Berry x2 - Soft soil patch near Route 120
- Nanab Berry x6 - Soft soil patch near Lilycove City
- Carbos - Near Gentleman Walter in the fenced area
- HP Up - South of Beauty Jessica, on the other side of the fence (Hidden)
- Nugget - Area with flowers, north of Pokéfan Vanessa (Requires Cut) (Hidden)
- Full Heal - Near Lilycove City, beyond a patch of grass in the fenced area (Hidden)
- Zinc - South of the Safari Zone entrance (EMERALD ONLY)
- Revive - Between Pokémon Breeders Pat and Myles in the fenced area (EMERALD ONLY)
- Max Revive - Between Cool Trainers Marcel and Cristin in the fenced area (Hidden) (EMERALD ONLY)