(added items) |
m (→The Treasure Hunter: added images for the shards) |
||
| (8 intermediate revisions by 5 users not shown) | |||
| Line 1: | Line 1: | ||
{{Header Nav|game=Pokémon Ruby and Sapphire}} | {{Header Nav|game=Pokémon Ruby and Sapphire}} | ||
[[File:PRS%26E_Route_124.png|right|thumb|Route 124]] | |||
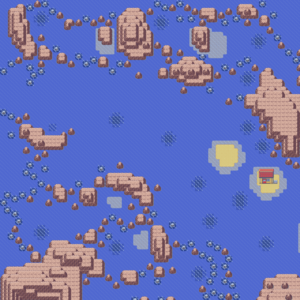
Route 124 is the first route in Hoenn which is mostly water. There's a couple of islands in the eastern portion, and some areas to {{bpm|Dive}} into underwater paths - though you won't be able to access them immediately. You can also battle various trainers here. | |||
== | ==The Surface== | ||
{| {{prettytable|text center=1}} | {{-}} | ||
===The Treasure Hunter=== | |||
! style="background-color: | On one of the islands, a treasure hunter can be found. He loves collecting shards of rock, which can be found all throughout the sea routes in multiple colours. In fact, he loves them so much that he is willing to trade valuable items for them! | ||
! style="background-color: | {| {{prettytable|text center=1|float=left}} | ||
! style="background-color:blue;color:#fff" | Item | |||
! style="background-color:blue;color:#fff" | Reward | |||
|- | |||
| [[File:PKMN RedShard.png]]{{bpi|Red Shard}} || [[File:PKMN FireStone.png]]{{bpi|Fire Stone}} | |||
|- | |||
||[[ | | [[File:PKMN YellowShard.png]]{{bpi|Yellow Shard}} || [[File:PKMN Thunderstone.png]]{{bpi|Thunderstone}} | ||
| | |||
||[[ | |||
|- | |- | ||
| [[File:PKMN BlueShard.png]]{{bpi|Blue Shard}} || [[File:PKMN WaterStone.png]]{{bpi|Water Stone}} | |||
||[[ | |||
|- | |- | ||
| [[File:PKMN GreenShard.png]]{{bpi|Green Shard}} || [[File:PKMN LeafStone.png]]{{bpi|Leaf Stone}} | |||
||[[ | |||
|} | |} | ||
{{-}} | |||
===Pokémon Found=== | |||
{| {{prettytable|text center=1}} | {| {{prettytable|text center=1}} | ||
! style="background-color:#383a32;color:#fff" | Ruby, Sapphire, & Emerald | |||
! style="background-color:# | ! style="background-color:#383a32;color:#fff" | Level | ||
! style="background-color:# | ! style="background-color:#383a32;color:#fff" | Encounter Rate | ||
! style="background-color:# | |- | ||
! style="background-color:# | ! style="background-color:#{{pokemon color|Water light}};color:#fff" colspan="3" | Surfing | ||
|- | |||
| style="vertical-align:middle" | {{PokePic|Tentacool}}{{bp|Tentacool}} | |||
| | | style="vertical-align:middle" | 5-35 | ||
| style="vertical-align:middle" | 60% | |||
|- | |- | ||
| | | style="vertical-align:middle" | {{PokePic|Wingull}}{{bp|Wingull}} | ||
| style="vertical-align:middle" | 10-30 | |||
| style="vertical-align:middle" | 35% | |||
| | |||
| | |||
| | |||
|- | |- | ||
| | | style="vertical-align:middle" | {{PokePic|Pelipper}}{{bp|Pelipper}} | ||
| style="vertical-align:middle" | 25-30 | |||
| style="vertical-align:middle" | 5% | |||
|30 | |||
| | |||
|- | |- | ||
! style="background-color:# | ! style="background-color:#{{pokemon color|Water light}};color:#fff" colspan="3" | Old Rod | ||
|- | |- | ||
| | | style="vertical-align:middle" | {{PokePic|Magikarp}}{{bp|Magikarp}} | ||
| style="vertical-align:middle" | 5-10 | |||
| style="vertical-align:middle" | 70% | |||
| | |||
| | |||
| | |||
|- | |- | ||
| | | style="vertical-align:middle" | {{PokePic|Tentacool}}{{bp|Tentacool}} | ||
| style="vertical-align:middle" | 5-10 | |||
| style="vertical-align:middle" | 30% | |||
| | |||
| | |||
| | |||
|- | |- | ||
! style="background-color:#{{pokemon color|Water}};color:#fff" colspan="3" | Good Rod | |||
| | |||
|- | |- | ||
| style="vertical-align:middle" | {{PokePic|Magikarp}}{{bp|Magikarp}} | |||
| style="vertical-align:middle" | 10-30 | |||
| style="vertical-align:middle" | 60% | |||
|- | |- | ||
| | | style="vertical-align:middle" | {{PokePic|Tentacool}}{{bp|Tentacool}} | ||
| style="vertical-align:middle" | 10-30 | |||
| style="vertical-align:middle" | 20% | |||
| | |||
| | |||
| | |||
|- | |- | ||
| | | style="vertical-align:middle" | {{PokePic|Wailmer}}{{bp|Wailmer}} | ||
| | | style="vertical-align:middle" | 10-30 | ||
|| | | style="vertical-align:middle" | 20% | ||
| | |- | ||
|| | ! style="background-color:#{{pokemon color|Water dark}};color:#fff" colspan="3" | Super Rod | ||
|40% | |- | ||
| style="vertical-align:middle" | {{PokePic|Wailmer}}{{bp|Wailmer}} | |||
| style="vertical-align:middle" | 25-45 | |||
| style="vertical-align:middle" | 60% | |||
|- | |||
| style="vertical-align:middle" | {{PokePic|Sharpedo}}{{bp|Sharpedo}} | |||
| style="vertical-align:middle" | 30-35 | |||
| style="vertical-align:middle" | 40% | |||
|} | |} | ||
{{-}} | |||
===Trainers Found=== | |||
{{Pokemon Trainer Group | |||
|{{Pokemon Trainer Table | |||
|game=RS | |||
|trnr1= [[File:PKMN Emerald SwimmerF.png|left]] Swimmer Grace | |||
|pkmn1= {{PokePic|Marill}}{{bp|Marill|33}} <br> {{PokePic|Wailmer}}{{bp|Wailmer|33}} <br> {{PokePic|Wingull}}{{bp|Wingull|33}} | |||
|rwrd1= [[File:Pokebuck.png]]264 | |||
|trnr2= [[File:PKMN Emerald SisAndBro.png|left]] Sis & Bro Rita & Sam | |||
|pkmn2= {{PokePic|Chinchou}}{{bp|Chinchou|36}} <br> {{PokePic|Carvanha}}{{bp|Carvanha|34}} | |||
|rwrd2= [[File:Pokebuck.png]]816 | |||
|trnr3= [[File:PKMN Emerald SwimmerM.png|left]] Swimmer Spencer | |||
|pkmn3= {{PokePic|Tentacool}}{{bp|Tentacool|33}} <br> {{PokePic|Tentacool}}{{bp|Tentacool|33}} <br> {{PokePic|Tentacool}}{{bp|Tentacool}} | |||
|rwrd3= [[File:Pokebuck.png]]264 | |||
|trnr4= [[File:PKMN Emerald SwimmerF.png|left]] Swimmer Jenny | |||
|pkmn4= {{PokePic|Wailmer}}{{bp|Wailmer|35}} | |||
|rwrd4= [[File:Pokebuck.png]]280 | |||
|trnr5= [[File:PKMN Emerald SwimmerM.png|left]] Swimmer Chad | |||
|pkmn5= {{PokePic|Wingull}}{{Bp|Wingull|34}} <br> {{PokePic|Wailmer}}{{bp|Wailmer|34}} | |||
|rwrd5= [[File:Pokebuck.png]]272 | |||
|trnr6= [[File:PKMN Emerald SwimmerM.png|left]] Swimmer Roland | |||
|pkmn6= {{PokePic|Carvanha}}{{bp|Carvanha|35}} | |||
|rwrd6= [[File:Pokebuck.png]]280 | |||
}} | |||
|{{Pokemon Trainer Table | |||
|game=E | |||
|trnr1= [[File:PKMN Emerald SwimmerF.png|left]] Swimmer Grace | |||
|pkmn1= {{PokePic|Marill}}{{bp|Marill|34}} | |||
|rwrd1= [[File:Pokebuck.png]]272 | |||
|trnr2= [[File:PKMN Emerald SwimmerM.png|left]] Swimmer Declan | |||
|pkmn2= {{PokePic|Gyarados}}{{bp|Gyarados|34}} | |||
|rwrd2= [[File:Pokebuck.png]]272 | |||
|trnr3= [[File:PKMN Emerald SisAndBro.png|left]] Sis & Bro Lila & Roy | |||
|pkmn3= {{PokePic|Chinchou}}{{bp|Chinchou|34}} <br> {{PokePic|Carvanha}}{{bp|Carvanha|33}} | |||
|rwrd3= [[File:Pokebuck.png]]792 | |||
|trnr4= [[File:PKMN Emerald SwimmerM.png|left]] Swimmer Spencer | |||
|pkmn4= {{PokePic|Tentacool}}{{bp|Tentacool|33}} <br> {{PokePic|Wingull}}{{bp|Wingull|33}} | |||
|rwrd4= [[File:Pokebuck.png]]264 | |||
|trnr5= [[File:PKMN Emerald SwimmerF.png|left]] Swimmer Jenny | |||
|pkmn5= {{PokePic|Wailmer}}{{bp|Wailmer|34}} | |||
|rwrd5= [[File:Pokebuck.png]]272 | |||
|trnr6= [[File:PKMN Emerald SwimmerM.png|left]] Swimmer Chad | |||
|pkmn6= {{PokePic|Tentacool}}{{bp|Tentacool|33}} <br> {{PokePic|Wailmer}}{{bp|Wailmer|33}} | |||
|rwrd6= [[File:Pokebuck.png]]264 | |||
|trnr7= [[File:PKMN Emerald TriathleteSwimmerF.png|left]] Triathlete Isabella | |||
|pkmn7= {{PokePic|Staryu}}{{bp|Staryu|34}} | |||
|rwrd7= [[File:Pokebuck.png]]1360 | |||
|trnr8= [[File:PKMN Emerald SwimmerM.png|left]] Swimmer Roland | |||
|pkmn8= {{PokePic|Carvanha}}{{bp|Carvanha|34}} | |||
|rwrd8= [[File:Pokebuck.png]]272 | |||
}}}} | |||
==Returning with Dive== | |||
[[File:PRS%26E_Route_124_underwater.png|right|thumb|Route 124 underwater]] | |||
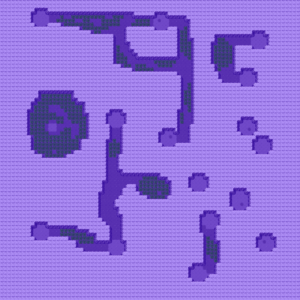
After obtaining the ability to use {{bpm|Dive}} out of battle from [[../Mossdeep City/]]'s gym, you can come back here to dive underwater wherever there are dark spots. Some are essentially just underwater routes, while others hold hidden items and not much else. | |||
{{-}} | |||
===Pokémon Found=== | |||
{| {{prettytable|text center=1}} | {| {{prettytable|text center=1}} | ||
! style="background-color:#383a32;color:#fff" | Ruby, Sapphire, & Emerald | |||
! style="background-color:# | ! style="background-color:#383a32;color:#fff" | Level | ||
! style="background-color:# | ! style="background-color:#383a32;color:#fff" | Encounter Rate | ||
! style="background-color:# | |||
|- | |- | ||
! style="background-color:#{{Pokemon color|Water dark}};color:#fff" colspan="3" | Diving | |||
| | |||
|- | |- | ||
|| | | style="vertical-align:middle" | {{PokePic|Clamperl}}{{bp|Clamperl}} | ||
| | | style="vertical-align:middle" | 20-35 | ||
|| | | style="vertical-align:middle" | 65% | ||
| | |- | ||
|| | | style="vertical-align:middle" | {{PokePic|Chinchou}}{{bp|Chinchou}} | ||
|5% | | style="vertical-align:middle" | 20-30 | ||
| style="vertical-align:middle" | 30% | |||
|- | |||
| style="vertical-align:middle" | {{PokePic|Relicanth}}{{bp|Relicanth}} | |||
| style="vertical-align:middle" | 30-35 | |||
| style="vertical-align:middle" | 5% | |||
|} | |} | ||
===Items Found=== | |||
While all items listed here require {{bpm|Surf}} and {{bpm|Dive}} to be accessed, the three items at the top of the list are not found in one of the underwater areas. | |||
*{{bpi|Blue Shard}} - Near the southwest corner of the route, via surfacing through the southwest-most Dive spot | |||
*{{bpi|Yellow Shard}} - Near the northeast corner of the route | |||
*{{bpi|Red Shard}} - North the northwest corner of the route | |||
*{{bpi|Carbos}} - In the empty square in the cul-de-sac of seaweed (Hidden) | |||
*{{bpi|Calcium}} - Directly beneath the central northern Dive spot, in the dark spot (Hidden) | |||
*{{bpi|Heart Scale}} - Directly beneath the spot closest Mossdeep City, in the dark spot (Hidden) | |||
*{{bpi|Heart Scale}} - In the Dive spot near the center of the route (Hidden) | |||
*{{bpi|Pearl}} - Directly beneath the second Dive spot north of the Treasure Hunter's house, in the dark spot (Hidden) | |||
*{{ | *{{bpi|Big Pearl}} - Directly beneath the larger-than-usual Dive spot just southwest of the Treasure Hunter's house, in the dark spot (Hidden) | ||
*{{ | *{{bpi|Green Shard}} - Beneath the square Dive spot near Lilycove City, in the empty square among the seaweed, south of the underwater Dive spot (Hidden) | ||
}} | {{-}} | ||
* Heart Scale - | |||
* Heart Scale - | |||
* | |||
* Big Pearl - | |||
* Green Shard - | |||
{{Footer Nav|game=Pokémon Ruby and Sapphire|prevpage=Team Magma Hideout|customprev=[[Pokémon Ruby and Sapphire/Team Aqua Hideout|Team Aqua Hideout]]|nextpage=Mossdeep City}} | {{Footer Nav|game=Pokémon Ruby and Sapphire|prevpage=Team Magma Hideout|customprev=[[Pokémon Ruby and Sapphire/Team Aqua Hideout|Team Aqua Hideout]]|nextpage=Mossdeep City}} | ||
Latest revision as of 12:00, 13 July 2022

Route 124 is the first route in Hoenn which is mostly water. There's a couple of islands in the eastern portion, and some areas to Dive into underwater paths - though you won't be able to access them immediately. You can also battle various trainers here.
The Surface[edit]
The Treasure Hunter[edit]
On one of the islands, a treasure hunter can be found. He loves collecting shards of rock, which can be found all throughout the sea routes in multiple colours. In fact, he loves them so much that he is willing to trade valuable items for them!
| Item | Reward |
|---|---|
Pokémon Found[edit]
| Ruby, Sapphire, & Emerald | Level | Encounter Rate |
|---|---|---|
| Surfing | ||
| 5-35 | 60% | |
| 10-30 | 35% | |
| 25-30 | 5% | |
| Old Rod | ||
| 5-10 | 70% | |
| 5-10 | 30% | |
| Good Rod | ||
| 10-30 | 60% | |
| 10-30 | 20% | |
| 10-30 | 20% | |
| Super Rod | ||
| 25-45 | 60% | |
| 30-35 | 40% | |
Trainers Found[edit]
| Ruby and Sapphire | ||
|---|---|---|
| Picture | Pokémon | Reward |
 | ||
| Emerald | ||
|---|---|---|
| Picture | Pokémon | Reward |
 | ||
Returning with Dive[edit]

After obtaining the ability to use Dive out of battle from Mossdeep City's gym, you can come back here to dive underwater wherever there are dark spots. Some are essentially just underwater routes, while others hold hidden items and not much else.
Pokémon Found[edit]
| Ruby, Sapphire, & Emerald | Level | Encounter Rate |
|---|---|---|
| Diving | ||
| 20-35 | 65% | |
| 20-30 | 30% | |
| 30-35 | 5% | |
Items Found[edit]
While all items listed here require Surf and Dive to be accessed, the three items at the top of the list are not found in one of the underwater areas.
- Blue Shard - Near the southwest corner of the route, via surfacing through the southwest-most Dive spot
- Yellow Shard - Near the northeast corner of the route
- Red Shard - North the northwest corner of the route
- Carbos - In the empty square in the cul-de-sac of seaweed (Hidden)
- Calcium - Directly beneath the central northern Dive spot, in the dark spot (Hidden)
- Heart Scale - Directly beneath the spot closest Mossdeep City, in the dark spot (Hidden)
- Heart Scale - In the Dive spot near the center of the route (Hidden)
- Pearl - Directly beneath the second Dive spot north of the Treasure Hunter's house, in the dark spot (Hidden)
- Big Pearl - Directly beneath the larger-than-usual Dive spot just southwest of the Treasure Hunter's house, in the dark spot (Hidden)
- Green Shard - Beneath the square Dive spot near Lilycove City, in the empty square among the seaweed, south of the underwater Dive spot (Hidden)


