m (fixed file link) |
|||
| (3 intermediate revisions by 2 users not shown) | |||
| Line 1: | Line 1: | ||
{{Header Nav|game=Pokémon Ruby and Sapphire}} | {{Header Nav|game=Pokémon Ruby and Sapphire}} | ||
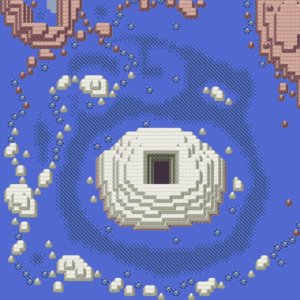
[[File:Pokemon EME Route 126.png|thumb|right|Route 126's surface in Emerald.]] | |||
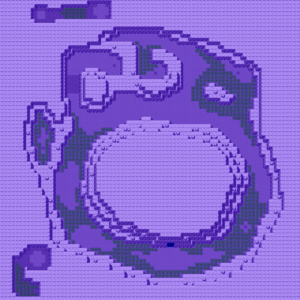
[[File:Pokemon RS Route 126 (underwater).png|thumb|left|Route 126's underwater trenches.]] | |||
{{-}} | |||
Route 126 is a large, circular area with a dormant volcano at its center, the home of all Sootpolites. There is a multitude of trainers to battle and items to find, but you can do that later - you've got a Region to save! To continue the main story, head to the southern part of the route and use {{bpm|Dive}} on the dark patch, and enter the cave you find underneath. | |||
{{-}} | |||
==Trainers== | |||
{{Pokemon Trainer Group | |||
|{{Pokemon Trainer Table | |||
[[File: | |game=RS | ||
|trnr1= [[File:PKMN Emerald SwimmerM.png|left]] Swimmer Barry | |||
Route 126 is a large, circular area with a dormant volcano at its center, the home of all Sootpolites. There | |pkmn1= {{PokePic|Gyarados}}{{bp|Gyarados|35}} | ||
|rwrd1= [[File:Pokebuck.png]]280 | |||
{{ | |trnr2= [[File:PKMN Emerald SwimmerM.png|left]] Swimmer Dean | ||
| | |pkmn2= {{PokePic|Carvanha}}{{bp|Carvanha|33}} <br> {{PokePic|Wingull}}{{bp|Wingull|33}} <br> {{PokePic|Carvanha}}{{bp|Carvanha|33}} | ||
|rwrd2= [[File:Pokebuck.png]]264 | |||
}} | |trnr3= [[File:PKMN Emerald SwimmerF.png|left]] Swimmer Brenda | ||
|pkmn3= {{PokePic|Goldeen}}{{bp|Goldeen|35}} | |||
{{ | |rwrd3= [[File:Pokebuck.png]]280 | ||
| | |trnr4= [[File:PKMN Emerald SwimmerF.png|left]] Swimmer Nikki ''Requires {{bpm|Dive}}'' | ||
|pkmn4= {{PokePic|Marill}}{{bp|Marill|32}} <br> {{PokePic|Wailmer}}{{bp|Wailmer|32}} <br> {{PokePic|Spheal}}{{bp|Spheal|32}} | |||
}} | |rwrd4= [[File:Pokebuck.png]]256 | ||
{{ | |||
| | |||
}} | }} | ||
|{{Pokemon Trainer Table | |||
|game=E | |||
|trnr1= [[File:PKMN Emerald SwimmerM.png|left]] Swimmer Leonardo | |||
|pkmn1= {{PokePic|Carvanha}}{{bp|Carvanha|34}} | |||
|rwrd1= [[File:Pokebuck.png]]272 | |||
|trnr2= [[File:PKMN Emerald SwimmerF.png|left]] Swimmer Isobel | |||
|pkmn2= {{PokePic|Staryu}}{{bp|Staryu|34}} | |||
|rwrd2= [[File:Pokebuck.png]]1360 | |||
|trnr3= [[File:PKMN Emerald SwimmerM.png|left]] Swimmer Dean | |||
|pkmn3= {{PokePic|Carvanha}}{{bp|Carvanha|31}} <br> {{PokePic|Wingull}}{{bp|Wingull|31}} <br> {{PokePic|Carvanha}}{{bp|Carvanha|31}} | |||
|rwrd3= [[File:Pokebuck.png]]248 | |||
|trnr4= [[File:PKMN Emerald SwimmerM.png|left]] Swimmer Nikki | |||
|pkmn4= {{PokePic|Marill}}{{bp|Marill|33}} <br> {{PokePic|Spheal}}{{bp|Spheal|33}} | |||
|rwrd4= [[File:Pokebuck.png]]264 | |||
|trnr5= [[File:PKMN Emerald SwimmerM.png|left]] Swimmer Barry | |||
|pkmn5= {{PokePic|Gyarados}}{{bp|Gyarados|34}} | |||
|rwrd5= [[File:Pokebuck.png]]272 | |||
|trnr6= [[File:PKMN Emerald SwimmerF.png|left]] Swimmer Sienna | |||
|pkmn6= {{PokePic|Luvdisc}}{{bp|Luvdisc|33}} <br> {{PokePic|Luvdisc}}{{bp|Luvdisc|33}} | |||
|rwrd6= [[File:Pokebuck.png]]264 | |||
|trnr7= [[File:PKMN Emerald TriathleteSwimmerM.png|left]] Triathlete Pablo | |||
|pkmn7= {{PokePic|Staryu}}{{bp|Staryu|33}} <br> {{PokePic|Staryu}}{{bp|Staryu|33}} | |||
|rwrd7= [[File:Pokebuck.png]]1320 | |||
|trnr8= [[File:PKMN Emerald SwimmerF.png|left]] Swimmer Brenda ''Requires {{bpm|Dive}}'' | |||
|pkmn8= {{PokePic|Goldeen}}{{bp|Goldeen|34}} | |||
|rwrd8= [[File:Pokebuck.png]]272 | |||
}}}} | |||
==Items== | ==Items== | ||
*{{bpi|Ultra Ball}} - In the central northern dive spot (Hidden; Requires {{bpm|Dive}}) | |||
*{{bpi|Heart Scale}} - In the northwest dive spot (Hidden; Requires Dive) | |||
*{{bpi|Stardust}} - In the northeast dark spot (Hidden; Requires Dive) | |||
* Heart Scale - | *{{bpi|Yellow Shard}} - In a dive spot, in the middle of a small patch of seaweed to the west (Hidden; Requires Dive) | ||
* Yellow Shard - | *{{bpi|Pearl}} - In a dive spot, in the middle of a small patch of seaweed to the west (Hidden; Requires Dive) | ||
* Pearl - | *{{bpi|Iron}} - In a dive spot, in the middle of a small patch of seaweed to the west (Hidden; Requires Dive) | ||
* Iron - | *{{bpi|Big Pearl}} - In the southeast dive spot, among the seaweed (Hidden; Requires Dive) | ||
*{{bpi|Blue Shard}} - In the bare square among the seaweed in the southwest-most dive spot (Hidden; Requires Dive) | |||
* Big Pearl - | |||
* | |||
==Pokémon found== | ==Pokémon found== | ||
{| {{ | {| {{Prettytable|text center=1}} | ||
! style="background-color:#383a32;color:#fff" | Ruby, Sapphire, & Emerald | |||
! style="background-color:# | ! style="background-color:#383a32;color:#fff" | Level | ||
! style="background-color:# | ! style="background-color:#383a32;color:#fff" | Encounter Rate | ||
! style="background-color:# | |- | ||
! style="background-color:# | ! style="background-color:#{{Pokemon color|Water light}};color:#fff" colspan="3"| Surfing | ||
|- | |||
| style="vertical-align:middle" | {{PokePic|Tentacool}}{{bp|Tentacool}} | |||
| | | style="vertical-align:middle" | 5-35 | ||
|| | | style="vertical-align:middle" | 60% | ||
| | |- | ||
|| | | style="vertical-align:middle" | {{PokePic|Wingull}}{{bp|Wingull}} | ||
| | | style="vertical-align:middle" | 10-30 | ||
| | | style="vertical-align:middle" | 35% | ||
| | |- | ||
| style="vertical-align:middle" | {{PokePic|Pelipper}}{{bp|Pelipper}} | |||
| style="vertical-align:middle" | 25-30 | |||
| style="vertical-align:middle" | 5% | |||
|- | |||
! style="background-color:#{{Pokemon color|Water light}};color:#fff" colspan="3"| Old Rod | |||
|- | |- | ||
| | | style="vertical-align:middle" | {{PokePic|Magikarp}}{{bp|Magikarp}} | ||
| style="vertical-align:middle" | 5-10 | |||
| style="vertical-align:middle" | 70% | |||
| | |||
| | |||
| | |||
|- | |- | ||
| | | style="vertical-align:middle" | {{PokePic|Tentacool}}{{bp|Tentacool}} | ||
| | | style="vertical-align:middle" | 5-10 | ||
| style="vertical-align:middle" | 30% | |||
| | |||
|- | |- | ||
! style="background-color:#{{Pokemon color|Water}};color:#fff" colspan="3"| Good Rod | |||
| | |||
|- | |- | ||
| | | style="vertical-align:middle" | {{PokePic|Magikarp}}{{bp|Magikarp}} | ||
| style="vertical-align:middle" | 10-30 | |||
| style="vertical-align:middle" | 60% | |||
|30 | |||
| | |||
|- | |- | ||
| style="vertical-align:middle" | {{PokePic|Tentacool}}{{bp|Tentacool}} | |||
| style="vertical-align:middle" | 10-30 | |||
| style="vertical-align:middle" | 20% | |||
|- | |- | ||
| | | style="vertical-align:middle" | {{PokePic|Wailmer}}{{bp|Wailmer}} | ||
| style="vertical-align:middle" | 10-30 | |||
| style="vertical-align:middle" | 20% | |||
| | |||
| | |||
| | |||
|- | |- | ||
! style="background-color:#{{Pokemon color|Water dark}};color:#fff" colspan="3"| Super Rod | |||
| | |||
|- | |- | ||
| | | style="vertical-align:middle" | {{PokePic|Wailmer}}{{bp|Wailmer}} | ||
| style="vertical-align:middle" | 25-45 | |||
| style="vertical-align:middle" | 60% | |||
| | |||
| | |||
| | |||
|- | |- | ||
| style="vertical-align:middle" | {{PokePic|Sharpedo}}{{bp|Sharpedo}} | |||
| style="vertical-align:middle" | 30-35 | |||
| style="vertical-align:middle" | 40% | |||
|- | |- | ||
! style="background-color:#{{Pokemon color|Water dark}};color:#fff" colspan="3"| Underwater | |||
| | |||
|- | |- | ||
| | | style="vertical-align:middle" | {{PokePic|Clamperl}}{{bp|Clamperl}} | ||
| style="vertical-align:middle" | 20-35 | |||
| style="vertical-align:middle" | 65% | |||
| | |||
|65% | |||
|- | |- | ||
| | | style="vertical-align:middle" | {{PokePic|Chinchou}}{{bp|Chinchou}} | ||
| style="vertical-align:middle" | 20-30 | |||
| style="vertical-align:middle" | 30% | |||
|30 | |||
| | |||
|30% | |||
|- | |- | ||
| | | style="vertical-align:middle" | {{PokePic|Relicanth}}{{bp|Relicanth}} | ||
| style="vertical-align:middle" | 30-35 | |||
| style="vertical-align:middle" | 5% | |||
| | |||
| | |||
|5% | |||
|} | |} | ||
{{bp|Relicanth}} is found underwater in Route 126. Though it is a fish Pokémon, it cannot be caught with a fishing rod. It is slightly tough to catch; 2 or 3 {{bpi|Ultra Ball}}s might get wasted, and {{bpi|Net Ball}}s and {{bpi|Dive Ball}}s do not work well. | |||
Along with {{bp|Wailord}}, Relicanth needs to be present in the your team to remove the seals from the hiding places of the Legendary Pokémon, {{bp|Regirock}}, {{bp|Regice}} and {{bp|Registeel}}. To see more detailed information on this, see [[../Capturing the Regis/]]. | |||
Along with {{bp|Wailord}}, Relicanth needs to be present in the your team to remove the seals from the hiding places of the Legendary Pokémon, {{bp|Regirock}}, {{bp|Regice}} and {{bp|Registeel}}. | |||
{{Footer Nav|game=Pokémon Ruby and Sapphire|prevpage=Seafloor Cavern|nextpage=Sootopolis City}} | {{Footer Nav|game=Pokémon Ruby and Sapphire|prevpage=Seafloor Cavern|nextpage=Sootopolis City}} | ||
Latest revision as of 22:35, 27 November 2023


Route 126 is a large, circular area with a dormant volcano at its center, the home of all Sootpolites. There is a multitude of trainers to battle and items to find, but you can do that later - you've got a Region to save! To continue the main story, head to the southern part of the route and use Dive on the dark patch, and enter the cave you find underneath.
Trainers[edit]
| Ruby and Sapphire | ||
|---|---|---|
| Picture | Pokémon | Reward |
| Emerald | ||
|---|---|---|
| Picture | Pokémon | Reward |
Items[edit]
- Ultra Ball - In the central northern dive spot (Hidden; Requires Dive)
- Heart Scale - In the northwest dive spot (Hidden; Requires Dive)
- Stardust - In the northeast dark spot (Hidden; Requires Dive)
- Yellow Shard - In a dive spot, in the middle of a small patch of seaweed to the west (Hidden; Requires Dive)
- Pearl - In a dive spot, in the middle of a small patch of seaweed to the west (Hidden; Requires Dive)
- Iron - In a dive spot, in the middle of a small patch of seaweed to the west (Hidden; Requires Dive)
- Big Pearl - In the southeast dive spot, among the seaweed (Hidden; Requires Dive)
- Blue Shard - In the bare square among the seaweed in the southwest-most dive spot (Hidden; Requires Dive)
Pokémon found[edit]
| Ruby, Sapphire, & Emerald | Level | Encounter Rate |
|---|---|---|
| Surfing | ||
| 5-35 | 60% | |
| 10-30 | 35% | |
| 25-30 | 5% | |
| Old Rod | ||
| 5-10 | 70% | |
| 5-10 | 30% | |
| Good Rod | ||
| 10-30 | 60% | |
| 10-30 | 20% | |
| 10-30 | 20% | |
| Super Rod | ||
| 25-45 | 60% | |
| 30-35 | 40% | |
| Underwater | ||
| 20-35 | 65% | |
| 20-30 | 30% | |
| 30-35 | 5% | |
Relicanth is found underwater in Route 126. Though it is a fish Pokémon, it cannot be caught with a fishing rod. It is slightly tough to catch; 2 or 3 Ultra Ball s might get wasted, and Net Ball s and Dive Ball s do not work well.
Along with Wailord, Relicanth needs to be present in the your team to remove the seals from the hiding places of the Legendary Pokémon, Regirock, Regice and Registeel. To see more detailed information on this, see Capturing the Regis.


