Jump to navigation
Jump to search
Route 132
m (Cleanup) |
(Found another trainer while playing sapphire) Tags: Mobile edit Mobile web edit |
||
| (11 intermediate revisions by 7 users not shown) | |||
| Line 1: | Line 1: | ||
{{Header Nav|game=Pokémon Ruby and Sapphire| | {{Header Nav|game=Pokémon Ruby and Sapphire}} | ||
{| {{prettytable|notwide=1}} align="right" style="text-align:center" | |||
|+ New Pokémon | |||
! style="background-color:#a82c2a; color:#fff" | Ruby | |||
! style="background-color:#36c; color:#fff" | Sapphire | |||
! style="background-color:#008000; color:#fff" | Emerald | |||
|- valign="center" | |||
| colspan=3 | [[File:Pokemon 116Horsea.png|40px]]{{bp|Horsea}} | |||
|} | |||
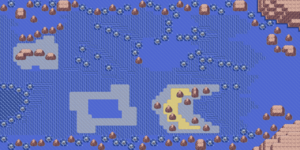
[[File:PKMN Emerald Route132.png|right|thumb|Route 132]] | |||
This route mostly exists as a transporting route, take note of the water current path you take, as it affects where you end up in Routes 133 and 134. | |||
However, before you venture on this route you should have the following in your party: | |||
*one Pokémon that knows Fly (in case you got stuck and need to start the route over) | |||
*one Pokémon that knows Dig (you'll find out why in a few pages) | |||
*Relicanth | |||
*Wailord | |||
==Pokémon found== | |||
{| {{prettytable|text center=1}} | |||
|+ Pokémon found (Surfing) | |||
! style="background-color:#a82c2a;color:#fff" | Ruby | |||
! style="background-color:#a82c2a;color:#fff" | Encounter Rate | |||
! style="background-color:#36c;color:#fff" | Sapphire | |||
! style="background-color:#36c;color:#fff" | Encounter Rate | |||
! style="background-color:#008000;color:#fff" | Emerald | |||
! style="background-color:#008000;color:#fff" | Encounter Rate | |||
|- valign="center" | |||
||[[File:Pokemon_072Tentacool.png|40px]]{{bp|Tentacool}} | |||
|60% | |||
||[[File:Pokemon_072Tentacool.png|40px]]{{bp|Tentacool}} | |||
|60% | |||
||[[File:Pokemon_072Tentacool.png|40px]]{{bp|Tentacool}} | |||
|60% | |||
|- | |||
||[[File:Pokemon_278Wingull.png|40px]]{{bp|Wingull}} | |||
|35% | |||
||[[File:Pokemon_278Wingull.png|40px]]{{bp|Wingull}} | |||
|35% | |||
||[[File:Pokemon_278Wingull.png|40px]]{{bp|Wingull}} | |||
|35% | |||
|- | |||
||[[File:Pokemon_279Pelipper.png|40px]]{{bp|Pelipper}} | |||
|5% | |||
||[[File:Pokemon_279Pelipper.png|40px]]{{bp|Pelipper}} | |||
|5% | |||
||[[File:Pokemon_279Pelipper.png|40px]]{{bp|Pelipper}} | |||
|5% | |||
|} | |||
{| {{prettytable|text center=1}} | |||
|+ Pokémon found (Fishing) | |||
! style="background-color:#a82c2a;color:#fff" | Ruby | |||
! style="background-color:#a82c2a;color:#fff" | Encounter Rate | |||
! style="background-color:#36c;color:#fff" | Sapphire | |||
! style="background-color:#36c;color:#fff" | Encounter Rate | |||
! style="background-color:#008000;color:#fff" | Emerald | |||
! style="background-color:#008000;color:#fff" | Encounter Rate | |||
|- valign="center" | |||
! style="background-color:#49c;color:#fff" colspan="6" | Old Rod | |||
|- | |||
||[[File:Pokemon_129Magikarp.png|40px]]{{bp|Magikarp}} | |||
|70% | |||
||[[File:Pokemon_129Magikarp.png|40px]]{{bp|Magikarp}} | |||
|70% | |||
||[[File:Pokemon_129Magikarp.png|40px]]{{bp|Magikarp}} | |||
|70% | |||
|- | |||
||[[File:Pokemon_072Tentacool.png|40px]]{{bp|Tentacool}} | |||
|30% | |||
||[[File:Pokemon_072Tentacool.png|40px]]{{bp|Tentacool}} | |||
|30% | |||
||[[File:Pokemon_072Tentacool.png|40px]]{{bp|Tentacool}} | |||
|30% | |||
|- | |||
! style="background-color:#49c;color:#fff" colspan="6" | Good Rod | |||
|- | |||
||[[File:Pokemon_129Magikarp.png|40px]]{{bp|Magikarp}} | |||
|60% | |||
||[[File:Pokemon_129Magikarp.png|40px]]{{bp|Magikarp}} | |||
|60% | |||
||[[File:Pokemon_129Magikarp.png|40px]]{{bp|Magikarp}} | |||
|60% | |||
|- | |||
||[[File:Pokemon_072Tentacool.png|40px]]{{bp|Tentacool}} | |||
|20% | |||
||[[File:Pokemon_072Tentacool.png|40px]]{{bp|Tentacool}} | |||
|20% | |||
||[[File:Pokemon_072Tentacool.png|40px]]{{bp|Tentacool}} | |||
|20% | |||
|- | |||
||[[File:Pokemon_320Wailmer.png|40px]]{{bp|Wailmer}} | |||
|20% | |||
||[[File:Pokemon_320Wailmer.png|40px]]{{bp|Wailmer}} | |||
|20% | |||
||[[File:Pokemon_320Wailmer.png|40px]]{{bp|Wailmer}} | |||
|20% | |||
|- | |||
|- | |||
! style="background-color:#49c;color:#fff" colspan="6" | Super Rod | |||
|- | |||
||[[File:Pokemon_320Wailmer.png|40px]]{{bp|Wailmer}} | |||
|45% | |||
||[[File:Pokemon_320Wailmer.png|40px]]{{bp|Wailmer}} | |||
|45% | |||
||[[File:Pokemon_320Wailmer.png|40px]]{{bp|Wailmer}} | |||
|45% | |||
|- | |||
||[[File:Pokemon_319Sharpedo.png|40px]]{{bp|Sharpedo}} | |||
|40% | |||
||[[File:Pokemon_319Sharpedo.png|40px]]{{bp|Sharpedo}} | |||
|40% | |||
||[[File:Pokemon_319Sharpedo.png|40px]]{{bp|Sharpedo}} | |||
|40% | |||
|- | |||
||[[File:Pokemon_116Horsea.png|40px]]{{bp|Horsea}} | |||
|15% | |||
||[[File:Pokemon_116Horsea.png|40px]]{{bp|Horsea}} | |||
|15% | |||
||[[File:Pokemon_116Horsea.png|40px]]{{bp|Horsea}} | |||
|15% | |||
|} | |||
==Items== | |||
* Rare Candy - north side of the northwest island | |||
* Protein (Emerald only) - ring-shaped island in the west | |||
==Trainers== | |||
* Black Belt Kiyo | * Black Belt Kiyo | ||
| Line 15: | Line 142: | ||
** {{bp|Gyarados|20}} | ** {{bp|Gyarados|20}} | ||
** {{bp|Magikarp|19}} | ** {{bp|Magikarp|19}} | ||
* Swimmer Dana | |||
** {{bp|Marill|33}} | |||
** {{bp|Luvdisc|33}} | |||
** {{bp|Azumarill|33}} | |||
* Swimmer Gilbert | |||
** {{bp|Sharpedo|35}} | |||
{{Footer Nav|game=Pokémon Ruby and Sapphire|prevpage= | {{Footer Nav|game=Pokémon Ruby and Sapphire|prevpage=Pacifidlog Town|nextpage=Route 133}} | ||
Latest revision as of 02:21, 2 May 2023
| Ruby | Sapphire | Emerald |
|---|---|---|

This route mostly exists as a transporting route, take note of the water current path you take, as it affects where you end up in Routes 133 and 134.
However, before you venture on this route you should have the following in your party:
- one Pokémon that knows Fly (in case you got stuck and need to start the route over)
- one Pokémon that knows Dig (you'll find out why in a few pages)
- Relicanth
- Wailord
Pokémon found[edit]
| Ruby | Encounter Rate | Sapphire | Encounter Rate | Emerald | Encounter Rate |
|---|---|---|---|---|---|
| 60% | 60% | 60% | |||
| 35% | 35% | 35% | |||
| 5% | 5% | 5% |
| Ruby | Encounter Rate | Sapphire | Encounter Rate | Emerald | Encounter Rate |
|---|---|---|---|---|---|
| Old Rod | |||||
| 70% | 70% | 70% | |||
| 30% | 30% | 30% | |||
| Good Rod | |||||
| 60% | 60% | 60% | |||
| 20% | 20% | 20% | |||
| 20% | 20% | 20% | |||
| Super Rod | |||||
| 45% | 45% | 45% | |||
| 40% | 40% | 40% | |||
| 15% | 15% | 15% | |||
Items[edit]
- Rare Candy - north side of the northwest island
- Protein (Emerald only) - ring-shaped island in the west
Trainers[edit]
Get the Rare Candy on the reef on the west end of the route. Come back to face the trainer on the southern portion of the reef.