Jump to navigation
Jump to search
Route 134
(updated footer) |
Trig Jegman (talk | contribs) mNo edit summary |
||
| Line 1: | Line 1: | ||
{{stub}} | {{stub}} | ||
{{Header Nav|game=Pokémon Ruby and Sapphire}} | {{Header Nav|game=Pokémon Ruby and Sapphire}} | ||
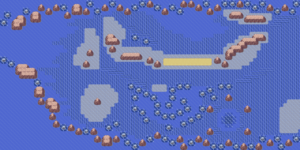
[[File: | [[File:PKMN Emerald Route134.png|right|thumb|Route 134]] | ||
This route flows into Slateport City and is important for containing the Sealed Chamber, the place where you awaken the 3 Regis (Regirock, Regice, Registeel) You have to dive to get there. You can also find a Carbos and a Star Piece here if you're playing Emerald. | This route flows into Slateport City and is important for containing the Sealed Chamber, the place where you awaken the 3 Regis (Regirock, Regice, Registeel) You have to dive to get there. You can also find a Carbos and a Star Piece here if you're playing Emerald. | ||
| Line 18: | Line 18: | ||
! style="background-color:#008000;color:#fff" | Encounter Rate | ! style="background-color:#008000;color:#fff" | Encounter Rate | ||
|- valign="center" | |- valign="center" | ||
||[[ | ||[[File:Pokemon_072Tentacool.png|40px]]{{bp|Tentacool}} | ||
|60% | |60% | ||
||[[ | ||[[File:Pokemon_072Tentacool.png|40px]]{{bp|Tentacool}} | ||
|60% | |60% | ||
||[[ | ||[[File:Pokemon_072Tentacool.png|40px]]{{bp|Tentacool}} | ||
|60% | |60% | ||
|- | |- | ||
||[[ | ||[[File:Pokemon_278Wingull.png|40px]]{{bp|Wingull}} | ||
|35% | |35% | ||
||[[ | ||[[File:Pokemon_278Wingull.png|40px]]{{bp|Wingull}} | ||
|35% | |35% | ||
||[[ | ||[[File:Pokemon_278Wingull.png|40px]]{{bp|Wingull}} | ||
|35% | |35% | ||
|- | |- | ||
||[[ | ||[[File:Pokemon_279Pelipper.png|40px]]{{bp|Pelipper}} | ||
|5% | |5% | ||
||[[ | ||[[File:Pokemon_279Pelipper.png|40px]]{{bp|Pelipper}} | ||
|5% | |5% | ||
||[[ | ||[[File:Pokemon_279Pelipper.png|40px]]{{bp|Pelipper}} | ||
|5% | |5% | ||
|} | |} | ||
| Line 50: | Line 50: | ||
! style="background-color:#49c;color:#fff" colspan="6" | Old Rod | ! style="background-color:#49c;color:#fff" colspan="6" | Old Rod | ||
|- | |- | ||
||[[ | ||[[File:Pokemon_129Magikarp.png|40px]]{{bp|Magikarp}} | ||
|70% | |70% | ||
||[[ | ||[[File:Pokemon_129Magikarp.png|40px]]{{bp|Magikarp}} | ||
|70% | |70% | ||
||[[ | ||[[File:Pokemon_129Magikarp.png|40px]]{{bp|Magikarp}} | ||
|70% | |70% | ||
|- | |- | ||
||[[ | ||[[File:Pokemon_072Tentacool.png|40px]]{{bp|Tentacool}} | ||
|30% | |30% | ||
||[[ | ||[[File:Pokemon_072Tentacool.png|40px]]{{bp|Tentacool}} | ||
|30% | |30% | ||
||[[ | ||[[File:Pokemon_072Tentacool.png|40px]]{{bp|Tentacool}} | ||
|30% | |30% | ||
|- | |- | ||
! style="background-color:#49c;color:#fff" colspan="6" | Good Rod | ! style="background-color:#49c;color:#fff" colspan="6" | Good Rod | ||
|- | |- | ||
||[[ | ||[[File:Pokemon_129Magikarp.png|40px]]{{bp|Magikarp}} | ||
|60% | |60% | ||
||[[ | ||[[File:Pokemon_129Magikarp.png|40px]]{{bp|Magikarp}} | ||
|60% | |60% | ||
||[[ | ||[[File:Pokemon_129Magikarp.png|40px]]{{bp|Magikarp}} | ||
|60% | |60% | ||
|- | |- | ||
||[[ | ||[[File:Pokemon_072Tentacool.png|40px]]{{bp|Tentacool}} | ||
|20% | |20% | ||
||[[ | ||[[File:Pokemon_072Tentacool.png|40px]]{{bp|Tentacool}} | ||
|20% | |20% | ||
||[[ | ||[[File:Pokemon_072Tentacool.png|40px]]{{bp|Tentacool}} | ||
|20% | |20% | ||
|- | |- | ||
||[[ | ||[[File:Pokemon_320Wailmer.png|40px]]{{bp|Wailmer}} | ||
|20% | |20% | ||
||[[ | ||[[File:Pokemon_320Wailmer.png|40px]]{{bp|Wailmer}} | ||
|20% | |20% | ||
||[[ | ||[[File:Pokemon_320Wailmer.png|40px]]{{bp|Wailmer}} | ||
|20% | |20% | ||
|- | |- | ||
| Line 90: | Line 90: | ||
! style="background-color:#49c;color:#fff" colspan="6" | Super Rod | ! style="background-color:#49c;color:#fff" colspan="6" | Super Rod | ||
|- | |- | ||
||[[ | ||[[File:Pokemon_320Wailmer.png|40px]]{{bp|Wailmer}} | ||
|45% | |45% | ||
||[[ | ||[[File:Pokemon_320Wailmer.png|40px]]{{bp|Wailmer}} | ||
|45% | |45% | ||
||[[ | ||[[File:Pokemon_320Wailmer.png|40px]]{{bp|Wailmer}} | ||
|45% | |45% | ||
|- | |- | ||
||[[ | ||[[File:Pokemon_319Sharpedo.png|40px]]{{bp|Sharpedo}} | ||
|40% | |40% | ||
||[[ | ||[[File:Pokemon_319Sharpedo.png|40px]]{{bp|Sharpedo}} | ||
|40% | |40% | ||
||[[ | ||[[File:Pokemon_319Sharpedo.png|40px]]{{bp|Sharpedo}} | ||
|40% | |40% | ||
|- | |- | ||
||[[ | ||[[File:Pokemon_116Horsea.png|40px]]{{bp|Horsea}} | ||
|15% | |15% | ||
||[[ | ||[[File:Pokemon_116Horsea.png|40px]]{{bp|Horsea}} | ||
|15% | |15% | ||
||[[ | ||[[File:Pokemon_116Horsea.png|40px]]{{bp|Horsea}} | ||
|15% | |15% | ||
|} | |} | ||
{{Footer Nav|game=Pokémon Ruby and Sapphire|prevpage=Route 133|nextpage=Capturing the Regis}} | {{Footer Nav|game=Pokémon Ruby and Sapphire|prevpage=Route 133|nextpage=Capturing the Regis}} | ||
Latest revision as of 22:49, 20 September 2022

This route flows into Slateport City and is important for containing the Sealed Chamber, the place where you awaken the 3 Regis (Regirock, Regice, Registeel) You have to dive to get there. You can also find a Carbos and a Star Piece here if you're playing Emerald.
Items[edit]
- Carbos (Emerald only) - west end of the long island
- Star Piece (Emerald only) - southwest corner island
Pokémon found[edit]
| Ruby | Encounter Rate | Sapphire | Encounter Rate | Emerald | Encounter Rate |
|---|---|---|---|---|---|
| 60% | 60% | 60% | |||
| 35% | 35% | 35% | |||
| 5% | 5% | 5% |
| Ruby | Encounter Rate | Sapphire | Encounter Rate | Emerald | Encounter Rate |
|---|---|---|---|---|---|
| Old Rod | |||||
| 70% | 70% | 70% | |||
| 30% | 30% | 30% | |||
| Good Rod | |||||
| 60% | 60% | 60% | |||
| 20% | 20% | 20% | |||
| 20% | 20% | 20% | |||
| Super Rod | |||||
| 45% | 45% | 45% | |||
| 40% | 40% | 40% | |||
| 15% | 15% | 15% | |||