(updated encounters table; removed wip template) |
|||
| (13 intermediate revisions by 5 users not shown) | |||
| Line 1: | Line 1: | ||
{{Header Nav|game=Pokémon Ruby and Sapphire}} | {{Header Nav|game=Pokémon Ruby and Sapphire}} | ||
[[File:PKMN RubySapphire ShoalCave1F-1 HighTide.png|thumb|left|300px|Floor 1F-1 at high tide, in Ruby & Sapphire.]] | |||
[[File:PKMN Emerald ShoalCave1F-1 HighTide.png|thumb|right|300px|Floor 1F-1 at high tide, in Emerald.]] | |||
{{-}} | |||
{| {{prettytable|notwide=1}} align="left" style="text-align:center" | |||
|+ New Pokémon | |||
! style="background-color:#a82c2a; color:#fff" | Ruby | |||
! style="background-color:#00036c; color:#fff" | Sapphire | |||
! style="background-color:#008000; color:#fff" | Emerald | |||
|- valign="center" | |||
| colspan=3 | {{PokePic|Snorunt}}{{bp|Snorunt}}<br>{{PokePic|Spheal}}{{bp|Spheal}} | |||
|} | |||
'''Shoal Cave''' is an average size cave, accessible only from [[../Route 125/]] (and by extension [[../Mossdeep City/]]). It is unique in the fact that it is the only cave in Hoenn to have a significant tidal clock - so significant, in fact, that the traversable area of the cave doubles during Low Tide. In order to check whether it's high or low tide beforehand, Trainers can speak to Sailor Ernest on Route 125. | |||
Shoal Cave is also the only location in the region where {{bpi|Shoal Salt}} and {{bpi|Shoal Shells}} can be found, which are both required for a unique item, and thus have their own section. | |||
In order to fully explore the cave and all it has to offer, it is recommended that Trainers bring Pokémon that know {{bpm|Surf}} and {{bpm|Strength}}. | |||
{{Footer Nav|game=Pokémon Ruby and Sapphire|nextpage=Route | ==The Tides== | ||
Shoal Cave is the only area in the game to use a tidal system - what areas of the cave you can access changes depending on what the tide level is. | |||
===High Tide=== | |||
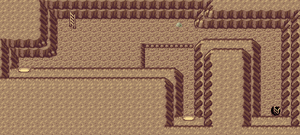
[[File:PKMN RubySapphire ShoalCave1F-2 HighTide.png|thumb|right|300px|Floor 1F-2 at high tide, in Ruby & Sapphire.]] | |||
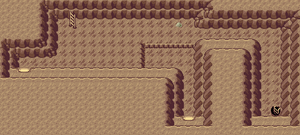
[[File:PKMN Emerald ShoalCave1F-2 HighTide.png|thumb|right|300px|Floor 1F-2 at high tide, in Emerald.]] | |||
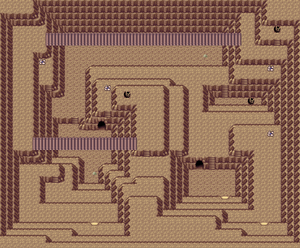
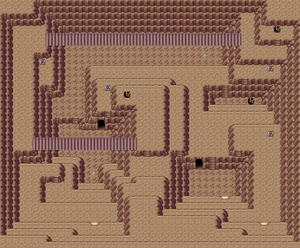
During high tide, only the first two rooms are available - and even then, you can't get everything in those two rooms. | |||
====Items==== | |||
*{{bpi|Big Pearl}} - Room 1F-1, in the northeast, accessible from the inner room. | |||
*{{bpi|Rare Candy}} - Room 1F-2, east of the central ledge. | |||
*{{bpi|Shoal Shell}} - Room 1F-2, on a ledge just north of the southern bridge. | |||
*{{bpi|Shoal Shell}} - Room 1F-2, on the north-western ledge. | |||
*{{bpi|Shoal Shell}} - Room 1F-2, on the north-eastern ledge. | |||
*{{bpi|Shoal Shell}} - Room 1F-2, on the south-eastern ledge. | |||
===Low Tide=== | |||
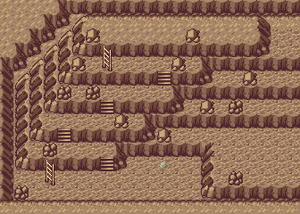
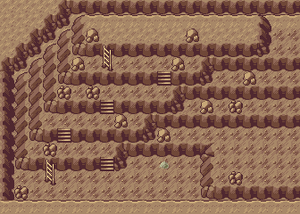
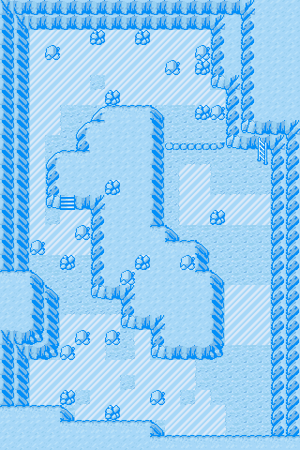
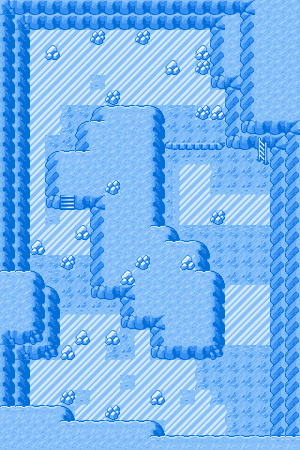
During low tide, you gain access to the rest of the cave, from the previously unreachable areas at the start to the icy depths at the bottom. This is also when you can get unique items, so it's definitely worth it to explore the cave at low tide. | |||
====Items==== | |||
*{{bpi|Shoal Salt}} - Room 1F-2, outside the western exit from the lower room. | |||
*{{bpi|Shoal Salt}} - Room 1F-2, under the northern bridge. | |||
*{{bpi|Shoal Salt}} - Room B1F, in the southeast corner. | |||
*{{bpi|Ice Heal}} - Room B1F, east of the ladder. | |||
*{{bpi|Shoal Salt}} - Room B2F, in the north and near the center. | |||
*{{bpi|Focus Band}} - Room B2F, given to the player by the Black Belt. | |||
*{{bpi|Nevr-Melt Ice}} - Room B3F, on the elevated floor. | |||
*TM07 ({{bpm|Hail}}) - Room B3F, near the ledge. | |||
===Shell Bell=== | |||
If you collect 4 Shoal Shells from high tide and 4 Shoal Salts from low tide, a man in the cave entrance will give you the {{bpi|Shell Bell}}, which restores the holder's HP by an eighth of the damage the holder just dealt. | |||
{{-}} | |||
[[File:PKMN RubySapphire ShoalCave1F-2 LowTide.png|thumb|left|300px|Floor 1F-2 at Low Tide, in Ruby & Sapphire.]] | |||
[[File:PKMN Emerald ShoalCave1F-2 LowTide.png|thumb|right|300px|Floor 1F-2 at Low Tide, in Emerald.]] | |||
[[File:PKMN RubySapphire ShoalCaveB1F.png|thumb|left|300px|Floor B1F in Ruby & Sapphire.]] | |||
[[File:PKMN Emerald ShoalCaveB1F.png|thumb|right|300px|Floor B1F in Emerald.]] | |||
[[File:PKMN RubySapphire ShoalCaveB2F.png|thumb|left|300px||Floor B2F in Ruby & Sapphire.]] | |||
[[File:PKMN Emerald ShoalCaveB2F.png|thumb|right|300px|Floor B2F in Emerald.]] | |||
[[File:PKMN RubySapphire ShoalCaveB3F.png|thumb|left|300px|Floor B3F in Ruby & Sapphire.]] | |||
[[File:PKMN Emerald ShoalCaveB3F.png|thumb|right|300px|Floor B3F in Emerald.]] | |||
{{-}} | |||
==Pokémon Found== | |||
{| {{prettytable|text center=1}} | |||
! style="background-color:#383a32;color:#fff" | Pokémon Ruby, Sapphire, & Emerald | |||
! style="background-color:#383a32;color:#fff" | Level | |||
! style="background-color:#383a32;color:#fff" | Encounter Rate | |||
|- | |||
! style="background-color:#383a32;color:#fff" colspan="3" | Floors 1F-1 to B2F | |||
|- | |||
| style="vertical-align:middle" | {{PokePic|Spheal}}{{bp|Spheal}} | |||
| style="vertical-align:middle" | 26, 28, 30, 32 | |||
| style="vertical-align:middle" | 50% | |||
|- | |||
| style="vertical-align:middle" | {{PokePic|Zubat}}{{bp|Zubat}} | |||
| style="vertical-align:middle" | 26, 28, 30, 32 | |||
| style="vertical-align:middle" | 45% | |||
|- | |||
| style="vertical-align:middle" | {{PokePic|Golbat}}{{bp|Golbat}} | |||
| style="vertical-align:middle" | 32 | |||
| style="vertical-align:middle" | 5% | |||
|- | |||
! style="background-color:#383a32;color:#fff" colspan="3" | Floor B3F | |||
|- | |||
| style="vertical-align:middle" | {{PokePic|Spheal}}{{bp|Spheal}} | |||
| style="vertical-align:middle" | 26, 28, 30, 32 | |||
| style="vertical-align:middle" | 45% | |||
|- | |||
| style="vertical-align:middle" | {{PokePic|Zubat}}{{bp|Zubat}} | |||
| style="vertical-align:middle" | 26, 28, 30 | |||
| style="vertical-align:middle" | 40% | |||
|- | |||
| style="vertical-align:middle" | {{PokePic|Snorunt}}{{bp|Snorunt}} | |||
| style="vertical-align:middle" | 26, 28, 30 | |||
| style="vertical-align:middle" | 10% | |||
|- | |||
| style="vertical-align:middle" | {{PokePic|Golbat}}{{bp|Golbat}} | |||
| style="vertical-align:middle" | 30, 32 | |||
| style="vertical-align:middle" | 5% | |||
|- | |||
! style="background-color:#{{Pokemon color|Water light}};color:#fff" colspan="3" | Surfing | |||
|- | |||
| style="vertical-align:middle" | {{PokePic|Tentacool}}{{bp|Tentacool}} | |||
| style="vertical-align:middle" | 5-35 | |||
| style="vertical-align:middle" | 60% | |||
|- | |||
| style="vertical-align:middle" | {{PokePic|Zubat}}{{bp|Zubat}} | |||
| style="vertical-align:middle" | 5-35 | |||
| style="vertical-align:middle" | 30% | |||
|- | |||
| style="vertical-align:middle" | {{PokePic|Spheal}}{{bp|Spheal}} | |||
| style="vertical-align:middle" | 25-35 | |||
| style="vertical-align:middle" | 10% | |||
|- | |||
! style="background-color:#{{Pokemon color|Water light}};color:#fff" colspan="3"| Old Rod | |||
|- | |||
| style="vertical-align:middle" | {{PokePic|Magikarp}}{{bp|Magikarp}} | |||
| style="vertical-align:middle" | 5-10 | |||
| style="vertical-align:middle" | 70% | |||
|- | |||
| style="vertical-align:middle" | {{PokePic|Tentacool}}{{bp|Tentacool}} | |||
| style="vertical-align:middle" | 5-10 | |||
| style="vertical-align:middle" | 30% | |||
|- | |||
! style="background-color:#{{Pokemon color|Water}};color:#fff" colspan="3"| Good Rod | |||
|- | |||
| style="vertical-align:middle" | {{PokePic|Magikarp}}{{bp|Magikarp}} | |||
| style="vertical-align:middle" | 10-30 | |||
| style="vertical-align:middle" | 60% | |||
|- | |||
| style="vertical-align:middle" | {{PokePic|Tentacool}}{{bp|Tentacool}} | |||
| style="vertical-align:middle" | 10-30 | |||
| style="vertical-align:middle" | 20% | |||
|- | |||
| style="vertical-align:middle" | {{PokePic|Wailmer}}{{bp|Wailmer}} | |||
| style="vertical-align:middle" | 10-30 | |||
| style="vertical-align:middle" | 20% | |||
|- | |||
! style="background-color:#{{Pokemon color|Water dark}};color:#fff" colspan="3" | Super Rod | |||
|- | |||
| style="vertical-align:middle" | {{PokePic|Wailmer}}{{bp|Wailmer}} | |||
| style="vertical-align:middle" | 20-45 | |||
| style="vertical-align:middle" | 100% | |||
|} | |||
{{Footer Nav|game=Pokémon Ruby and Sapphire|nextpage=Route 127|prevpage=Route 125}} | |||
Latest revision as of 14:56, 13 October 2022
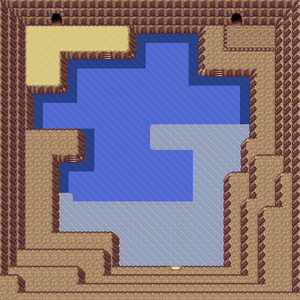
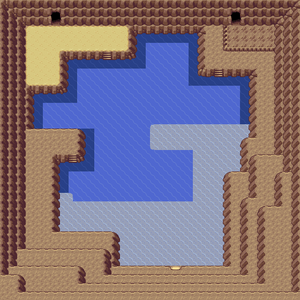
| Ruby | Sapphire | Emerald |
|---|---|---|
Shoal Cave is an average size cave, accessible only from Route 125 (and by extension Mossdeep City). It is unique in the fact that it is the only cave in Hoenn to have a significant tidal clock - so significant, in fact, that the traversable area of the cave doubles during Low Tide. In order to check whether it's high or low tide beforehand, Trainers can speak to Sailor Ernest on Route 125.
Shoal Cave is also the only location in the region where Shoal Salt and Shoal Shells can be found, which are both required for a unique item, and thus have their own section.
In order to fully explore the cave and all it has to offer, it is recommended that Trainers bring Pokémon that know Surf and Strength.
The Tides[edit]
Shoal Cave is the only area in the game to use a tidal system - what areas of the cave you can access changes depending on what the tide level is.
High Tide[edit]
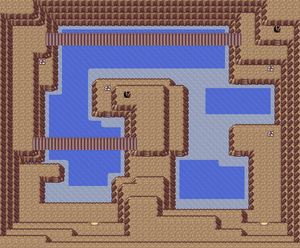
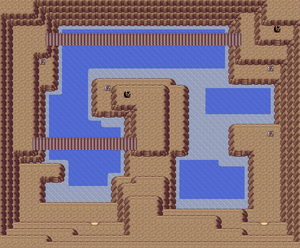
During high tide, only the first two rooms are available - and even then, you can't get everything in those two rooms.
Items[edit]
- Big Pearl - Room 1F-1, in the northeast, accessible from the inner room.
- Rare Candy - Room 1F-2, east of the central ledge.
- Shoal Shell - Room 1F-2, on a ledge just north of the southern bridge.
- Shoal Shell - Room 1F-2, on the north-western ledge.
- Shoal Shell - Room 1F-2, on the north-eastern ledge.
- Shoal Shell - Room 1F-2, on the south-eastern ledge.
Low Tide[edit]
During low tide, you gain access to the rest of the cave, from the previously unreachable areas at the start to the icy depths at the bottom. This is also when you can get unique items, so it's definitely worth it to explore the cave at low tide.
Items[edit]
- Shoal Salt - Room 1F-2, outside the western exit from the lower room.
- Shoal Salt - Room 1F-2, under the northern bridge.
- Shoal Salt - Room B1F, in the southeast corner.
- Ice Heal - Room B1F, east of the ladder.
- Shoal Salt - Room B2F, in the north and near the center.
- Focus Band - Room B2F, given to the player by the Black Belt.
- Nevr-Melt Ice - Room B3F, on the elevated floor.
- TM07 (Hail) - Room B3F, near the ledge.
Shell Bell[edit]
If you collect 4 Shoal Shells from high tide and 4 Shoal Salts from low tide, a man in the cave entrance will give you the Shell Bell , which restores the holder's HP by an eighth of the damage the holder just dealt.
Pokémon Found[edit]
| Pokémon Ruby, Sapphire, & Emerald | Level | Encounter Rate |
|---|---|---|
| Floors 1F-1 to B2F | ||
| 26, 28, 30, 32 | 50% | |
| 26, 28, 30, 32 | 45% | |
| 32 | 5% | |
| Floor B3F | ||
| 26, 28, 30, 32 | 45% | |
| 26, 28, 30 | 40% | |
| 26, 28, 30 | 10% | |
| 30, 32 | 5% | |
| Surfing | ||
| 5-35 | 60% | |
| 5-35 | 30% | |
| 25-35 | 10% | |
| Old Rod | ||
| 5-10 | 70% | |
| 5-10 | 30% | |
| Good Rod | ||
| 10-30 | 60% | |
| 10-30 | 20% | |
| 10-30 | 20% | |
| Super Rod | ||
| 20-45 | 100% | |