Jump to navigation
Jump to search
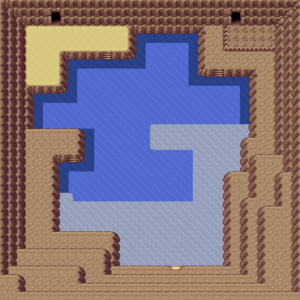
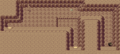
Shoal Cave front cave at high tide. 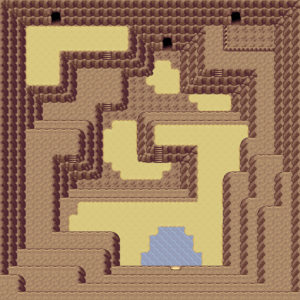
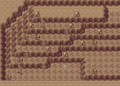
Shoal Cave front cave at low tide.
(added items) |
(added new Pokemon table and maps) |
||
| Line 1: | Line 1: | ||
{{Header Nav|game=Pokémon Ruby and Sapphire}} | {{Header Nav|game=Pokémon Ruby and Sapphire}} | ||
{| {{prettytable|notwide=1}} align="right" style="text-align:center" | |||
|+ New Pokémon | |||
! style="background-color:#a82c2a; color:#fff" | Ruby | |||
! style="background-color:#36c; color:#fff" | Sapphire | |||
! style="background-color:#008000; color:#fff" | Emerald | |||
|- valign="center" | |||
| colspan=3 | [[File:Pokemon 361Snorunt.png|40px]]{{bp|Snorunt}}<br /> | |||
[[File:Pokemon 363Spheal.png|40px]] {{bp|Spheal}} | |||
|} | |||
[[File:PRS%26E_ShoalCave_HighTide_1F_front.png|right|thumb|Shoal Cave front cave at high tide.]] | |||
[[File:PRS%26E_ShoalCave_LowTide_1F_front.png|right|thumb|Shoal Cave front cave at low tide.]] | |||
The Shoal Cave is located just outside of Mossdeep City. | The Shoal Cave is located just outside of Mossdeep City. | ||
| Line 29: | Line 40: | ||
{| {{prettytable|text center=1}} | {| {{prettytable|text center=1}} | ||
|+ Pokémon found (cave) | |+ Pokémon found (cave) | ||
! style="background-color:#a82c2a;color:#fff" | Ruby | |||
! style="background-color:#a82c2a;color:#fff" | Encounter Rate | |||
! style="background-color:#36c;color:#fff" | Sapphire | ! style="background-color:#36c;color:#fff" | Sapphire | ||
! style="background-color:#36c;color:#fff" | Encounter Rate | ! style="background-color:#36c;color:#fff" | Encounter Rate | ||
! style="background-color:#008000;color:#fff" | Emerald | ! style="background-color:#008000;color:#fff" | Emerald | ||
! style="background-color:#008000;color:#fff" | Encounter Rate | ! style="background-color:#008000;color:#fff" | Encounter Rate | ||
| Line 59: | Line 70: | ||
{| {{prettytable|text center=1}} | {| {{prettytable|text center=1}} | ||
|+ Pokémon found (Surfing) | |+ Pokémon found (Surfing) | ||
! style="background-color:#a82c2a;color:#fff" | Ruby | |||
! style="background-color:#a82c2a;color:#fff" | Encounter Rate | |||
! style="background-color:#36c;color:#fff" | Sapphire | ! style="background-color:#36c;color:#fff" | Sapphire | ||
! style="background-color:#36c;color:#fff" | Encounter Rate | ! style="background-color:#36c;color:#fff" | Encounter Rate | ||
! style="background-color:#008000;color:#fff" | Emerald | ! style="background-color:#008000;color:#fff" | Emerald | ||
! style="background-color:#008000;color:#fff" | Encounter Rate | ! style="background-color:#008000;color:#fff" | Encounter Rate | ||
| Line 89: | Line 100: | ||
{| {{prettytable|text center=1}} | {| {{prettytable|text center=1}} | ||
|+ Pokémon found (Fishing) | |+ Pokémon found (Fishing) | ||
! style="background-color:#a82c2a;color:#fff" | Ruby | |||
! style="background-color:#a82c2a;color:#fff" | Encounter Rate | |||
! style="background-color:#36c;color:#fff" | Sapphire | ! style="background-color:#36c;color:#fff" | Sapphire | ||
! style="background-color:#36c;color:#fff" | Encounter Rate | ! style="background-color:#36c;color:#fff" | Encounter Rate | ||
! style="background-color:#008000;color:#fff" | Emerald | ! style="background-color:#008000;color:#fff" | Emerald | ||
! style="background-color:#008000;color:#fff" | Encounter Rate | ! style="background-color:#008000;color:#fff" | Encounter Rate | ||
| Line 148: | Line 159: | ||
{| {{prettytable|text center=1}} | {| {{prettytable|text center=1}} | ||
|+ Pokémon found (cave) | |+ Pokémon found (cave) | ||
! style="background-color:#a82c2a;color:#fff" | Ruby | |||
! style="background-color:#a82c2a;color:#fff" | Encounter Rate | |||
! style="background-color:#36c;color:#fff" | Sapphire | ! style="background-color:#36c;color:#fff" | Sapphire | ||
! style="background-color:#36c;color:#fff" | Encounter Rate | ! style="background-color:#36c;color:#fff" | Encounter Rate | ||
! style="background-color:#008000;color:#fff" | Emerald | ! style="background-color:#008000;color:#fff" | Emerald | ||
! style="background-color:#008000;color:#fff" | Encounter Rate | ! style="background-color:#008000;color:#fff" | Encounter Rate | ||
| Line 179: | Line 190: | ||
{| {{prettytable|text center=1}} | {| {{prettytable|text center=1}} | ||
|+ Pokémon found (cave) | |+ Pokémon found (cave) | ||
! style="background-color:#a82c2a;color:#fff" | Ruby | |||
! style="background-color:#a82c2a;color:#fff" | Encounter Rate | |||
! style="background-color:#36c;color:#fff" | Sapphire | ! style="background-color:#36c;color:#fff" | Sapphire | ||
! style="background-color:#36c;color:#fff" | Encounter Rate | ! style="background-color:#36c;color:#fff" | Encounter Rate | ||
! style="background-color:#008000;color:#fff" | Emerald | ! style="background-color:#008000;color:#fff" | Emerald | ||
! style="background-color:#008000;color:#fff" | Encounter Rate | ! style="background-color:#008000;color:#fff" | Encounter Rate | ||
| Line 217: | Line 228: | ||
==Shell Bell== | ==Shell Bell== | ||
If you collect 4 Shoal Shells from high tide and 4 Shoal Salts from low tide, a man will give you a '''Shell Bell''' for those, it will restore your HP by 1/8 of the damage you dealt to the opponent. | If you collect 4 Shoal Shells from high tide and 4 Shoal Salts from low tide, a man will give you a '''Shell Bell''' for those, it will restore your HP by 1/8 of the damage you dealt to the opponent. | ||
==Maps== | |||
<gallery> | |||
File:PRS%26E_ShoalCave_HighTide_1F_back.png|Floor 1 back cave - high tide | |||
File:PRS%26E_ShoalCave_LowTide_1F_back.png|Floor 1 back cave - low tide | |||
File:PRS%26E_ShoalCave_LowTide_B1F.png|Basement floor 1 - low tide | |||
File:PRS%26E_ShoalCave_LowTide_B2F.png|Basement floor 2 - low tide | |||
File:PRS%26E_ShoalCave_LowTide_B3F.png|Basement floor 3 - low tide | |||
</gallery> | |||
{{Footer Nav|game=Pokémon Ruby and Sapphire|nextpage=Route 127|prevpage=Route 125}} | {{Footer Nav|game=Pokémon Ruby and Sapphire|nextpage=Route 127|prevpage=Route 125}} | ||
Revision as of 20:53, 25 November 2018
| Ruby | Sapphire | Emerald |
|---|---|---|


The Shoal Cave is located just outside of Mossdeep City.
Depending on the time of day there is high tide and low tide. You can confirm the schedule by speaking with Sailor Ernest from Route 125.
Items
(Low Tide)
- Shoal Salt - second cavern in the southwest
- Shoal Salt - second cavern under the bridge in the north
- Shoal Salt - middle of the third cavern
- Shoal Salt - southeast corner of the cavern with stairs/ladders
- Ice Heal - southeast corner of the stairs/ladder room
- Focus Band - receive from the Black Belt trainer
- Never-Melt Ice - central plateau of the Ice Cavern
- TM07 (Hail) - ledge in the Ice Cavern
(High Tide)
- Shoal Shell - back cavern, center ledge
- Shoal Shell - back cavern, northwest ledge
- Shoal Shell - back cavern, northeast ledge
- Shoal Shell - back cavern, southeast ledge
- Rare Candy - back cavern, east side
- Big Pearl - northeast ledge of front cavern
Pokemon Found
High Tide
All Rooms
| Ruby | Encounter Rate | Sapphire | Encounter Rate | Emerald | Encounter Rate |
|---|---|---|---|---|---|
| 50% | 50% | 50% | |||
| 45% | 45% | 45% | |||
| 5% | 5% | 5% |
| Ruby | Encounter Rate | Sapphire | Encounter Rate | Emerald | Encounter Rate |
|---|---|---|---|---|---|
| 60% | 60% | 60% | |||
| 30% | 30% | 30% | |||
| 10% | 10% | 10% |
| Ruby | Encounter Rate | Sapphire | Encounter Rate | Emerald | Encounter Rate |
|---|---|---|---|---|---|
| Old Rod | |||||
| 70% | 70% | 70% | |||
| 30% | 30% | 30% | |||
| Good Rod | |||||
| 60% | 60% | 60% | |||
| 20% | 20% | 20% | |||
| 20% | 20% | 20% | |||
| Super Rod | |||||
| 100% | 100% | 100% | |||
Low Tide
1F-1,1F-2,BF-1, BF-2
| Ruby | Encounter Rate | Sapphire | Encounter Rate | Emerald | Encounter Rate |
|---|---|---|---|---|---|
| 50% | 50% | 50% | |||
| 45% | 45% | 45% | |||
| 5% | 5% | 5% |
BF-3
| Ruby | Encounter Rate | Sapphire | Encounter Rate | Emerald | Encounter Rate |
|---|---|---|---|---|---|
| 45% | 45% | 45% | |||
| 40% | 40% | 40% | |||
| 10% | 10% | 10% | |||
| 5% | 5% | 5% |
Shell Bell
If you collect 4 Shoal Shells from high tide and 4 Shoal Salts from low tide, a man will give you a Shell Bell for those, it will restore your HP by 1/8 of the damage you dealt to the opponent.
Maps
-
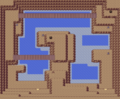
Floor 1 back cave - high tide
-
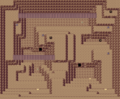
Floor 1 back cave - low tide
-
Basement floor 1 - low tide
-
Basement floor 2 - low tide
-
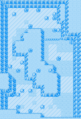
Basement floor 3 - low tide


