No edit summary |
Trig Jegman (talk | contribs) mNo edit summary |
||
| (8 intermediate revisions by 4 users not shown) | |||
| Line 1: | Line 1: | ||
{{Header Nav|game=Command & Conquer: Generals}} | {{Header Nav|game=Command & Conquer: Generals}} | ||
[[ | [[File:CNCGenerals-CHI3A.jpg|thumb|China forces are overrun by GLA at Three Gorges Dam.]] | ||
This is the first mission to present a real challenge to seasoned gamers. | <div style="float:right;clear:right"> | ||
{{sidebar|float=none|width=200px|title=IMPORTANT|contents=Research Capture command. Send troops immediately west of base to capture oil derrick for much-needed funds.}} | |||
{{sidebar|float=none|width=200px|title=SPECIAL STRATEGY HINT|contents=Highlight all troops and then click on barracks. '''Only''' the wounded troops will report to barracks and heal.}} | |||
{{sidebar|float=none|width=200px|title=SPECIAL STRATEGY HINT|contents=Highlight all vehicles and click on weapons factory. '''Only''' damaged vehicles will report to the war factory. If the waypoint is set back to where you are presently positioned, the vehicles will automatically returned healed and ready for battle.}} | |||
</div> | |||
This is the first mission to present a real challenge to seasoned gamers. The mission starts with an immediate assault from the south. | |||
* Immediately save game when command console pops up in case things don't go as planned. | |||
* Build nuke reactor immediately in front of dozer. Immediately build gattling cannon on road at top of hill afterwards. | |||
* Group battlemaster tanks as #1, tank hunters as #2, dragon tanks as #3 for effective battle of incoming troops. | |||
* Put infantry in bunker. | |||
* Attack tanks with battlemaster tanks and tank hunters while using dragon tanks against infantry. Immediately retreat to top of hill as cut scene to flood happens next as you can lose troops. | |||
* Build supply center. Fend off a few small attacks from south and then don't worry about southern front. No more attacks will come from this direction. | |||
* Build weapons factory fairly close to river crossing area. It will be more efficient to repair vehicles without long travel times to the weapons factory. | |||
* Immediately start gattling cannon by river crossing. | |||
* Start repairing vehicles and start cranking out battlemaster tanks and gattling tanks. | |||
* Build second gattling cannon by river crossing. | |||
* Power is low. Build second nuclear reactor before GLA cross the river. | |||
* Fight off GLA as they advance across the river. | |||
* Build barracks and start creating tank hunters. Keep five in commission. | |||
* Build Command Center so that the General's Powers can be utilized. If you haven't selected them yet, go ahead and do so now. It is highly suggested to select Vehicle Repair, Artillery Barrage and Cluster Mines. | |||
* Use Cluster Mines and Artillery Barrage on river crossing to slow down GLA assault. Continue to repair vehicles. '''Funds are limited.''' Take a defensive position near gattling cannons while you build up your attack force. Using tank hunter infantry in the defensive mix to help hold off the attack. | |||
* Build second Supply Center. Funds need to be accumulated quick to overcome attrition and to make it across the river with reasonable strength. | |||
{{-}} | |||
==Crossing the river== | |||
{{sidebar|width=200px|title=SPECIAL STRATEGY HINT|contents=Civilian structures do not always allow garrisoned troops to fire in all directions. Find a structure that is positioned in a way that allows a good defense.}} | |||
Crossing the river will not be clean and neat. Think Normandy Beach. Think survival with a very high mortality rate. | |||
* It is possible to cross the river and establish a base with six BM tanks, four gattling tanks, five tank hunter infantry and the mass of infantry that you started the mission with. A larger force is recommended. Bring along the dozer for quick construction of a second base on other side of the river. | |||
* Group different units with different numbers for effective fighting. Use '''all''' forces on leading attack vehicles so they are destroyed quickly. Also assign dozer a number so it is easy to maneuver. | |||
* Take this force across the river. As soon as the GLA-occupied tower is in range, call in an artillery strike to help take it out. Use cluster mines and artillery barrages to slow down GLA armored assault. | |||
* Scoot up troops slightly to protect dozer and your soon-to-be-created structures. Have the dozer build the supply center first next to the supply depot, then the weapons factory. If you are not careful, these buildings will be destroyed before they are completed. | |||
* Immediately start cranking out BM tanks and gattling tanks. Repair vehicles. | |||
* Squeeze in a barracks next to the supply center. Create tank hunters and infantry and station in one of the structures, preferably the free-standing first house southeast of the bridge. Station a dozer behind this house to repair it. | |||
* The GLA will not stop attacking until they run out of funds. Be prepared to create a second dozer if it is lost. Center your defense behind a well fortified civilian structure, with gattling tanks protecting the structure from infantry attacks. | |||
* When you have a strong enough force or the GLA starts running out of funds, move toward the center of town. In the center of town are supplies that the GLA uses. Garrison civilian structures at the south end of the town center with a combination of tank hunters and infantry. | |||
* Attack the main base with your armor. Withdraw when the GLA counterattacks and have the garrisoned troops destroy the GLA forces. Keep moving forward with armored vehicles and garrisoned troops until the GLA base runs out of defensive capability. | |||
<gallery> | |||
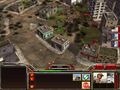
File:CNCGenerals-CHI3E.jpg|This house seems to work particularly well as a defensive structure. Use your Gattling tanks to protect it from GLA infantry. | |||
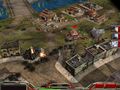
File:CNCGenerals-CHI3C.jpg|The river ford creates a natural chokepoint. | |||
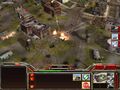
File:CNCGenerals-CHI3F.jpg|GLA supplies are located in the middle of town. When troop levels are strong enough, push armor toward the town center and garrison troops on the south end. | |||
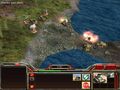
File:CNCGenerals-CHI3G.jpg|GLA troops ambushed by garrisoned troops in final assault of GLA base. | |||
</gallery> | |||
{{-}} | |||
==Alternative Method== | |||
* This idea was gleaned from Staley, Deuce ex Defcon's Walkthrough. | |||
* Use funds generated by oil derrick to build a huge fleet of fighter jets. The GLA has no anti-air defense until you get to their actual base. '''Use the guard command''' on the fighter jets to have them automatically attack ground units in that region. It is great fun to sit on autopilot and watch the carnage. | |||
* Attack the GLA base when they run low on supplies and fighting units. | |||
==Alternative Method 2 - Extra challenge - prevent destruction of the Three Gorges Dam!== | |||
The level can be passed without the dam destruction albeit difficultly, since even if you decide to spare the dam the GLA sends some scorpion tanks to destroy it anyway. To keep the real-life largest dam in the world for China do the following (speed is paramount): | |||
* Immediately start building a command center | |||
* Send Black Lotus south towards the bridge (it helps to have her under the shortkey 1) | |||
* Send a battlemaster west to get a free 2nd dozer and immediately start building a nuclear reactor | |||
* Put the 2 tank hunters and 3 of the red guards in the bunker (that is enough for defense) | |||
* Choose max bombardment and the mines for general's powers | |||
* By this time a GLA scorpion will have begun shelling the dam. Send the Black Lotus (on her way to the bridge by now) to cross and disable it. | |||
* | * As soon as the command center is finished start building the radar upgrade to navigate the map more quickly and fire the artillery south of the attacking scorpion (with a little luck it will arrive just in time to destroy 2 additional arriving scorpions sent to destroy the dam before they start firing). | ||
* | * Start building a supply stash | ||
* Once the artillery has struck mine the same area (if you deploy the mines before the barrage ends it will activate the mines). | |||
* When the supply stash is finished build 3 more trucks and start building an airfield at once | |||
* Have Black Lotus disable the first scorpion every few seconds to keep him from destroying the, by now severely damaged dam. | |||
* Build 4 Migs and as each is completed have it attack the disabled scorpion at the dam from the east to minimize damage to the adjacent dam. | |||
* As soon as the funds allow build more airfields and have at least 12 Migs guard the eastern approach to the dam as the GLA will keep sending small groups of scorpions to destroy the dam. Mines will help too. Also put the dozer 2 behind the bunker to repair it as it is certainly damaged in the fight by now. | |||
* Send the Black Lotus to capture the GLA base buildings starting with the weapons dealer (sell them a soon as they are captured), as it will halt the production of scorpions. Still bee on the lookout for existing ones as at one point they will rush for the dam. Be mindful of the GLA units nearby. Also be aware of the unfavorable terrain at the dam approach that will make your ground-hugging Migs vulnerable at moments even though the GLA has no air defense. | |||
* At some point you may build a war factory and purchase the black napalm upgrade for the Migs, as well as the barracks for the "capture building" upgrade to take the western oil derrick and the refinery for additional funds and 10% unit cost discount. | |||
* Destroy the stinger site either with a Mig firestorm attack or the artillery. Send additional Migs on a free hunt over the GLA base using the "Guard" option to eliminate units that could threaten Black Lotus while she captures the GLA buildings. (leave the first 12 Migs to guard the dam approach). | |||
* Have Black Lotus capture/sell all the remaining GLA buildings. Mission accomplished and the Three Gorges Dam still stands proudly! | |||
{{Footer Nav|game=Command & Conquer: Generals|prevpage=Hong Kong Crisis|nextpage=Broken Alliances}} | {{Footer Nav|game=Command & Conquer: Generals|prevpage=Hong Kong Crisis|nextpage=Broken Alliances}} | ||
Latest revision as of 22:35, 1 October 2021

This is the first mission to present a real challenge to seasoned gamers. The mission starts with an immediate assault from the south.
- Immediately save game when command console pops up in case things don't go as planned.
- Build nuke reactor immediately in front of dozer. Immediately build gattling cannon on road at top of hill afterwards.
- Group battlemaster tanks as #1, tank hunters as #2, dragon tanks as #3 for effective battle of incoming troops.
- Put infantry in bunker.
- Attack tanks with battlemaster tanks and tank hunters while using dragon tanks against infantry. Immediately retreat to top of hill as cut scene to flood happens next as you can lose troops.
- Build supply center. Fend off a few small attacks from south and then don't worry about southern front. No more attacks will come from this direction.
- Build weapons factory fairly close to river crossing area. It will be more efficient to repair vehicles without long travel times to the weapons factory.
- Immediately start gattling cannon by river crossing.
- Start repairing vehicles and start cranking out battlemaster tanks and gattling tanks.
- Build second gattling cannon by river crossing.
- Power is low. Build second nuclear reactor before GLA cross the river.
- Fight off GLA as they advance across the river.
- Build barracks and start creating tank hunters. Keep five in commission.
- Build Command Center so that the General's Powers can be utilized. If you haven't selected them yet, go ahead and do so now. It is highly suggested to select Vehicle Repair, Artillery Barrage and Cluster Mines.
- Use Cluster Mines and Artillery Barrage on river crossing to slow down GLA assault. Continue to repair vehicles. Funds are limited. Take a defensive position near gattling cannons while you build up your attack force. Using tank hunter infantry in the defensive mix to help hold off the attack.
- Build second Supply Center. Funds need to be accumulated quick to overcome attrition and to make it across the river with reasonable strength.
Crossing the river[edit]
Crossing the river will not be clean and neat. Think Normandy Beach. Think survival with a very high mortality rate.
- It is possible to cross the river and establish a base with six BM tanks, four gattling tanks, five tank hunter infantry and the mass of infantry that you started the mission with. A larger force is recommended. Bring along the dozer for quick construction of a second base on other side of the river.
- Group different units with different numbers for effective fighting. Use all forces on leading attack vehicles so they are destroyed quickly. Also assign dozer a number so it is easy to maneuver.
- Take this force across the river. As soon as the GLA-occupied tower is in range, call in an artillery strike to help take it out. Use cluster mines and artillery barrages to slow down GLA armored assault.
- Scoot up troops slightly to protect dozer and your soon-to-be-created structures. Have the dozer build the supply center first next to the supply depot, then the weapons factory. If you are not careful, these buildings will be destroyed before they are completed.
- Immediately start cranking out BM tanks and gattling tanks. Repair vehicles.
- Squeeze in a barracks next to the supply center. Create tank hunters and infantry and station in one of the structures, preferably the free-standing first house southeast of the bridge. Station a dozer behind this house to repair it.
- The GLA will not stop attacking until they run out of funds. Be prepared to create a second dozer if it is lost. Center your defense behind a well fortified civilian structure, with gattling tanks protecting the structure from infantry attacks.
- When you have a strong enough force or the GLA starts running out of funds, move toward the center of town. In the center of town are supplies that the GLA uses. Garrison civilian structures at the south end of the town center with a combination of tank hunters and infantry.
- Attack the main base with your armor. Withdraw when the GLA counterattacks and have the garrisoned troops destroy the GLA forces. Keep moving forward with armored vehicles and garrisoned troops until the GLA base runs out of defensive capability.
-
This house seems to work particularly well as a defensive structure. Use your Gattling tanks to protect it from GLA infantry.
-
The river ford creates a natural chokepoint.
-
GLA supplies are located in the middle of town. When troop levels are strong enough, push armor toward the town center and garrison troops on the south end.
-
GLA troops ambushed by garrisoned troops in final assault of GLA base.


Alternative Method[edit]
- This idea was gleaned from Staley, Deuce ex Defcon's Walkthrough.
- Use funds generated by oil derrick to build a huge fleet of fighter jets. The GLA has no anti-air defense until you get to their actual base. Use the guard command on the fighter jets to have them automatically attack ground units in that region. It is great fun to sit on autopilot and watch the carnage.
- Attack the GLA base when they run low on supplies and fighting units.
Alternative Method 2 - Extra challenge - prevent destruction of the Three Gorges Dam![edit]
The level can be passed without the dam destruction albeit difficultly, since even if you decide to spare the dam the GLA sends some scorpion tanks to destroy it anyway. To keep the real-life largest dam in the world for China do the following (speed is paramount):
- Immediately start building a command center
- Send Black Lotus south towards the bridge (it helps to have her under the shortkey 1)
- Send a battlemaster west to get a free 2nd dozer and immediately start building a nuclear reactor
- Put the 2 tank hunters and 3 of the red guards in the bunker (that is enough for defense)
- Choose max bombardment and the mines for general's powers
- By this time a GLA scorpion will have begun shelling the dam. Send the Black Lotus (on her way to the bridge by now) to cross and disable it.
- As soon as the command center is finished start building the radar upgrade to navigate the map more quickly and fire the artillery south of the attacking scorpion (with a little luck it will arrive just in time to destroy 2 additional arriving scorpions sent to destroy the dam before they start firing).
- Start building a supply stash
- Once the artillery has struck mine the same area (if you deploy the mines before the barrage ends it will activate the mines).
- When the supply stash is finished build 3 more trucks and start building an airfield at once
- Have Black Lotus disable the first scorpion every few seconds to keep him from destroying the, by now severely damaged dam.
- Build 4 Migs and as each is completed have it attack the disabled scorpion at the dam from the east to minimize damage to the adjacent dam.
- As soon as the funds allow build more airfields and have at least 12 Migs guard the eastern approach to the dam as the GLA will keep sending small groups of scorpions to destroy the dam. Mines will help too. Also put the dozer 2 behind the bunker to repair it as it is certainly damaged in the fight by now.
- Send the Black Lotus to capture the GLA base buildings starting with the weapons dealer (sell them a soon as they are captured), as it will halt the production of scorpions. Still bee on the lookout for existing ones as at one point they will rush for the dam. Be mindful of the GLA units nearby. Also be aware of the unfavorable terrain at the dam approach that will make your ground-hugging Migs vulnerable at moments even though the GLA has no air defense.
- At some point you may build a war factory and purchase the black napalm upgrade for the Migs, as well as the barracks for the "capture building" upgrade to take the western oil derrick and the refinery for additional funds and 10% unit cost discount.
- Destroy the stinger site either with a Mig firestorm attack or the artillery. Send additional Migs on a free hunt over the GLA base using the "Guard" option to eliminate units that could threaten Black Lotus while she captures the GLA buildings. (leave the first 12 Migs to guard the dam approach).
- Have Black Lotus capture/sell all the remaining GLA buildings. Mission accomplished and the Three Gorges Dam still stands proudly!